
Owners Manual


21
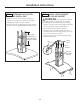
• Align the template with the marks on the ceiling
and tape in place.
– Be sure the template is oriented correctly
with the front of the hood.
• Use a plumb bob to be sure the mounting holes
will provide parallel alignment with the countertop
below.
• Determine wire access hole location.
• Center punch all screw and determined wire hole
locations.
• Drill pilot holes in the 4 screw locations. Use a 3/16"
bit and drill approximately 1-1/2" deep.
• Drill one 1/2" hole for wires.
STEP 1 MOUNT TEMPLATE
Installation Instructions
INSTALLATION—RECIRCULATING
NOTE: Do not cut the duct opening shown on the template
for this recirculating installation.
36" HOOD
TEMPLATE
Cut one 1/2"Dia.
Wire Access Hole
as Needed
8-1/4" To
Centerline of
Pilot Holes
8
-1
/
2
"
FRONTOFHOOD
Cut one 1/2"Dia.
Wire AccessHole
as Needed
Cut one 1/2"Dia.
Wire Access Hole
as Needed
Cut one 1/2"Dia.
Wire Access Hole
as Needed
Drill 3/16" Pilot Holes
Approx. 1-1/2" Deep
4 Places
8-1/4" To
Centerline of
Pilot Holes
10-5/16" To
Centerline of
Pilot Holes
10-5/16" To
Centerline of
Pilot Holes
31-14772
Printed in Mexico
12-08 JR
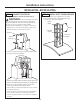
STEP 3 INSTALL CEILING SUPPORT
AND DEFLECTOR ASSEMBLY
•Using the 4 wood screws provided, attach the
ceiling support using the pilot holes drilled in step 1.
Screws
STEP 2 INSTALL AIR DEFLECTOR
INTO CEILING SUPPORT
•Lay ceiling support on a firm surface, clip side up.
•Position the air deflector onto the ceiling support,
duct opening up and one of the open sides to what
will be the front of the hood assembly. The tabs on
the deflector will be to the outside of the ceiling
support.
•Using 2 screws provided,
secure the tabs on the
deflector to the ceiling
support.
Front
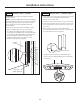
STEP 4 INSTALL LOWER VERTICAL
AND HORIZONTAL SUPPORTS
TO HOOD ASSEMBLY
• Using screws provided, attach the 4 lower
vertical supports to the hood assembly with
4 screws per support.
• Using screws provided, install the horizontal
support in the second outer holes of the vertical
supports.