
Installation Guide


8 31-11007-2
Installation Instructions
MOUNT THE GLASS RANGE HOOD
(Continued)
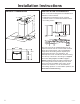
4.Removethetopductcoverbracketfromthewall.
5.Alignthetopedgeoftheductcoverbracketwith
thetopedgeoftherecirculationductmounting
bracketthatisattachedtotherecirculationduct.
Alignthecenternotchesofeachbracket.Place
bothbracketsbackontothewallintheprevious
position.Installthe2mountingscrewsintothe
anchorsandsecurelytighten.
6.AttachtheCHARCOAL
FILTER(notincluded).
FINISH THE INSTALLATION
1.Ducted installation only:Connectthehouse
ductingtothedamperonthehoodbody.Sealall
connectionswithducttape.
2.For ducted and recirculation installation:Install
theupperductcover.Slightlyspreadthesidesof
thecoverapartandhookthembehindtheduct
covermountingbrackets.Attachthecovertothe
bracketswith4ductcoverscrews.
NOTE:Dependingontheceilingheightandhood
installheight,theupperductcovercanbeinstalled
withtheexhaustventsonthetoptowardsthe
ceiling,oriptheductcoverandhidetheexhaust
ventsunderthelowerductcover.
3.Installthelowerductcover.Slightlyspreadthe
sidesofthecoverapartandhookthembehindthe
upperductcoverandthewall.Slidethelowerduct
coverdowntotsecurelyintothetopoftherange
hood.
4.Finishattachingthelowerductcovertothe
chimneyoftheventhoodwith2ductcoverscrews
intoholesonbothsidesofthecover.
5.Reinstallthemetalgreaseltertotheventhood.
6.Turnthepowersupplyon.Turnonblowerand
light.Iftherangehooddoesnotoperate,checkthat
thecircuitbreakerisnottrippedorthehousefuse
blown.Iftheunitstilldoesnotoperate,disconnect
thepowersupplyandcheckthatthewiring
connectionshavebeenmadeproperly.
ELECTRICAL CONNECTION
1.Removethecoverfromtheeldwiring
compartment.FeedthePowerSupplyCable
throughtheholeinthecompartment.
2.ConnectthePowerSupplyCabletotherange
hoodjunctionboxthroughtheholethatwasdrilled
inthe“PreparingtheWall”sectiononpage6.
AttachtheWhiteleadofthepowersupply(A)to
theWhiteleadoftherangehood(D)withawire
nut.AttachtheBlackleadofthepowersupply(B)
totheBlackleadoftherangehood(C)withawire
nut.ConnecttheGreen(E)(GreenandYellow)
ground
wireunder
theGreen
grounding
screw.
3.Securethe
junction
boxtothe
wallusing
2drywall
self-tapping
screwsintothetwodiagonalholesinthejunction
box.Reattachtheeldwiringcompartmentcover.
Ceiling
TopDuct
Cover
Bracket
Recirculation
DuctBracket
Secure
junctionbox
tothewall
usingthese
holes.
A
D
B
C
E
E
Ascrewhole
islocatedon
eachsideof
theductcover.