
Installation Instructions


Installation Instructions
INSTALLING THE ZONELINE (cont.)
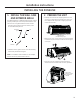
3. INSTALL THE UNIT INTO
THE WALL CASE
Slide the unit into the wall case and secure with four
screws through the unit flange holes.
The four screws will be located in a sealed bag that
sits under the control panel, sitting in the pocket in the
basepan.
5. REPLACE THE ROOM
FRONT
Reinstall the room cover by aligning and placing the top
rail of the room cover over the chassis (1), then pushing
it in at the bottom (2).
NOTE: There are several extra holes in the unit side
flanges for installation in wall cases other than GE.
To avoid damaging the flange insulation, the installer
should use an awl or other sharp tool to puncture the
insulation in the appropriate holes before installing the
attachment screws.
The four wall case screws will be taped
to the pocket in front of the control box.
4
. CONNECT POWER CORD
OR DIRECT CONNECT KIT
Review installation instructions provided with power
cord or direct connect kits for detailed assembly
instructions.
Power supply kit
(Appearance may vary)
20