Model 25983 5.
Equipment Approval Information Your telephone equipment is approved for connection to the Public Switched Telephone Network and is in compliance with parts 15 and 68, FCC Rules and Regulations and the Technical Requirements for Telephone Terminal Equipment published by ACTA. 1 Notification to the Local Telephone Company On the bottom of this equipment is a label indicating, among other information, the US number and Ringer Equivalence Number (REN) for the equipment.
Interference Information This device complies with Part 15 of the FCC Rules. Operation is subject to the following two conditions: (1) This device may not cause harmful interference; and (2) This device must accept any interference received, including interference that may cause undesired operation. This equipment has been tested and found to comply with the limits for a Class B digital device, pursuant to Part 15 of the FCC Rules.
Table of Contents Equipment Approval Information..................2 Interference Information. ............................3 Hearing Aid Compatibility (HAC)..................3 Licensing......................................................3 FCC RF Radiation Exposure Statement.........3 Introduction................................................6 Before You Begin.........................................6 Parts Checklist............................................ 6 Telephone Jack Requirements................
Base Unit Speakerphone Operation............ 27 Receiving a Call with Speakerphone. .... 27 Making a Call with Speakerphone......... 27 Switching Between Speakerphone and Handset.......................................................28 Conference the External Caller with Cordless Handset and Base. ....................... 28 Memory......................................................28 Storing a Name and Number in Memory.... 28 Storing a Redial Number..............................
Introduction CAUTION: When using telephone equipment, there are basic safety instructions that should always be followed. Refer to the IMPORTANT SAFETY INSTRUCTIONS provided with this product and save them for future reference. Before You Begin Parts Checklist (for 25983xx2 model) Make sure your package includes the items shown here.
Installation Digital Security System Your cordless phone uses a digital security system to protect against false ringing, unauthorized access, and charges to your phone line. INSTALLATION NOTE: Some cordless telephones operate at frequencies that may cause or receive interference with nearby TVs, microwave ovens, and VCRs. To minimize or prevent such interference, the base of the cordless telephone should not be placed near or on top of a TV, microwave ovens, or VCR.
Handset and Charge Cradle Layout TALK/CALL BACK (button) visual ringer display CALLER ID-VOLUME 5(button) CALLER ID-VOLUME 6(button) charge cradle with power adaptor mem (memory button) redial (button) format/trans (format/ transfer button) repeat (button) play/stop (button) *TONE/exit (button) mute/menu (button) erase (button) microphone delete (button) chan (channel button) skip (button) #PAUSE/ringer (button) flash/call waiting/ answerer (button) charge indicator Base Layout announce (button) m
Installing the Phone Installing the Handset Battery NOTE: You must connect the handset battery before using the cordless handsets. CAUTION: To reduce the risk of fire or personal injury, use only the Thomson Inc. approved Nickel-Cadmium (Ni-Cd) battery model 5-2729 or Nickel-Metal Hydride (Ni-MH) battery model 5-2522, which is compatible with this unit. 1. Locate battery and battery door which are packaged together inside a plastic bag and are separate from the handset. 2.
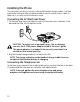
Installing the Phone Choose the best location to install your base and handset charge cradles. Your base and handset charge cradles should be placed on a level surface such as a desk or table top, or you may mount the base on a wall. Connecting the AC (Electrical) Power 1. On the base, plug the power adaptor cord into the power jack on the back of the base and the other into an electrical outlet.
Attaching the Pedestal Bracket Desktop mode: 1. Position pedestal bracket in correct orientation; refer to imprint on bracket. 2. Attach the pedestal by first inserting the stationary tabs on the pedestal into the upper set of slots on the bottom of the base and then push the pedestal down until it snaps into place. 3. Check the handset hook to make sure it is inserted so the imprint reads DESK. Remove and turn over if necessary. Wallmount: 1.
Answering System Operation Recording the Outgoing Announcement For best results when recording, you should be about nine inches from the microphone, and eliminate as much background noise as possible. 1. Make sure the answering system is ON. 2. Press and hold the announce button on the base while you record the announcement. 3. Begin speaking after you hear the beep. 4. Release the button after you finish your announcement.
Screening Calls from the Base You can screen incoming calls by waiting for the caller to leave a message (to hear who it is), then pick up the handset, or press TALK/CALL BACK on cordless handset or the speaker/call back button on the base to talk to the caller. The answering system automatically stops recording when you activate the handset or pick up an extension phone. TIP: Make sure the volume on the base is set loud enough to hear incoming calls.
Erasing Messages You may erase messages three ways: To erase a message while it is playing: 1. Press and release the respective mailbox button (play/stop 1 or play/stop 2 or play/stop 3) 2. Press caller id 9 or : button to select and play the message you want to erase. 3. Press the delete button, the current message is erased, and the next message plays. To erase all previously played Messages in a mailbox: 1. Make sure the phone is OFF (not in the TALK mode) 2. Press the delete button.
Telephone Set Up There are twelve programmable menus available for the base: Language, Display Contrast, Rings to Answer, Security Code, Base Ring Level, Ringer Tone, Tone/Pulse, Set Day, Set Time, Local Area Code, Link Cordless Handset, and Default Setting. There are nine programmable menus available for the cordless handset: Language, Handset Name, Area Code, Ringer On/Off, Ringer Tone, VIP Ring Tone, Transfer, Link Base, and Default Setting.
Handset Name NOTE: This setting may only be made with the cordless handset. 1. Press the mute/menu button until ENTER NAME shows in the display. 2. Use the touch-tone pad on the handset to enter the name (up to 15 characters). More than one letter is stored in each of the number keys. For example, to enter the name Bill Smith, press the 2 key twice for the letter B. Press the 4 key 3 times for the letter I. Press the 5 key 3 times for the letter L. Wait for one second.
NOTE: TOLL (Toll Saver) can save you the cost of a toll call when accessing your messages from another phone. If you have new messages, the unit answers after the 3rd ring. If you have no new messages, the unit answers after the 5th ring. You can hang up after the 3rd or 4th ring and save the pay telephone or long distance charge. 3. Press menu/flash again to store your selection. You will hear a confirmation tone. Security Code NOTE: This setting may only be made with the base.
Handset Ringer ON/OFF NOTE: This setting may only be made with the handset. 1. Press the menu/flash button until RINGER 4 1ON or 2OFF shows in the display. 1ON is the default setting. 2. Use the CALLER ID-VOLUME (6 or 5) button or the touch-tone pad on the handset to scroll to 1ON or 2OFF. 3. Press mute/menu to save. You will hear a confirmation tone. NOTE: If you turn the ringer OFF, RINGER OFF shows in the display. Ringer Tone NOTE: This setting may be made with the base and the handset.
Setting Day/Time NOTE: This setting may only be made with the base. Time is transmitted automatically by your local phone company as part of Caller ID service. If you are subscribed to Caller ID service, the current time is set automatically when you receive your first CID call. Otherwise, you can set the time manually. The day of week is not set automatically by Caller ID. The day of week must be set manually through base. 1. Press the menu/flash button until SET DAY shows in the display.
Tone/Pulse Dialing NOTE: This setting may be made only with the base. 1. Press the menu/flash button until 41TONE 2PULSE shows in the display. 1TONE is the default. 2. Press the caller id (9 or :) button or the touch-tone pad to scroll to 1TONE or 2PULSE. 3. Press mute/menu to save. You will hear a confirmation tone. Transfer ON/OFF NOTE: This setting may only be made with the handset.
Default Setting NOTE: This setting may be made with the base or the cordless handset. 1. Press the menu/flash button on base or mute/menu button on handset until DEFAULT SETTING or DEFAULT shows in the display. NO is the default setting. 2. Use the touch-tone pad to select 1YES or 2NO, or press the caller id (9 or :) button on the base or CALLER ID-VOLUME (6 or 5) button on the handset to scroll to 1YES or 2NO.
Making a Call Cordless Handset 1. Press the TALK/CALL BACK button. Wait for a dial tone, then dial the desired number. -OR2. Dial the number and then press the TALK/CALL BACK button. 3. When finished, press TALK/CALL BACK or place the handset in charging cradle to hang up. Corded Handset 1. Lift the handset and wait for a dial tone. Dial the desired number. -OR2. Dial the number, then lift the handset. 3. When finished, put the handset back on the cradle to hang up. Speakerphone 1.
Handset Ringer on/off Shortcut Apart from the setting in the main menu, there is a shortcut to set the ringer. Make sure the phone is OFF (not in TALK mode). 1. Press the #PAUSE/ringer button to go to the RINGER on/off menu. RINGER 41 ON shows in the display. 1ON is the default. 2. Use the CALLER ID-VOLUME (5or6) button or the touch-tone pad on the handset to scroll to 1 ON, or 2 OFF. 3. Press the #PAUSE/ringer button to save your selection. You will hear a confirmation tone.
Call Transfer Transferring Call from Base to Cordless Handset During an external call, you may transfer the external call from base to handset. NOTE: To cancel the call transfer, you may press *exit button or page/tranfser button on base. 1. Press the page/tranfser button to put the line on hold and transfer the call. TRANSFERRING shows in the display. 2. If using the corded handset, place it on hook. 3.
Corded Handset 1. Lift the corded handset. 2. Press the redial button. - OR 3. Press the redial button first, then lift the corded handset. If you get a busy signal, and want to keep dialing the number, press the redial button to quickly redial the number. Cordless Handset 1. Press TALK/CALL BACK button. 2. Press the redial button. - OR 3. Press the redial button then press the TALK/CALL BACK button.
Mute To have a private, off-line conversation, use the mute feature. The party on the other end of the line cannot hear you, but you can still hear them. 1. Press the mute/do not disturb button on the base or mute/menu button on the handset. The mute indicator on base turns on and MUTE ON or MUTE shows in the display. 2. Press mute/do not disturb button on the base or mute/menu button on the handset again to cancel and return to your phone conversation.
Base Unit Speakerphone Operation For best speakerphone performance, avoid the following: • Areas with high background noise. (The microphone might pick up these sounds.) • Surfaces affected by vibration. • Recessed areas such as in a corner, under a cupboard, or next to a cabinet, which can generate an echo effect. Note the following guidelines when using the speakerphone. • Stay reasonably close to the phone so that you can be clearly heard by the person to whom you are speaking.
Switching Between Speakerphone and Handset You can switch between speakerphone and handset after dialing a number, or any time during a conversation. Speaker to Cordless/Corded Handset — Press TALK/CALL BACK on handset, and then press speaker/call back on the base. Or lift the corded handset when using speaker phone. Speak into the cordless/corded handset. Corded/Cordless Handset to Speaker — Press speaker/call back, then hang up the handset. Speak into the Speakerphone.
4. Use the base or cordless handset touch-tone pad to enter a name (up to 15 characters). More than one letter is stored in each of the number keys. For example, to enter Bill Smith, press the 2 key twice for the letter B. Press the 4 key 3 times for the letter I. Press the 5 key 3 times for the letter L. Press the 5 key 3 times for the second letter L, and press the 1 key to insert a space between the first and last name.
Reviewing, Changing or Deleting Stored Names/Numbers To Review: Press mem/conference button on the handset or memory button on base, then press the caller id (9 or :) button (on base) or the CALLER ID-VOLUME (6 or 5) button (on cordless handset) to scroll through the stored numbers. Or press the memory location number. To Change: Follow the steps under Storing a Name and Number in Memory except replace the stored name or number with the new information.
1. Make sure the phone is OFF (not in TALK mode). 2. Press the memory button. 3. Press the desired memory location button (0-9), or use the caller id (9 or :) button to scroll to the desired telephone number. 4. Press the speaker/call back button. The number dials automatically. Chain Dialing from Memory Use this feature to make calls that require a sequence of numbers, such as a frequently used long distance card number.
Caller ID (CID) IMPORTANT: In order to use this unit’s Caller ID features, you must subscribe to either the standard Name/Number Caller ID Service or Call Waiting Caller ID Service. To know who is calling while you are on the phone, you must subscribe to Call Waiting Caller ID Service. This unit receives and displays CID information transmitted by your local telephone company. This information can include the phone number, date and time; or the name, phone number, and date and time.
Storing CID Records (In CID Memory) If you are not at home or cannot answer, your telephone’s Caller ID memory stores the data for the most recent 40 calls you received so that you can see who called while you were unavailable. When the 41st call is received, the oldest Caller ID record (1st call) is automatically deleted. You may review the stored information at any time. Calls received since your last review are marked as NEW in the display.
Storing CID Records in Internal Memory You may transfer a Caller ID record to your phone’s memory. NOTE: It is important that you format CID records correctly before storing in memory. It is not possible to reformat CID records stored in memory. 1. Use the caller id (9 or :) button (on base) or CALLER ID-VOLUME (6 or 5) button (on cordless handset) to scroll to the desired record. 2. Press the memory button on base or mem/conference button on handset. 3. Press the desired memory location.
NOTE: If the phone company does not supply all ten digits of an incoming caller’s number, you will not be allowed to adjust the format of that number. Scroll to the number you want to call back: 3. If the number does not dial as shown, press the format button on base or format/ trans button on cordless handset. Repeat if necessary, until the correct number of digits show in the display. 4. Press the TALK/CALL BACK button on handset or speaker/call back button on base. The number dials automatically.
Caller ID Errors If there is an error in the transmission of information to your Caller ID phone, ERROR shows in the display. If you have not subscribed to Caller ID service or it is not working, NO DATA shows in the display. Remote Access This section explains two types of remote access: using the cordless handset to access the answering system and accessing the answering system from another phone. You may access the answering system on the base with the handset buttons.
You should erase some of the messages in order for the system to record incoming messages. NOTE: The unit also answers after the 10th ring if it is turned off. To access the answering system, enter your 3-digit security code after you hear the beep. Accessing the Answering System from Another Location You can access your answering system from any touch-tone phone by entering your 3-digit security code after you hear the outgoing announcement. 1. Dial the phone number the answering system is connected to.
Changing the Battery CAUTION: To reduce the risk of fire or personal injury, use only the Thomson Inc. approved Nickel-Cadmium (Ni-Cd ) battery model 5-2729 or Nickel-Metal Hydride (Ni-MH) battery model 5-2522, which is compatible with this unit. 1. Make sure handset is OFF (not in TALK mode) before you replace battery. 2. Remove the battery compartment door. 3. Disconnect the battery plug from the jack inside the battery compartment and remove the battery pack from the handset. 4.
Display Messages The following indicators show the status of a message or of the unit. ANSWERER REMOTE/ Indicates the answering system is being accessed remotely. ANSWERER REMOTE ACCESS BLOCKED CALL Caller information is blocked from transmission. BLOCKED NAME/ NUMBER Caller name and number is blocked from transmission. DELETE? Prompt asking if you want to erase one of the 10 numbers stored in the phone’s outgoing memory. DELETE ALL? Prompt asking if you want to erase all Caller ID records.
NEW Indicates call or calls have not been reviewed. NEW VOICE MAIL Indicates a new voice mail is available. NO DATA No Caller ID information was received. NO CALLS Indicates no call have been received. PAGING/PAGING The page on base or format/trans button on cordless FROM HANDSET/ handset has been pressed. PAGING FRM BASE/ PAGING HANDSET PLEASE REGISTER Indicates the handset needs to be registered before use.
Troubleshooting Guide Telephone Solutions No dial tone • Check and repeat installation steps: Ensure the base power cord is connected to a working outlet . Ensure the telephone line cord is connected to the base and the wall jack. • Connect another phone to the same jack; if there is still no dial tone, the problem might be your wiring or local service. • The cordless handset may be out of range of the base. Move closer to the base. • Ensure the battery is properly charged (16 hours).
Unit beeps • Place the handset in the cradle for 20 seconds. If it still beeps, charge battery for 16 hours. • Clean charging contacts on cordless handset and charge cradle with a soft cloth or an eraser. • Replace the battery. Memory Dialing doesn’t work • Did you program the memory location keys correctly? • Did you follow proper dialing sequence? Unit locks up and no communication between the base and cordless handset • Unplug the AC power adaptor from the wall outlet and the back of the base.
Causes of Poor Reception • Aluminum siding. • Foil backing on insulation. • Heating ducts and other metal construction that can shield radio signals. • You’re too close to appliances such as microwaves, stoves, computers, etc. • Atmospheric conditions, such as strong storms. • Base is installed in the basement or lower floor of the house. • Base is plugged into AC outlet with other electronic devices. • Baby monitor is using the same frequency. • Handset battery is low. • You’re out of range of the base.
Warranty Assistance If trouble is experienced with this equipment, for warranty information, please contact customer service at 1-800-448-0329. If the equipment is causing harm to the telephone network, the telephone company may require that you disconnect the equipment until the problem is resolved. Any unauthorized repairs, changes or modifications not expressly approved by Thomson Inc. could void the user’s authority to operate this product.
Limited Warranty What your warranty covers: • Defects in materials or workmanship. For how long after your purchase: • One year, from date of purchase. (The warranty period for rental units begins with the first rental or 45 days from date of shipment to the rental firm, whichever comes first.) What we will do: • Provide you with a new unit. The exchange unit is under warranty for the remainder of the original product’s warranty period. How you get service: • Properly pack your unit.
Product Registration: • Please complete and mail the Product Registration Card packed with your unit. It will make it easier to contact you should it ever be necessary. The return of the card is not required for warranty coverage. Limitation of Warranty: • The warranty stated above is the only warranty applicable to this product. All other warranties, express or implied (including all implied warranties of merchantability or fitness for a particular purpose) are hereby disclaimed.
Accessory Information DESCRIPTION AC power adaptor Replacement Handset Battery-Ni-Cd Replacement Handset Battery-Ni-MH Replacement Handset Charge Cradle MODEL NO. 5-2760 5-2729 5-2522 5-2752 To place order, have your Visa, MasterCard, or Discover Card ready and call toll-free 1-800-338-0376. A shipping and handling fee will be charged upon ordering. We are required by law to collect appropriate sales tax for each individual state, country, and locality to which the merchandise is being sent.
Index A Accessing the Answering System from Another Location 37 Accessory Information 47 Answering a Call 21 Answering System 26 Answering System Indicator 36 Answering System Operation 12 Answering System Set Up 11 Attaching the Pedestal Bracket 11 Auto Standby 22 B Base Layout 8 Base Ringer Level 17 Base Speakerphone 21, 24 Base Unit Speakerphone Operation 27 Basic Operation 21 Battery Safety Precautions 38 Battery Solutions 42 Before You Begin 6 C Call Timer
L S Language 15 Last Number Redial 24 Leaving a Memo 14 Leaving a Message 12 Licensing 3 Limited Warranty 45 Local Area Code 19 M Making a Call 22 Making a Call with Speakerphone 27 Manual Channel Selection 22 Memory 28 Memory Full 36 Message Playback from Base Unit 13 Mute 26 P Paging the Cordless Handset 25 Parts Checklist 6 R Receiving a Call with Speakerphone 27 Receiving CID Records 32 Recording the Outgoing Announcement 12 Registration 20 Re
Visit the GE website at: www.GE.com/phones Model 25983 00025467 (Rev 1 Dom E/S) 08-16 Printed in China Thomson Inc. 101 West 103rd Street Indianapolis, IN 46290-1102 © 2008 Thomson Inc.
Modelo 25983 Serie 5.
Información Sobre la Aprobación de Equipo El equipo de su teléfono esta aprobado para la conexión con la red Telefónica Pública (Public Switched Telephone Network) y cumple con los requisitos establecidos en las secciones 15 y 68 de las Reglas y Regulaciones de la FCC y con los Requerimientos Técnicos para Equipos de Terminales Telefónicas (Technical Requirements for Telephone Terminal Equipment), publicado por ACTA.
Información de Interferencias Este artefacto cumple con la Parte 15 de las Reglas de la FCC. Su funcionamiento es sujeto a las dos condiciones siguientes: (l) Este artefacto no puede causar interferencia dañosa, y (2) Este artefacto debe aceptar cualquier interferencia recibida, incluyendo interferencia que puede causar un funcionamiento no deseado. Este equipo ha sido probado y cumple con los límites para un artefacto digital de la Clase B, de conformidad con la Parte 15 de las Reglas de la FCC.
Tabla de Contenido Información Sobre la Aprobación de Equipo 2 Información de Interferencias......................3 Compatibilidad con Audífonos (CCA)............3 Licensing .....................................................3 Estatuto sobre la Exposición a la Radiación de la FCC RF............................................3 Introducción................................................6 Antes de Comenzar. .....................................6 Lista de Partes..............................................
Volumen........................................................... 26 Altavoz. ....................................................... 26 Auricular Alámbrico................................26 Auricular Inalámbrico. ............................26 Sistema Contestador. ............................... 26 Indicador VMWI en el Auricular.......... 26 Operación del Teléfono con Altavoz Unidad de Base.............................................................27 Para Recibir una Llamada con el Altavoz. ............
Introducción CUIDADO: Cuando utilice equipo telefónico, hay instrucciones básicas de seguridad que siempre deben seguirse. Refiérase a la guía de INSTRUCCIONES DE SEGURIDAD IMPORTANTES provista con este producto y guárdela para referencia futura. Antes de Comenzar Lista de Partes (para modelo 25983xx2) Asegúrese que su empaque incluya los artículos ilustrados aquí.
Instalación Sistema Digital de Seguridad Su teléfono inalámbrico usa un sistema de seguridad digital para evitar el timbrado falso, el uso no autorizado y cargos a su línea telefónica. NOTA SOBRE LA INSTALACIÓN: Algunos teléfonos inalámbricos operan a frecuencias que pueden causar o recibir interferencia con aparatos de televisión, hornos de microondas, hornos, o videocaseteras que se encuentren cerca de este aparato.
Formato del Auricular y del Cargador TALK/CALL BACK (botón llamar/ regresar llamada) timbre visual CALLER ID-VOLUME 6 (botón identificador de llamada/volumen 6) redial (botón volver a marca) format/trans (botón formato/transferir) repeat (botón repetir) play/stop (botón reproducir/detener) *TONE/exit (botón tono/salir) pantalla CALLER ID-VOLUME 5 (botón identificador de llamada/volumen 5) Base de Carga mem (botón memoria) delete (botón borrar) chan (botón canal) skip (botón saltar) #PAUSE/ringer (botó
Para Instalar el Teléfono Para Instalar la Batería del Auricular NOTA: Usted debe conectar la batería del auricular antes de usar los auriculares inalámbricos. PRECAUCION: Para reducir el riesgo de fuego o lastimaduras personales, use solamente la batería de Ni’quel-Cadmio (Ni-Cd) modelo 5-2729 o Hidruro Metálico de Níquel- (Ni-MH) modelo 5-2522 aprobado por Thomson Inc. eso es compatible con esta unidad. 1.
Para Instalar el Teléfono Escoja la mejor localización para instalar la base y el cargador del auricular. La base y el cargador deben ser chocados sobre una superficie plana como un escritorio o una mesa, o usted puede montar la base sobre la pared. Para Conectar la Corriente AC (Eléctrica) 1. En la base, conecte el cable del adaptador de corriente en el receptáculo de corriente en la parte posterior de la base y el otro en una toma eléctrica.
Conexión del Soporte de Pedestal Modo Escritorio: 1. Coloque el soporte de pedestal en la orientación correcta; consulte la impresión en el soporte. 2. Conecte el pedestal primero insertando las lengüetas fijas en el juego superior de ranuras en la parte inferior de la base, y luego empuje el pedestal hacia abajo hasta que embone en su lugar. 3. Cheque el gancho del auricular para verificar que esté insertado de manera que la impresión muestre DESK (ESCRITORIO). Remueva e invierta si es necesario.
Operación del Sistema Contestador Para Grabar el Anuncio Saliente Para mejores resultados, usted debe estar aproximadamente a nueve pulgadas del micrófono, y eliminar tanto ruido de fondo como le sea posible. 1. Asegúrese que el sistema contestador esté activado (ON). 2. Presione y sostenga el botón announce en la base mientras usted graba el anuncio. 3. Comience a hablar después de que usted escuche el tono. 4. Suelte el botón después de que usted haya terminado su anuncio.
Para Filtrar Llamadas desde la Base Usted puede filtrar las llamadas entrantes simplemente esperando a que la persona que llama deje su mensaje (para saber quién es), después levante el auricular, o después presione el botón TALK/CALL BACK en el auricular inalámbrico o el botón speaker/call back en la base para hablar con la persona que llama. El sistema contestador automáticamente deja de grabar cuando usted activa el auricular o levanta una extensión del teléfono.
Para Borrar Mensajes Usted puede borrar mensajes en la base de tres maneras: Para borrar un mensaje mientras está en reproducción: 1. Presione y libere el botón de buzón respectivo (play/stop 1 o play/stop 2 o play/stop 3) 2. Presione el botón caller id 9 o : para seleccionar y reproducir el mensaje que usted quiere borrar. 3. Presione el botón delete, el mensaje actual es borrado, y el siguiente mensaje es reproducido. Para borrar todos los Mensajes reproducidos anteriormente en un buzón: 1.
Programación del Teléfono Hay doce menús programables disponibles para la base: Idioma, Contraste de la Pantalla, Timbres para Contestar, Código de Seguridad, Nivel de Timbre Base, Tono del Timbre, Tono/ Pulso, Ajuste de Día, Ajuste de la Hora, Clave de Área Local, Enlace Auricular, y Programaciones de Fábrica.
Nombre del Auricular NOTA: Esta programación puede hacerse únicamente desde el auricular inalámbrico. 1. Presione el botón mute/menu hasta que la indicación INSCRIBA NOMBRE aparezca en la pantalla. 2. Utilice el teclado numérico ara ingresar un nombre (hasta 15 caracteres). Más de una letra es almacenada en cada una de las teclas numéricas. Por ejemplo, para escribir Bill Smith, presione la tecla 2 dos veces para la letra B. Presione la tecla 4 3 veces para la letra I.
NOTA: TOLL (el Ahorrador de Cargos) le puede ahorrar el costo de una llamada telefónica cuando usted tiene acceso a sus mensajes desde otro teléfono. Si usted tiene mensajes nuevos, el aparato contesta después del tercer timbre. Si usted no tiene mensajes, el aparato contesta después del quinto timbre. Usted puede colgar después del tercer o cuarto timbre y ahorrar el cargo de la llamada telefónica o de larga distancia. 3. Presione nuevamente el botón menu/flash para hacer su selección.
Timbre del Auricular ON/OFF NOTA: Esta programación puede hacerse únicamente desde el auricular inalámbrico. 1. Presione el botón menu/flash hasta que la indicación TIMBRE 4 1ACTIVADO o 2DESACTIV aparezca en la pantalla. La programación de fábrica es 1ACTIVADO. 2. Utilice el botón CALLER ID-VOLUME (5 o 6) o el teclado numérico del auricular para recorrer las opciones 1ACTIVADO o 2DESACTIV. 3. Presione mute/menu para guardar. Usted escuchará un tono de confirmación.
Para Programar la Fecha/Hora NOTA: Esta programación puede hacerse únicamente desde la base. La hora es transmitida automáticamente por su compañía telefónica local como parte del servicio de Identificador de Llamadas. Si usted está suscrito al servicio de Identificador del Llamadas, la hora actual se programa automáticamente cuando usted recibe su primera llamada del Identificador. De otra manera, usted puede programar la hora manualmente.
Marcado por Tono/ Pulso NOTA: Esta programación puede hacerse únicamente desde el auricular inalámbrico. 1. Presione el botón menu/flash hasta que la indicación 41TONO 2PULSO aparezca en la pantalla. La programación de fábrica es 1 TONE. 2. Utilice el botón caller id (9 o :) o el teclado numérico para recorrer las opciones 1TONO o 2PULSO. 3. Presione mute/flash para guardar. Usted escuchará un tono de confirmación. Transferencia ON/OFF NOTA: Esta programación puede hacerse únicamente desde la base.
Programación de Fábrica NOTA: Esta configuración puede ser efectuada con la base o con el auricular inalámbrico. 1. Presione el botón menu/flash en la base o el botón mute/menu en el auricular hasta que la indicación PROG DE FABRICA o FABRICA aparezca en la pantalla. La selección de fábrica es NO. 2. Use teclado numérico de tonos para seleccionar 1SI o 2NO, o presione el botón caller id (9 o :) en la base o el botón de CALLER ID-VOLUME (6 o 5) en el auricular para desplazarse a 1SI o 2NO.
Para Hacer una Llamada Auricular Inalámbrico 1. Presione el botón TALK/CALL BACK. Espere al tono de marcar, y después marque el número deseado. -O2. Marque el número primero y después presione el botón TALK/CALL BACK. 3. Cuando usted haya terminado, presione TALK/CALL BACK o coloque el auricular en la base de carga para colgar. Auricular Alámbrico 1. Levante el auricular y espere al tono de marcar. Marque el número deseado. -O2. Marque el número primero y después levante el auricular. 3.
Atajo para Timbre del Auricular On/Off Aparte de la configuración del menú principal, hay un acceso directo para ajustar el timbre. Asegúrese de que el teléfono esté en OFF (no en modo hablar). 1. Presione el botón #PAUSE/ringer para ir al menú TIMBRE ACTIVADO/DESACTIVE. TIMBRE 41 ACTIVADO se muestra en la pantalla. La programación de fábrica es 1 ACTIVADO. 2. Use el botón CALLER ID-VOLUME (5o6) o el teclado de tonos en el auricular para desplazarse a 1 ACTIVADO o 2 DESACTIV. 3.
Transferencia de Llamada Transferencia de una Llamada de la Base al Auricular Inalámbrico Durante una llamada externa, usted puede transferir la llamada externa de la base al auricular. NOTA: Para cancelar la transferencia de llamada, usted puede presionar el botón *exit o el botón page/transfer en la base. 1. Presione el botón page/transfer para colocar la línea en retención y transferir la llamada. TRANSFIRIENDO se muestra en la pantalla. 2. Si está usando el auricular inalámbrico, cuelgue.. 3.
Auricular Alámbrico 1. Levante el auricular alámbrico. 2. Presione el botón redial. - O Presione el botón redial primero, luego levante el auricular alámbrico. Si usted escucha la señal de ocupado, y quiere seguir marcando ese número, presione el botón redial para volver a marcar ese número rápidamente. Auricular Inalámbrico 1. Presione el botón TALK/CALL BACK. 2. Presione el botón redial. - O 3. Presione el botón redial luego presione el botón TALK/CALL BACK.
Enmudecedor Para tener una conversación privada fuera de la línea, utilice la función del enmudecedor. La persona al otro lado de la línea no puede escucharle, pero usted todavía puede escucharles a ellos. 1. Presione el botón mute/do not disturb la base o el botón mute/menu en el auricular. El indicador de silencio se enciende y ENMUDECEDOR ENC o ENMU se muestra en la pantalla. 2.
Operación del Teléfono con Altavoz Unidad de Base Para el mejor funcionamiento del altavoz, evite lo siguiente: • Áreas con mucho ruido de fondo. (El micrófono puede recoger estos sonidos). • Superficies afectadas por vibración. • Áreas remetidas, como una esquina, abajo de una gaveta, o junto a un gabinete, los cuales pueden generar un efecto de eco.
Para tener una Conferencia entre la Persona Externa que Llama con el Auricular Inalámbrico y la Base El auricular o la base pueden entrar a conferencia directamente presionando el botón TALK/CALL BACK en el auricular o el botón speaker/call back en la base mientras que la otra parte (auricular o base) está en la línea externa. Memoria El auricular y la base tienen localizaciones para almacenar números de memoria separadas.
6. Utilice el teclado de tono para inscribir la clave de área seguida por el número telefónico que usted quiera almacenar (hasta 24 dígitos, incluyendo pausas), y presione el botón memory o el botón mem/conference nuevamente para salvar su selección. Usted escuchará un tono de confirmación. 7. Para inscribir otro nombre y número en una localización de memoria diferente, por favor siga el paso 1 y repita el proceso. Para Almacenar un Número de Volver a Marcar 1.
Para Revisar, Cambiar, o Borrar Nombres/Números Almacenados Para Revisar: Presione el botón mem/conference en el auricular o el botón memory en la base, y después presione el botón caller id (9 o :) (en la base) o el botón CALLER ID-VOLUME (6 o 5) (en el auricular inalámbrico) para recorrer los números almacenados. U presione el botón de localización de memoria.
1. Asegúrese que el teléfono esté desactivado (OFF) (no en modalidad para hablar –TALK). 2. Presione el botón memory. 3. Presione el botón de la localización de memoria deseada (0-9), u presione el botón caller id (9 o :) para recorrer los números hasta llegar al número deseado. 4. Presione el botón speaker/call back. El número almacenado se marca automáticamente.
Funciones del Identificador de Llamadas (Caller ID) IMPORTANTE: Para utilizar las características de la identificación de llamador de esta unidad, usted debe suscribirse a cualquiera de los servicios de Identificador de Llamadas, ya sea el servicio estándar de Identificador de Nombre/Número o el servicio de Identificador de Llamada en Espera. Para saber quién llama miestras usted está en el teléfono, usted necesita suscribirse al servicio de Identificador de Llamada en Espera.
Almacenar Archivos del Identificador de Llamadas (en la Memoria de CID) Si usted no está en casa o no puede contestar, la memoria del Identificador de Llamadas de su teléfono automáticamente almacena la información de las 40 últimas llamadas para que sepa quién llamó mientras usted no estuvo disponible. Cuando la llamada número 41 es recibida, el último archivo del Identificador de Llamadas (la primera llamada) se borra automáticamente. Usted puede revisar la información almacenada en cualquier momento.
Almacenar Archivos del Identificador de Llamadas en la Memoria Interna Usted puede transferir archivos del Identificador de Llamadas a la memoria de su teléfono. NOTA: Es importante que usted formatee los archivos del Identificador de Llamadas (CID) correctamente antes de almacenarlos en la memoria. No es posible volver a formatear los archivos del Identificador (CID) almacenados en la memoria. 1.
NOTA: Si la compañía telefónica no le provee con los diez dígitos de el número telefónico de la persona que llama, usted no podrá ajustar el formato de ese número. Recorra los números hasta llegar al número que quiera marcar: 3. Si el número no puede ser marcado como se muestra, presione el botón format en la base o el botón format/trans en el auricular inalámbrico. Repita si fuera necesario hasta que el número correcto de dígitos aparezca en la pantalla. 4.
Errores del Identificador de Llamadas Si hay un error en la transmisión de información de su teléfono con Identificador de Llamadas, la indicación ERROR aparece en la pantalla. Si usted no está suscrito al servicio de Identificador de Llamadas o no está funcionando adecuadamente, la indicación NO ENVIADO aparece en la pantalla.
NOTA: El aparato también contesta después del décimo timbre si está desactivado. Para tener acceso a su sistema contestador, inscriba su código de seguridad de 3 dígitos después de que usted escuche el tono. Para Tener Acceso al Sistema Contestador desde Otra Localización Usted puede tener acceso a su sistema contestador desde cualquier teléfono de tono inscribiendo su código de 3 dígitos después de que usted escuche el anuncio saliente. 1.
Instalar la Batería del Auricular PRECAUCION: Para reducir el riesgo de fuego o lastimaduras personales, use solamente la batería de Ni’quel-Cadmio (Ni-Cd) modelo 5-2729 o Hidruro Metálico de Níquel- (Ni-MH) modelo 5-2522 aprobado por Thomson Inc. eso es compatible con esta unidad. 1. Asegúrese que el teléfono esté desactivado (no en modalidad para hablar) antes de cambiar la batería. 2. Quite la tapa del compartimiento de la batería. 3.
Mensajes en la Pantalla Los siguientes mensajes especiales indican el estado actual de un mensaje o del aparato: ACC REMOTO CONT Indica que el sistema de contestadora está siendo accesado remotamente. LLAMADA PRIVADA La información del que llama está bloqueada desde la transmisión. NOMBRE/NUMERO El nombre y número del que llama están bloqueados desde la transmisión. PRIVADO BORRAR? Indicación preguntándole si quiere borrar uno de los 10 números almacenados en la memoria saliente del teléfono.
NO HAY INFORMACIÓN No se recibió información del Caller ID. NO LLAMADA Indica que no se han recibido llamadas. LOCALIZANDO/ El botón page en la base o el botón format/trans en el LOCALIZAR DESDE auricular inalámbrico ha sido presionado. AURICULR/LOCALIZAR DESDE BASE/LOCALIZAR AURICULAR REGISTRAR Indica que el auricular necesita ser registrado antes de usarlo. OPR BOTON TALK Indica qe el Indentificador de Llamadas es un Número de Marcado de Directorio (DDN) y no se puede formatear.
Solución de Problemas Soluciones para el Teléfono No hay tono de marcar • Verifique y repita los pasos de la instalación: Asegúrese que el cable de corriente de la base esté conectado a un enchufe que sirva. Asegúrese que todos los cables de línea conectados al teléfono y al enchufe de pared. • Conecte otro teléfono al mismo enchufe; si no hay tono de marcar en el segundo teléfono, el problema puede estar en su cableado o su servicio local. • El auricular inalámbrico puede estar fuera de rango con la base.
El aparato emite “bips” • Coloque el auricular sobre la base durante 20 segundos. Si sigue emitiendo “bips”, cargue la batería durante 16 horas. • Limpie los contactos en el auricular inalámbrico y en la base con un trapo limpio o una goma de borrar. • Vea las soluciones para “No hay tono de marcar”. • Cambie la batería.
Causas de una Mala Recepción • Recubrimiento externo de la casa con aluminio. • Aislación con revestimiento de papel de aluminio. • Conductos de calefacción y otras construcciones de metal que paran las señales de radio. • Está demasiado cerca de los aparatos eléctricos como microondas, cocina, computadoras, etc. • Condiciones atmosféricas, como una tormenta eléctrica. • La base está instalada en el sótano o en un piso más bajo de la casa.
Ayuda de la Garantía Si usted experimenta problemas con este equipo, para información de garantía, comuníquese con el departamento de servicio al cliente al 1-800-448-0329. Si el equipo está causando daños a la red telefónica, la compañía telefónica puede requerir que desconecte su equipo hasta que el problema haya sido resuelto. Cualquier reparaciones o cambio o modificación no aprobados expresamente por Thomson Inc. podría ser motivo de anulación de la autoridad del usuario para operar este producto.
Garantía Limitada Lo que cubre su garantía: • Defectos de materiales o de trabajo. Por cuánto tiempo después de la compra: • Un año, a partir de la fecha de compra. (El periodo de garantía para unidades arrendadas se inicia con la primera renta o 45 días de la fecha del embarque a la firma de arrendamiento, lo que ocurra primero). Lo que haremos: • Proporcionarle una unidad nueva. La unidad de intercambio quedará bajo garantía por el resto del periodo de garantía del producto original.
Limitaciones sobre la Garantía: • La garantía especificada anteriormentes es la única garantía aplicable a este producto. Cualquier otra garantía, expresa o implícata (incluyendo todas las garantías implícitas de mercado o de salud para cualquier propósito) son considerdas no validas. Ninguna informacieon verbal o escrita otorgado por Thomson Inc., sus agentes, o empleados será considerada para crear una garantía ni para aumentar bajo ninguna circunstancia la cobertura de esta garantía.
Información de Accesorios DESCRIPCIÓN NÚMERO DE CATÁLOGO Cable de corriente AC 5-2760 Batería de Repuesto del Auricular-Ni-Cd 5-2729 Batería de Repuesto del Auricular-Ni-MH 5-2522 Base para Carga del Auricular 5-2752 Para ordenar, tenga lista su tarjeta Visa, Mastercard o Discover y llame al 1-800-338-0376. Se aplicará un cargo por envío al ordenar.
Índice A Acceso Remoto 36 Almacenar Archivos del Identificador de Llamadas (en la Memoria de CID) 33 Almacenar Archivos del Identificador de Llamadas en la Memoria Interna 34 Altavoz 22, 26 Altavoz en la Base 21, 24 Antes de Comenzar 6 Atajo para Timbre del Auricular On/Off 23 Auricular Alámbrico 21, 22, 25, 26 Auricular Inalámbrico 21, 22, 25, 26 Auto Alerta 22 Ayuda de la Garantía 44 C Cargador con Cable de Corriente Causas de una Mala Recepción Clave de Área Local Código de
Para Borrar Mensajes 14 Para Borrar Todos los Archivos del Identificador de Llamadas 35 Para Cambiar el Código de Seguridad 37 Para Conectar el Auricular Alámbrico 11 Para Conectar el cable de Línea Telefónica 10 Para Conectar la Corriente AC (Eléctrica) 10 Para Contestar una Llamada 21 Para Dejar un Mensaje 12 Para Dejar un Recado (MEMO) 14 Para Filtrar Llamadas desde el Auricular 13 Para Filtrar Llamadas desde la Base 13 Para Grabar el Anuncio Saliente 12 Para Hacer una Llamada 22 Para Hac
Visite el sitio de GE en: www.GE.com/phones Modelo 25983 00025467 (Rev. 1 Dom E/S) 08-16 Impreso en China Thomson Inc. 101 West 103rd Street Indianapolis, IN 46290-1102 © 2008 Thomson Inc.