SPACEMAKERTM Television/Radio User's Guide GE LOGO Model 05GP005 IMPORTANT INFORMATION ..........................................................i TABLE OF CONTENTS .........................................................1 STARTUP .....................................................2-4 LOCATION OF CONTROLS ....................................................5-7 MOUNTING YOUR SPACEMAKERTM .................................................8-10 CONNECTIONS ...................................................
Safety Precautions Important Information WARNING To prevent fire or shock hazard, do not expose this TV to rain or moisture. WARNING RISK OF ELECTRIC SHOCK DO NOT OPEN TO REDUCE THE RISK OF ELECTRIC SHOCK, DO NOT REMOVE COVER (OR BACK). NO USER SERVICEABLE PARTS INSIDE. REFER SERVICING TO QUALIFIED SERVICE PERSONNEL. This symbol indicates “dangerous voltage” inside the product that presents a risk of electric shock or personal injury.
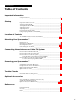
Introduction Table of Contents Important Information Safety Precautions _____________________________________________________i Startup Unpack TV and Accessories ____________________________________________2 Turning TV On and Off ________________________________________________3 Turning Radio On and Off _____________________________________________3 Adjusting Volume ____________________________________________________4 Adjusting Picture _____________________________________________________4 Degaussing the
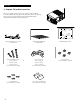
Start Up 1. Unpack TV and Accessories When you unpack your new TV, be sure you have removed all the accessories and information papers. The items shown below are packed with your TV. Some parts may have been packed in the battery compartment in the back of the Spacemaker™. Drill 1/4 inch holes at the 5 locations marked. Percez trous de 1/4 pouce aux 5 endroits indiques. 1/4" 3/4" Screw Guide Also cut out screw guide along dashed lines to use for checking proper screw lenght.
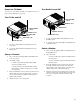
Start Up Power the TV/Radio Turn Radio On and Off You can power your Television/Radio several different ways. See page 12 for the different power options. Turn TV On and Off OFF/TV/RADIO Switch TUNING Control AM/FM Switch OFF/TV/RADIO Switch AM Radio Dial Scale TUNING Control UHF/V-HI/V-LOW Switch VHF TV Dial Scale FM Radio Dial Scale A. To turn on, slide the OFF/TV/RADIO switch to the RADIO position. UHF TV Dial Scale B. A. To turn on, slide the OFF/TV/RADIO switch to the TV position. B.
Startup Adjust the Volume • Slide VOLUME to the right to increase the volume level. • Slide VOLUME to the left to decrease the volume level. Adjust the Picture What is pleasing to one person may not be to another.
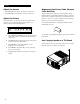
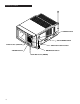
Location of Controls Antenna DC (12V) Jack AC POWER (120V/60Hz) Cord Jack Carrying Handle and Tilt Stand HEADPHONE CONTRAST BRIGHT COLOR TINT DEGAUSS EXT.ANT. Antenna DEGAUSS Button CONTRAST Knob • Receives UHF/VHF TV signals and FM radio signals. • Attach to the top clip for portable use. • Attach to the bottom clip for mounting the TV under the counter. • Press to “degauss” the picture tube.
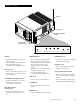
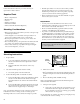
Location of Controls TUNING Control G IN NN FU NC TIO N TU S US GA DE T TV R LO -BA ND HT UH F H L CO IG T BR AS VH TIN OFF/TV/RADIO Switch R NT F CO M IN RA DIO VO -B LU AN D AM ME FM MA TV Dial Scales (UHF/VHF) VOLUME Control X UHF/V-HI/V-LOW TV Switch AM/FM Radio Switch Radio Dial Scales (FM/AM) 6
Location of Controls TUNING Control • Turn to select the station or channel after selecting TV or RADIO with the OFF/TV/RADIO switch. • Refer to the channel numbers on the VHF/UHF dial scales when choosing a TV channel. • Refer to the station numbers on the FM/AM dial scales when choosing a radio station. OFF/TV/RADIO Switch • Place in the OFF position to turn off the TV/Radio. • Place in the TV position to select a TV channel.
Mounting Your Spacemaker™ Follow the instructions below if you want to mount your Spacemaker™ under a cabinet. Required Tools • • • • • • Ruler or Tape Measure Masking Tape Scissors Phillips Screwdriver Drill and 1⁄4” Drill Bit Drill Countersink Attachment (Optional) Mounting Considerations • Make sure the bottom of the cabinet you select is strong enough to hold the Spacemaker™. • Allow adequate room on both sides of the Spacemaker™ to allow proper ventilation and access to control knobs.
Mounting Your Spacemaker™ B. Select spacers which are approximately 1⁄4” shorter than the overhang. Two or three spacers can be used together to make length of 1⁄4” to 1-3⁄4” at 1⁄4” increments. C. While holding the Bracket and selected spacers in place under the cabinet, check to see that the Bracket clears the overhang so the TV can be easily slid onto the Bracket or removed for portable use. 8. Position Mounting Bracket under cabinet as shown below and match the screw holes. Screw Washer 7.
Mounting Your Spacemaker™ 10. Clip dipole antenna to bottom clip. A. If the dipole antenna is attached to the top clip, remove it from the clip, and rotate it to the bottom. B. Snap the antenna into the bottom clip. Top Clip TUNING Retaining Rail HEADPHONE CONTRAST BRIGHT COLOR TINT DEGAUSS EXT.ANT. Bottom Clip 12. Attach AC Power Cord. A. First attach the AC Power Cord to the plug on the side of the TV marked AC POWER (120V/60Hz). 11. Slide Spacemaker™ onto Bracket. A.
Connecting Home Antenna or Cable-TV Systems Follow one of these steps to connect a home antenna or cable-TV system to your TV. A. Home Antenna If the cable coming from your antenna is a flat twin-lead cable that carries VHF and/or UHF signals, connect it to your set like this: From Home Antenna EXT. ANT. Antenna Adapter* (such as #195400) VHF and/or UHF Insert Plug In TV’s Jack Labeled EXT. ANT. B.
Powering Your Spacemaker™ You can power your Spacemaker™ four different ways: A. Standard Household AC Operation. Plug the power cord into a standard AC power outlet. B. DC Operation from ten “D” batteries installed in the battery compartment. C. Optional DC Rechargeable Battery. You can purchase an optional rechargeable battery to install in the battery compartment. D. Optional DC Card Cord.
Powering Your Spacemaker™ DC Operation from Ten “D” Batteries Installing Batteries Battery Operation You can operate your Spacemaker™ from DC power by installing ten “D” batteries into the battery compartment. • Make sure the detachable AC power cord is removed from the AC POWER jack. The TV will not operate on battery power if the cord is attached. 1. • Replace the batteries if TV picture shrinks or becomes unstable.
Powering Your Spacemaker™ Optional Rechargeable Battery Operating Instructions The rechargeable battery (No. RT007) is an optional accessory available from your local GE dealer. You can also use the order form on page 17 to order a battery. When fully charged, the battery will supply about 2 to 2-1⁄2 hours of operating time. Be sure to recharge the battery before and after use. 1.
Powering Your Spacemaker™ Connecting TV to 12-volt Car/Truck Battery IMPORTANT • The DC Car Cord is designed for use only in cars or trucks with negative (-) ground (negative terminal of car battery is connected to car chassis). You can power your Spacemaker™ from a 12-volt car or truck battery by using an optional DC Car Cord. You can use the order form on page 17 to order a DC Car Cord. 1. Unplug the AC cord from the wall outlet. 2. Unplug the AC cord from the side of your TV.
Trouble Checks You may have problems that can be fixed with a few minor adjustments. Look for the type of problem you are having below and then try the suggestions to get your TV going again. For warranty information see page 19. Trouble Check No picture or sound. (AC power) • • • • No Picture or sound (battery operation). • • • • • Sound OK; poor picture. • • • Picture OK; poor sound. • • • Poor reception. • • • Lines in picture. • • • Picture rolls vertically. • • No color or poor color.
Cut Here ✄ Optional Accessories Your Television/Radio is highly versatile piece of equipment. The accessories shown below will let you take full advantage of that versatility. Order Form for Model 05GP005 Stereo Headphone & Adapters Lightweight stereo headphone with 3.5mm stereo plug. Includes the two Headphone Adapters shown below at no extra cost. No. 3-5750 Description Model No. Price Each* Qty Total Amount Fuse for DC Power Cord 175857 $ 3.15 Antenna Adapter 189268 $12.
Cut Here ✄ Accessory Order Form United States Orders USE YOUR CREDIT CARD To place your order by phone, have your Visa or MasterCard ready and call the toll-free number listed below between 8AM and 8PM Eastern Standard Time. Use this number only to place an order for accessory items listed on this order form. ® Copy complete account number 1 – 800 – 338 – 0376 Card expires: s r Copy complete account number r Most time your order will be shipped UPS within 72 hours of receipt.
Limited Warranty Spacemaker™ Color Television/Radio What your Warranty covers: • Any defect in material or workmanship. For how long after your purchase: • 90 days for labor charges. • One year for parts. • Two years for picture tube. The warranty period for rental units begins with the first rental. What we will do: • Pay any Authorized GE Television Service center the labor charges to repair your television.
References Glossary AC Operation (120 volts, 60 Hz) Dipole Antenna UHF/V-Hi/V-Low Switch Normal household power available at wall outlet. Adjustable antenna on TV. Receives UHF/VHF TV and FM radio signals. See Antenna. Switch used to select UHF or VHF television stations. UHF for channels above 13, V-Hi for channels 7 through 13 and V-Low for channels 2 through 6. AC Power Cord Jack Detachable power cord that connects normal household power to your TV. Ext. Ant.
References Index AC operation ..............................11, 20 AC power cord ...........................10, 20 AC POWER (120V/60Hz) cord jack .....................5, 12, 14, 20 Accessories....................................2, 17 AM antenna ......................................20 AM/FM radio switch ..............6, 7, 20 AM selection .......................................3 Antenna .........................................5, 20 Antenna adapter ..............................11 Antenna connections .....
If your TV needs service, please contact your dealer or the nearest servicenter. Please do not send any products to the Indianapolis address listed below or on the box. This only adds delays for service of your TV. See how to get service in the warranty on page 19. Thomson Consumer Electronics 600 N Sherman Dr, PO Box 1976 Indianapolis, IN 46206-1976 ©1994 Thomson Consumer Electronics, Inc. Trademarks(s)® Registered Marca(s) Registrada(s) Printed in U.S.A.