2-9827 Digital Answer-Phone™ User’s Guide We bring good things to life.
To Press Play message .............................................. Repeat message ......................................... (during playback) Play previous message ............................. (during playback) Stop ............................................................... (during playback) Erase message ........................................... (during playback) Skip message .............................................. (during playback) Turn answer OFF .......................................
To Press Play message .............................................. Repeat message ......................................... (during playback) Play previous message ............................. (during playback) Stop ............................................................... (during playback) Erase message ........................................... (during playback) Skip message .............................................. (during playback) Turn answer OFF .......................................
FCC REGISTRATION INFORMATION Your GE telephone equipment is registered with the Federal Communications Commission and is in compliance with parts 15 and 68, FCC Rules and Regulations. 1 Notification to the Local Telephone Company On the bottom of this equipment is a label indicating, among other information, the FCC Registration number and Ringer Equivalence Number (REN) for the equipment. You must, upon request, provide this information to your telephone company.
INTRODUCTION Your GE Digital Answer-Phone™ is designed to give you flexibility in use, and high quality performance. To get the most from your new telephone, we suggest that you take a few minutes right now to read through this instruction manual. If you have any questions or problems, consult the Table of Contents, the Troubleshooting Guide, or the Index for the solution. TABLE OF CONTENTS INSTALLATION AND SETUP ..............................................................................................
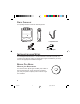
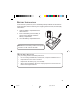
PARTS CHECKLIST Your package should contain the following items: SLEEP WAKE HOUR MINUT E AM PM WAKE FM 88 • 92 • 96 • 100 • 104 • 108 MHZ AM 550 • 650 • 800 • 1000 • 1300 • 1600 kHZ Long handset cord Handset Base unit Phone line cord AC power adapter 2580059.12 INSTALLATION AND SETUP Your GE Digital Answer-Phone™ can be mounted on the wall or placed on a counter top or table top. After you decide which type of installation you want, refer to the appropriate installation diagram.
BATTERY INSTALLATION In the event of a power loss, the 9-volt battery backup enables the answerer to retain messages stored in memory, the outgoing announcement, and time/day information. Open the battery compartment door with a flat tool. 2. Insert a 9V battery (not included), as shown on the diagram inside the battery compartment. 3. Close the battery compartment door. BATTERY 1. NOTE: When the battery needs to be replaced, the BATT. LOW indicator will flash.
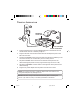
TABLETOP INSTALLATION 6 ANSWERER volume switch 2 1 PULSE/TONE switch RINGER volume switch 1. Plug the telephone line cord into PHONE LINE jack on the back of the unit and the other end into a modular jack RJ11C . 2. Plug the handset cord into the handset and into the telephone jack on the left side of the unit. 3. Set the PULSE/TONE switch on the left side of the phone to TONE if you use touch-tone service; set it to PULSE if you have rotary service. 4.
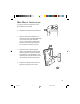
WALL MOUNT INSTALLATION Your phone can be mounted on a wall phone plate (not included). 1. Rotate the handset hook one-half turn. WAKE SLEEP 1 AM 2. 3. 4. Plug one end of the telephone line cord into the jack marked PHONE LINE on the back of the unit. Wrap the excess cord around the plastic tabs. Plug the other end of the telephone line cord into a modular wall jack. Attach the wall mount bracket by turning the T-shaped bracket upside down, as pictured.
5. Slip the mounting holes over the wall plate posts and slide the unit down firmly into place. Mounting holes 5 6. Plug one end of the handset cord into the handset and the other end into the unit. Hang up the phone. 7. Set the PULSE/TONE switch on the left side of the phone to TONE if you use touch-tone service; set it to PULSE if you have rotary service. 8. 9.
BATTERY LOW INDICATOR When a battery has not been installed or needs to be replaced, the BATT. LOW indicator flashes rapidly. MESSAGES/ANSWER ON indicator light ANSWERING MACHINE SETUP This section shows you how to set up your answering machine to receive incoming calls. Before you begin the setup, you must be sure the answerer is on. HOUR MINUTE TURNING ON THE ANSWERING MACHINE Press and hold the ANS.
RECORDING THE OUTGOING ANNOUNCEMENT When recording your outgoing announcement, you should be about 9 inches from the MIC, located on the front of the unit, and eliminate as much background noise as possible. 1. Press and hold the ANNOUNCE button. 2. Begin talking after you hear the tone. 3. Release the button when you finish your announcement.
TELEPHONE OPERATION MAKING A CALL 1. Pick up the handset to get a dial tone. 2. HOUR MINUTE Dial the number. RECEIVING A CALL Make sure that the RINGER (on the side of the unit) is set to LO or HI. 1. Pick up the handset when the phone rings. 2. Put handset in cradle when finished with conversation.
REDIAL BUTTON Redial the last number you called by pressing the REDIAL button after you get a dial tone. HOUR MINUTE NOTE: Your phone's memory retains the last phone number you dialed (as many as 32 digits). If you pressed any numbers after dialing the phone number, (for example, when accessing a voice-menu system) those numbers are also redialed.
MEMORY DIALING Store as many as 10 numbers in memory for easy dialing. Numbers can be stored in the numbered keys (0-9). E HOUR STORING A NUMBER IN MEMORY 1. Pick up the handset. 2. Press STORE. 3. Dial the number to be stored. 4. Press STORE followed by a Memory Location (0-9 on the keypad). 5. Write the phone number on the memory directory (located in the cradle area of the base, under the plastic cover).
CHANGING A STORED NUMBER Change a stored number by replacing it with a different number (see "Storing a Number in Memory"). Be sure to update your memory directory when you change numbers. DIALING A NUMBER FROM MEMORY You can dial numbers from memory when using the handset. When you get a dial tone, press the MEMORY DIAL button followed by the Memory Location (0-9) for the number you want to dial. CAUTION: If you make test calls to emergency numbers, remain on the line and explain the reason for the call.
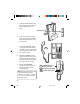
ANSWERING MACHINE OPERATION This section discusses the buttons and features on the answering machine. SLEEP WAKE HOUR ERASE button MINUTE REVIEW button PLAY • STOP button SKIP button MEMO button ANS. ON button AM ANNOUNCE button PM WAKE MIC MESSAGE PLAYBACK The MESSAGES/ANSWER ON indicator light lets you know when somebody has left a message. When you have new messages the light blinks. If you have old messages that have not been erased, the light stays on.
TOTAL MESSAGE ERASE You can erase all the messages from memory by pressing and holding the ERASE button when the unit is not playing messages (the unit beeps to confirm the messages are erased). Note that total message erase cannot be completed if there are any unplayed messages. NOTE: If you hear several high-pitched beeps, your answerer has not erased the messages because some of them or all of them have not been played.
ACCESSING THE ANSWERER FROM ANOTHER LOCATION You can access your answering machine from a touch-tone phone by entering the three-digit, security code after you hear the announcement. The security code is located on the underside of your telephone. 1. Dial the phone number for the answering machine. 2. Enter the 3-digit security code after you hear the tone. 3. Follow the voice menu instructions to perform the answerer functions.
TROUBLESHOOTING TIPS SOLUTION/EXPLANATION TELEPHONE PROBLEM • Check hook switch to make sure it pops up. • Make sure TONE/PULSE is set to correct position. • Unplug the phone, wait 30 seconds, and plug the phone back in. No dial tone Can't dial out Phone doesn’t ring • Check RINGER VOLUME. • Could have too many phones on one line. (See FCC information regarding REN) Light and tone feedback flutter when dialing in pulse mode. • This is normal as power is fluctuating with phone outpulsing.
ANSWERING MACHINE PROBLEM SOLUTION/EXPLANATION Can’t hear messages • Adjust answerer volume (p.4) Time/Day Stamp stuck at 1 a.m Monday • Set the time/day clock (p. 7). Answers on 10th ring • Make sure answerer is turned on. • Memory is full. Play messages and erase them. (p. 14) Incoming messages are incomplete • Was an extension phone picked up while the caller was leaving a message? • Memory is full. • You accidentally pressed the PLAY•STOP button during playback and stopped the message.
CARE AND MAINTENANCE To keep your GE telephone working and looking good, follow these few simple guidelines: • Avoid putting the phone near heating appliances and devices that generate electrical noise. (i.e., motors, fluorescent lamps.) • Phone should not be exposed to direct sunlight or moisture. • Avoid dropping the handset and other rough treatment. • Clean telephone with a soft cloth. (Remember to first unplug the phone from the wall outlet.
INDEX A ANS. ON button 7 Answering machine setup 7 Accessing answering machine from another location 15 B Battery Installation 3 Battery safety precautions 3 BATT.
LIMITED WARRANTY What your warranty covers: • Any defect in materials or workmanship. For how long after your purchase: • Two years. (The warranty period for rental units begins with the first rental or 45 days from date of shipment to the rental firm, whichever comes first.) What we will do: • Provide you with a new, or at our option, a refurbished unit. • The exchange unit is under warranty for the remainder of the original product’s warranty period.