
Instructions / Assembly
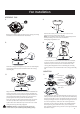


INSTALLING THE LIGHT KIT
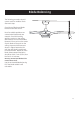
1.
Remove 1 of 3 mounting plate screw
(P) from the mounting plate of motor
assembly (E) and loosen the other 2.
Fan Installation
2.
Remove 3 LED light kit mounting screws (Q)
from the metal housing (F), and save for later
use.
P
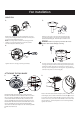
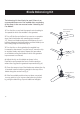
5.
Securely attach shade (H) by twisting clock-
wise onto the metal housing (F).
Note: Before starting installation, disconnect the power by turning off the circuit breaker or removing the fuse at fuse box.
Turning power off using the fan switch is not sufficient to prevent electric shock.
F
F
Q
F
H
4.
G
P
F
9-pin connector
single pin connector
double sided tape
13
Guide the pin connectors through the
center hole on the metal housing(F).
Raise the metal housing (F) up to the
mounting plate, position keyhole slots
around the mounting plate screws (P)
and twist clockwise. Insert the
mounting plate screw (P) that you had
previously removed. Tighten all screws.
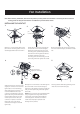
3.
A) Attach the 9-pin connector and
single pin connector from the LED
light kit (G) to motor assembly.
After making the connection, it is
recommended that the 9-pin
connector be adhered to the LED
light kit (G) using the double sided
tape provided. Peel off one side
of the tape to secure the 9-pin
connector in place on the LED
light kit (G). Then tuck all the
connections neatly into the LED
light kit (G),
B) Align the 3 screw holes on the LED light kit
(G) to the holes on the metal housing (F).
Insert the 3 LED light kit mounting screws (P)
that you have previously removed. Tighten
all screws.
Note: Both connectors are polarized and will
only fit together one way. Make sure the
connectors are properly aligned before
connecting them. Incorrect connection
could cause improper operation and
damage to the product.
pin
connector