
Instructions / Assembly
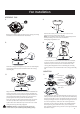


Remote Control Pairing Instructions
Important Note : By default, every fan has been pre-programmed at the factory and should be fully
functional once installation is completed. There is no need to perform the pairing process.
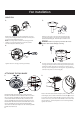
Make sure all wiring connections have been properly made and are secure.
Make sure batteries are installed correctly in the transmitter.
Make sure batteries have a full charge or replace with new batteries.
Make sure all switches of the power supply to the fan motor are turned on.
Should you find the fan or remote control not working or not fully functional after installation or
during use, pairing of the remote control can be done by following the below simple procedures.
Note, however, that there could be other reasons as to why a fan or a remote control is not working:
REMOTE CONTROL PAIRING INSTRUCTIONS
.
.
.
.
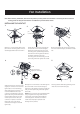
The remote is not functioning properly, and you want to reset a fan remote control, or
You are replacing the original transmitter or receiver, or
You have multiple ceiling fans of the same model in one location and you wish
to be able to control them with one remote.
These procedures apply if:
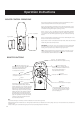
PROCEDURES FOR PAIRING RECEIVER AND TRANSMITTER
.
.
.
16
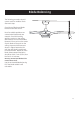
1. Turn OFF the power/isolation switch to ALL fans that you would like to program to the same
hand held remote.
2. Remove the battery cover to access the "Sync" switch on the hand held remote.
3. Install two 1.5 V AAA batteries and make sure the polarity of the batteries is correct.
4. Turn on the power/isolation switch to ALL fans.
5. Press the "Sync" switch with the corner of the battery cover (you can also use a small screwdriver
or ballpoint pen) to change the frequency settings within 30 seconds after restoring the power.
The lights will flash (on/off) 3 times and remain bright, then the pairing process is complete.
6. Try different speed settings on the transmitter to ensure all the fans are now fully functional. If not,
repeat the process starting from Step 1 again.
IF USING ONE REMOTE CONTROL TO CONTROL MULTIPLE FANS
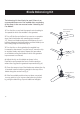
1. Turn OFF the power/isolation switch to the fan.
2. Remove the battery cover to access the "Sync" switch on the hand held remote.
3. Install two 1.5 V AAA batteries and make sure the polarity of the batteries is correct.
4. Turn on the power/isolation switch to the fan.
5. Press the "Sync" switch with the corner of the battery cover (you can also use a small screwdriver
or ballpoint pen) to change the frequency settings within 30 seconds after restoring the power.
The light will flash (on/off) 3 times and remain bright, then the pairing process is complete.
6. Try different speed settings on the transmitter to ensure the fan is now fully functional. If not,
repeat the process starting from Step 1 again.
TO RESET INDIVIDUAL REMOTE CONTROL FOR EACH FAN / INSTALLING A NEW RECEIVER
Note: If you have more than one fan of the same model but wish to only perform the pairing on
one fan, follow the same steps starting from step 1 to step 6. Make sure to only power ON one
fan at a time, and power OFF all the nearby fans to avoid picking up the same signal.