
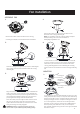
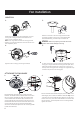
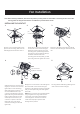
Instructions / Assembly

Operation Instructions
14
+
-
+
-
AAA
AAA
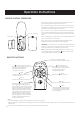
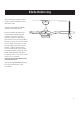
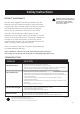
REMOTE CONTROL OPERATIONS
Step 1. Restore power at circuit breaker and turn the wall switch to the on
position (if using wall switch) to test for proper operation,
Step 2. Open the battery compartment cover, and then install two 1.5-volt
AAA batteries (LL) provided in the remote control bag. Ensure the batteries
are installed correctly with regard to polarity (+ and -).
Step 3. Check “ O " and " I " dip switch: For this fan the dip switch should be
in the “I” position, allowing for dimming of the light. Place the switch in the
“0” position to turn the dimming feature off if you do not want the dimming
feature.
Step 4. Close the battery compartment cover and see below diagram for the
function of each button on the transmitter.
Step 5. Select a location to install the transmitter holder (KK), Mount the
transmitter holder (KK) using the wood screws (MM) provided.
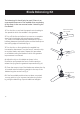
"Sync" switch:
“ O " and " I " dip switch
" " button
This button delays the light turning off
for approximately 5 seconds, enabling
you to exit your room before the light
turns completely off.
" " button
Turns fan on and reduces the fan speed.
Note :
.
To prevent damage to transmitter, remove the batteries if not used for long periods.
.
Replace batteries as a simultaneous set – always replace the whole set of batteries at one time, taking care not to mix old and new ones, or batteries of
different types.
.
Please contact your local batteries recycling center for proper battery disposal information.
Turns fan on and increases the fan speed.
“ ” button
This button turns the fan on and off.
Fan speed indicators
This indicates which fan speed is running.
“ ” button
This button is for changing the direction
of rotation of the fan.
indicator (summer use)
This LED turns on to indicate the fan
is running counterclockwise. The
downward airflow will provide
a cooling breeze in summer.
warm air downward without a
noticeable breeze in winter.
This LED turns on to indicate the fan is
running clockwise. The airflow will force
indicator (winter use)
“ ” button
“ ” button
This button controls the light and also
controls the brightness setting. Press and
release the button to turn the light ON or OFF.
Press and hold the button to set the desired
brightness: the light will slowly illuminate to
maximum light output and then stop when
holding the button, then release the button
and hold it again until it reaches minimal
illumination where it will automatically stop
again. The light button has an auto-resume,
it will stay at the same brightness as the
last time it was turned off.
IMPORTANT: If the remote control is not operating correctly, please follow
the steps on page 16, item 5 for syncing the switch. Use the corner of the
battery cover to press the “Sync” switch for syncing function.
Note: This Fan and Remote has a dimming function for the light. You can
control the brightness of the light with the on the hand held
remote. Please see below for Remote Functions.
REMOTE FUNCTIONS
" " button