Model 27950/27951 DECT6.
Important Information NOTICE: This product meets the applicable Industry Canada technical specifications. Operation is subject to the following two conditions: (1) This device may not cause interference, and (2) This device must accept any interference, including interference that may cause undesired operation of the device. The equipment must be installed using an acceptable method of connection.
Interference Information This equipment generates and uses radio frequency energy which may interfere with residential radio and television reception if not properly installed and used in accordance with instructions contained in this manual. Reasonable protection against such interference is ensured, although there is no guarantee this will not occur in a given installation.
REN Number On the bottom of this equipment is a label indicating, among other information, the Ringer Equivalence Number (REN) for the equipment. The REN is useful in determining the number of devices you may connect to your telephone line and still have all of these devices ring when your telephone number is called. In most (but not all) areas, the sum of the RENs of all devices connected to one line should not exceed 5.
Table of Contents Base Station Setup. ................................. 21 Important Information. ..................... 2 Date/Time................................................... 22 Interference Information. ................. 3 De-register................................................ 24 Telephone Network Information....... 3 Dial Mode. ................................................ 22 REN Number..................................... 4 Handset Name. .........................................
Ringer On/Off......................................... 30 Storing a Redial Record in Phone Book... 28 Three-way Conferencing........................ 32 Caller ID (CID)............................... 33 Call Waiting Caller ID.......................... 33 Deleting a CID Record........................... 37 Deleting All CID Records..................... 37 Dialing a CID Number. ........................... 35 Formatting a CID Number Before Dialing. ......................................................
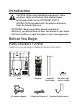
Introduction CAUTION: When using telephone equipment, there are basic safety instructions that should always be followed. Refer to the IMPORTANT SAFETY INSTRUCTIONS provided with this product and save them for future reference. IMPORTANT: Because cordless phones operate on electricity, you should have at least one phone in your home that isn’t cordless, in case the power in your home goes out. Before You Begin Parts Checklist • 27950 Make sure your package includes the items shown here.
Parts Checklist • 27951 Make sure your package includes the items shown here. Base Handset back cover Handset Handset battery pack AC power adaptor Telephone line cord Telephone Jack Requirements To use this phone, you need an RJ11C Wall plate type modular telephone jack, which might look like the one pictured here, Modular installed in your home. If you don’t have telephone line a modular jack, call your local phone jack company to find out how to get one installed.
Installation Digital Security System Your cordless phone uses a digital security system to protect against false ringing, unauthorized access, and charges to your phone line. INSTALLATION NOTE: Some cordless telephones operate at frequencies that may cause or receive interference with nearby TVs, microwave ovens, and VCRs. To minimize or prevent such interference, the base of the cordless telephone should not be placed near or on top of a TV, microwave ovens, or VCR.
Handset Layout talk/end (button) cid/vol 5 (caller ID/ volume 5button) cid/vol 6 (caller ID/ volume 6button) ph.
Base Layout Handset wall mount latch charge/in use (indicator) message counter indicator play/stop (button) Model 27950 rev (review button) skip (button) ans on/off (answerer on/off button) delete (button) memo (button) annc (announce button) volume 5/6 (button) speaker (button) page (button) Model 27951 charge/in use REVIEW page (button) (review button) (indicator) message counter indicator play/stop (button) SKIP (button) announce (button) memo (button) DELETE (button) volume 5/6 (button) ANS ON/OFF
Installing the Phone Installing the Handset Battery NOTE: You must connect the handset battery before use. CAUTION: To reduce the risk of fire or personal injury, use only the Thomson Inc. approved Nickelmetal Hydride (Ni-MH) battery model 5-2734, that is compatible with this unit. 1. Locate battery which is packaged inside a plastic bag and is separate from the handset. 2. Locate the battery compartment on the back of the handset. 3. Plug the battery pack cord into the jack inside the compartment.
Base Station 1. Choose an area near an electrical outlet and a telephone wall jack (RJ11C), and place your cordless telephone on a level surface, such as a desktop or tabletop NOTE: Model 27950 may also be wall mounted. Model 27951 Model 27950 2. Plug one end of the telephone line cord into the TEL LINE jack on the base and the other end into a modular jack. 3. Plug the AC power adaptor into the electrical outlet and the DC connector into the jack on the bottom/back of the base.
DSL Filter Installation If you subscribe to DSL service through your telephone line you will need to connect a DSL filter between your phone and the wall jack (refer to drawing for correct connection). You may order the filter from our Accessories Information Section.
Wall Mounting (Applicable only for Model 27950) 1. Fully extend the handset wall mount latch and rotate 180° 2. Insert the handset wall mount cradle into the socket at the back of the base. (To uninstall the wall mount cradle, turn over the base, press and hold the button on the bottom of the base and pull out the cradle at the same time.) 3. Plug the AC power adaptor into the electrical outlet and the DC connector into the jack on the bottom of the base.
4. Plug one end of the straight telephone line cord into the jack on the bottom of the base. 5. Feed the line cord through the groove and plug the end into the modular telephone jack. 6. Slip the mounting holes (on the bottom of the base) over the wall plate posts and firmly slide the unit down into place. Answering System Setup This section shows you how to set up your answering system to receive incoming calls. Before you begin the set up process, you must turn on the answering system.
2. Begin speaking after you hear the beep. 3. Release the ANNOUNCE button when you finish your announcement. NOTE: If you choose not to record an outgoing announcement, a default announcement plays instead. To return to the default announcement after you have recorded your own outgoing announcement, press the announce button and release it when you hear the beep. Or, press the delete button while the announcement is reviewing. NOTE: The maximum duration allowed for outgoing message is 2 minutes.
NOTE: During programming, you may press the MUTE/ ringer on/off button at any time to exit the sub-menu and return to the main menu, or press FLASH/exit to exit programming and return to standby screen. NOTE: If no key is pressed for 60 seconds, the handset will automatically exit programming and return to standby screen. Handset Setup 1. 2. 3. 4. Make sure your phone is OFF (not in talk mode). Press the menu button to go to the main menu. Press CID/VOL ( + or - ) button to scroll to Setup HS.
2. Press menu button to enter the menu. Use the CID/VOL ( + or - ) button to scroll to your selection. The default setting is VOL 3. 3. Press the menu button to save your selection and Saved shows in the display. NOTE: Ringer can be disabled by pressing the MUTE/ringer on/off button in standby mode, please refer to “Ringer On/Off”. Tones From the Setup HS Menu: 1. Press the CID/VOL ( + or - ) button to scroll to the Tones submenu. 2.
Key Tone - You may set the key tone to “On” or “Off” when you press buttons. Press the CID/VOL ( + or - ) button to scroll to On or Off, then press menu button to save the setting. The default setting is On. Auto Talk This option allows you to pick up the handset from base to answer an incoming call without pressing the TALK/END button. From the Setup HS Menu: 1. Press the CID/VOL ( + or - ) button to scroll to the Auto Talk submenu. 2. Press menu button to enter the menu.
NOTE: If you make a mistake, press CID/VOL ( + or - ) button to move the cursor forward or backward, then use the MUTE/ringer on/off button to backspace and delete one character at a time. NOTE: * key is a function key to toggle between the upper case and low case of characters during text edit. 4. Press the menu button to save your name. You will hear a confirmation tone and the display shows Saved. Base Station Setup 1. 2. 3. 4. Make sure your phone is OFF (not in talk mode).
Dial Mode From the Setup BS Menu: 1. Press the CID/VOL ( + or - ) button to scroll to the Dial mode sub-menu. 2. Press menu button to enter the menu and use the CID/VOL ( + or - ) button to select Tone or Pulse. 3. Press menu button to save your selection. Date/Time 1. Make sure your phone is OFF (not in talk mode). 2. Press the menu button to go to the main menu and use CID/ VOL ( + or - ) button to scroll to Date/Time. 3. Press menu button to enter the menu. Year 2007 shows in the display. 4.
Registration NOTE: The following procedures can ONLY be done with the 27950 or 27951 . A cordless handset will not operate until it is registered to the base. During the registration process, keep the handset near the base. Up to 4 cordless handsets can be registered to one base. NOTE: If a handset is not registered; Not Register flashes on the display and if the TALK button on the handset is pressed, it will display Unavailable. 1. Make sure your phone is OFF (not in talk mode). 2.
De-register Deregistration cancels registration. During the deregistration process, keep the handset near the base. WARNING: It is not recommended that a handset be deregistered unless absolutely necessary because once a handset is deregistered, that handset’s telephone features cannot be used until the handset is re-registered. From the Registration Menu: 1. Press the CID/VOL ( + or - ) button to scroll to the Remove handset sub-menu. 2. Press menu button to enter the menu.
Ring to Answer This feature lets you select the number of times you want the phone to ring before the Answering System answers a call. From the Answer System Menu: 1. Press the CID/VOL ( + or - ) button to scroll to the Ring to answer submenu. 2. Press menu button to enter the menu and use the CID/VOL ( + or - ) button to scroll to your selection. The default setting is 5 Rings. 3. Press menu button to save your selection.
From the Answer System Menu: 1. Press the CID/VOL ( + or - ) button to scroll to the Security code submenu. 2. Press menu button to show the current security code on the display. 3. Use the number keys to enter your new 3-digit security code. The default setting is 1 2 3. 4. Press menu button to save the setting. Telephone Operation Charge/In Use Indicator on Base The charge/in use indicator on the base will flash to alert you to an incoming call, during paging, or registration.
2. When finished, press the TALK/END button on handset or the speaker button on base, or put the handset back into the base cradle to hang up. NOTE: If you have turned the Auto Talk function on, you can pick up the handset from the base to answer the incoming call directly, without pressing any buttons. NOTE: Adjust the handset volume by pressing the CID/VOL ( + or - ) button during a call.
2. Press the REDIAL button. Then use the CID/VOL ( + or - ) button to select the desired redial number. NOTE: You may choose from 10 last dialed numbers. 3. Press the TALK/END button. The number dials automatically. Editing a Redial Record Before Dialing 1. Make sure the phone is OFF (not in talk mode). 2. Press the REDIAL button first, then use the CID/VOL ( + or - ) button to select the desired redial number. 3. Press the menu button. 4. Press CID/VOL (- or +) button to scroll to Select. 5.
7. Press the menu button to save. Saved shows in the display. Repeat steps 2 through 7 to save other records. Deleting a Redial Record 1. Make sure the phone is OFF (not in talk mode). 2. Press the REDIAL button first, then use the CID/VOL ( + or - ) button to select the desired redial number. 3. Press the menu button. 4. Use the CID/VOL ( + or - ) button to scroll to Delete?. 5. Press the menu button to delete the record showing in the display. Confirm? shows in the display. 6.
Auto Standby If you place the handset in the cradle while the handset is off the hook (during a call), the call is automatically disconnected. Ringer On/Off 1. Make sure the phone is OFF (not in talk mode). 2. Press the MUTE/ringer on/off button to switch the ringer on or off. NOTE: If you turn the ringer OFF, RINGER OFF shows in the display.
Page The page feature helps you locate a misplaced handset. 1. Press the page button on the base. The charge/in use indicator on the base flashes; the handset beeps and Page from base shows in the handset display. 2. To cancel the page, press the page button on the base, or press any key on the handset. Otherwise the paging will last for 2 minutes. Receiver Volume Control When the handset is ON (in talk mode) you may adjust the receiver volume by pressing the CID/VOL ( + or - ) button.
NOTE: To cancel the page, press the TALK/END button on the originating handset. 8. Wait for the person at the receiving handset to press the TALK/ END button. NOTE: If the receiving handset does not answer within 1 minute and 45 seconds, the intercom call is automatically canceled and the originating handset displays unavailable. 9. When finished, press the TALK/END on either handset to deactivate the intercom.
Caller ID (CID) IMPORTANT: In order to use this unit’s Caller ID features, you must subscribe to either the standard Name/Number Caller ID Service or Call Waiting Caller ID Service. To know who is calling while you are on the phone, you must subscribe to Call Waiting Caller ID Service. This unit receives and displays information transmitted by your local phone company. This information can include the phone number, date, and time; or the name, phone number, date, and time.
Receiving CID Records When you receive a call, the Caller ID information is transmitted between the first and second ring. The Caller ID information appears on the display while the phone rings, giving you a chance to monitor the information and decide whether or not to answer the call.
Dialing a CID Number 1. Make sure the phone is OFF (not in TALK mode). 2. Use the CID/VOL ( + or - ) button to display the desired record. 3. Press the TALK/END button. The number dials automatically.
Storing CID Records into Phone Book You may also store CID information in the Phone Book. NOTE: It is important that you format CID records correctly BEFORE storing in Phone Book as you cannot reformat CID records stored in Phone Book. 1. Make sure the phone is OFF (not in talk mode). 2. Use the CID/VOL ( + or - ) button to scroll to the desired CID record. 3. Press menu button. 4. Use the CID/VOL ( + or - ) button to scroll to Save number. 5. Press menu button to enter edit mode.
Deleting a CID Record 1. Make sure the phone is OFF (not in TALK mode). 2. Use the CID/VOL ( + or - ) button to display the CID record you want to delete. 3. Press the menu button. 4. Use the CID/VOL ( + or - ) button to scroll to Delete?. 5. Press the menu button. Confirm? shows in the display. 6. Press the menu button again to confirm the deletion. Deleted shows in the display. NOTE: Press the FLASH/exit button to return to the standby mode without deleting any CID records. Deleting All CID Records 1.
Phone Book Each handset can store up to fifty 24-digit numbers with up to 15-character names in memory for quick dialing. The records are stored by alphabetic ascending order. Adding Phone Book Entries 1. Make sure the phone is OFF (not in talk mode). 2. Press the ph. book button. 3. Press the menu button and use the CID/VOL ( + or - ) button to scroll Add new. 4. Press the menu button. Enter number shows in the display. 5. Use the touch-tone pad to input a telephone number.
TIP: Press the *TONE button to show the person’s telephone number whose name is current shown in the display. Editing a Phone Book Record 1. When reviewing the phone book records, use the CID/VOL ( + or - ) button or the number keys to scroll to the desired record. 2. Press menu button and use the CID/VOL ( + or - ) button to scroll to Edit. 3. Press menu button to enter edit mode. You may now change the number, if desired. 4. Press menu button to proceed to name change.
Dialing a Phone Book Record Dial a phone book record while in talk mode: 1. Make sure the phone is ON (in talk mode) by pressing the TALK/ END button. 2. Press the ph. book button to access the phone book. 3. Use the CID/VOL ( + or - ) button or the number keys to scroll to the desired record. 4. Press the menu button to dial the number. - OR Dial a phone book record while reviewing it: 1. Make sure the phone is OFF (not in talk mode). 2. Press the ph. book button to access the phone book. 3.
Answering System Operation This section discusses the buttons and features on the answering system. Message Indicator The message counter gives you a numeric display of how many messages you have and some other information of the answering system. a) A number displayed without flashing -- No new messages. The number is the total number of old messages. b) A flashing number displayed -- There are new messages. The number is the total number of old and new messages.
Messages Playback The message counter lets you know when you have message(s) or new message(s). To play the messages, press the play/stop button. While a message is playing, you may do the following: • Press the play/stop button to stop the message playback. • Press and release the REVIEW button to restart the current message. • Press and release the REVIEW button twice to go to the previous message. • Press and release the skip button to go to the next message.
Answering System Remote Access You can access your answering system from any touch-tone phone by entering your 3-digit security code during the playing of outgoing announcement or after you hear the outgoing announcement. 1. Dial the telephone number to which the answering system is connected. 2. Enter the security code during the outgoing announcement or after you hear the tone. 3. Follow the voice menu to use the answering system ’s remote functions.
Memory Full When answering system memory is full, the system answers after 10 rings, announces “Memory full” and waits for you to enter 3-digit security code. If you don’t enter the security code within 7 seconds, the phone hangs up. You should erase some messages so the answering system can record new messages. NOTE: The unit also answers after the 10th ring if it is turned off. To access the answering system, enter your 3digit security code.
5. Put the battery compartment door back on. 6. Place handset in the base or handset charge cradle to charge. Allow the handset battery to properly charge (for 14 hours) prior to first use or when you install a new battery pack. If you do not properly charge the phone, battery performance will be compromised. Battery Safety Precautions • Do not burn, disassemble, mutilate, or puncture. Like other batteries of this type, toxic materials could be released which can cause injury.
Display Messages The following messages shows the status of the phone, provides Caller ID information, or helps you set up and use your phone. BLOCKED Indicates the person is calling from a number which is blocked from transmission. DELETE ALL? Prompt asking if you want to erase all records. DELETE? Prompt asking if you want to erase the current record. END OF LIST Indicates that it is the end of the list. ENTER NAME Prompt telling you to enter a name.
Page from base Someone pressed the PAGE button on the base. RPT Indicates a repeat call message. Indicates a new call from the same number was received more than once. Unknown Indicates incoming call is from an area not serviced by CID or the CID information was not sent.
Troubleshooting Guide Telephone Solutions No dial tone • Check or repeat installation steps: Make sure the base power cord is connected to a working electrical outlet. Make sure the telephone line cord is connected to the base and the wall jack. • Connect another phone to the same jack. If it doesn’t work, the problem might be your wiring or local service. • The handset may be out of range of the base. Move closer to the base. • Make sure the battery is properly charged (for 14 hours).
You experience static, noise, or fading in and out • The handset may be out of range of the base. Move closer to base. • Make sure base is not plugged into an electrical outlet with another household appliance. If necessary, relocate the base. • Charge the battery (for 14 hours). Memory dialing doesn’t work • Did you follow proper dialing sequence? Unit locks up and no communication between the base and cordless handset • Unplug the power adaptor from the electrical outlet and the bottom of the base.
Caller ID Solutions No Display • Charge the battery (for 14 hours). Or replace the battery. • Make sure the unit is connected to a non-switched electrical outlet. Disconnect the power adaptor from the base and reconnect it. No Caller ID • You must be subscribed to the standard Name/Number Caller ID service from your local telephone company to receive CID information.
General Product Care To keep your unit working and looking good, follow these guidelines: • Avoid dropping the handset, as well as other rough treatment to the phone. • Clean the phone with a soft cloth. • Never use strong cleaning agents, paint thinner, abrasive powder, alcohol, or other chemical products to clean the unit. Doing so will damage the finish. • Retain the original packaging in case you need to ship the phone at a later date.
Warranty Thomson Digital Technologies Ltd., warrants to the purchaser or gift recipient that if any manufacturing defect becomes apparent in this product within 1 year from the original date of purchase, it will be replaced free of charge, including return transportation. This warranty does not include damage to the product resulting from accidents, misuse or leaking batteries. Should your product not perform properly during the warranty period, either: 1.
Accessory Information DESCRIPTION MODEL NO. Handset Replacement Battery 5-2734 AC Power adaptor 5-2757 DSL Filter 5-2802 To order, call the nearest distributor for your area; Ontario: (905) 624-8516 Manitoba: (204) 783-2088 British Columbia: (604) 438-8001 Quebec: (514) 352-9071 A shipping and handling fee will be charged upon ordering. It is required by law to collect appropriate sales tax for each individual state, country, and locality to which the merchandise is being sent.
Index A Accessory Information 53 Adding Phone Book Entries 38 Answer on/off 24 Answer System 24 Answering Calls 26 Answering System Operation 41 Answering System Remote Access 43 Answering System Setup 16 Area Code 21 Auto Standby 30 Auto Talk 20 B Base Layout 11 Base Station 13 Base Station Setup 21 Battery 50 Battery Safety Precautions 45 Before You Begin 7 C Call Timer 29 Call Waiting Caller ID 33 Caller ID (CID) 33 Caller ID Solutions 50 Causes of Poor Reception 51 Chain Dialing from Phone Book 40 Cha
Index Installation 9 Installing the Handset Battery 12 Installing the Phone 12 Intercom Operation 31 Interference Information 3 Introduction 7 L Language 18 Leaving a Memo 44 Licensing 4 M Making a Call 26 Memory Full 44 Message Indicator 41 Messages Playback 42 Mute 30 P Page 31 Parts Checklist • 27950 7 Parts Checklist • 27951 8 Phone Book 38 Programming Functions 17 Programming the Telephone 17 R Receiver Volume Control 31 Receiving CID Records 34 Recording the Outgoing Announcement 16 Redial 27 Regi
Model 27950/27951 00021470 (Rev. 0 CAN E/F) 07-34 Printed in China Thomson Digital Technologies Ltd. © 2007 Thomson Digital Technologies Ltd.
Modèle 27950/27951 DECT6.
Renseignements Importants AVIS: Ce produit est conforme aux spécifications techniques applicables d’Industrie Canada. Son fonctionnement est soumis aux deux conditions suivantes : (1) Cet appareil ne peut causer de l’interférence, et (2) Cet appareil doit accepter toute interférence, y compris l’interférence pouvant entraîner le fonctionnement non souhaitable de l’appareil.
Information sur le Réseau Téléphonique Si cet appareil provoque des dérangements sur la ligne et, par conséquent, sur le réseau téléphonique, la compagnie de téléphone signalera, s’il y a lieu, qu’elle doit temporairement interrompre le service. Si elle est dans l’impossibilité de le faire et que les circonstances dictent une telle mesure, la compagnie de téléphone peut immédiatement interrompre le service pendant un certain temps.
Licensing Sous license du brevet US 6,427,009. Compatibilité avec les Prothèses Auditives Ce téléphone est conforme aux normes FCC/Industrie Canada en matière de compatibilité avec les prothèses auditives. Énonce sur L’exposition au Rayonnement RF de la FCC Cet équipement est conforme aux limites d’exposition au rayonnement RF de la FCC établies pour un environnement non contrôlé.
Table des Matières Paramètres du Combiné. ......................... 18 Renseignements Importants. .............. 2 Repondeur................................................. 25 Renseignements sur L’interférence. ... 2 Fonctionnement du Telephone......... 27 Information sur le Réseau Attente Automatique............................... 32 Téléphonique. .......................... 3 Commande de Volume du Recepteur..... 33 Facteur D’équivalence de Sonnerie Enmudecedor. ...........................................
Téléphonique............................................. 42 Composition en Chaine a Partir de la Memoire. .................................................... 43 Modification d’un Dossier du Répertoire Téléphonique............................................. 41 Révision des Dossier du Répertoire Téléphonique............................................. 41 Suppression d’un Dossier du Répertoire Téléphonique............................................. 42 Programmation du Répondeur.........
Introduction ATTENTION : Vous devez respecter certaines règles de sécurité lorsque vous utilisez un appareil téléphonique. Reportez-vous aux INSTRUCTIONS IMPORTANTES DE SÉCURITÉ qui accompagnent ce produit et conservez-les pour référence ultérieure. IMPORTANT: Étant donné que les téléphones sans cordon fonctionnent à l’électricité, vous devriez disposer d’au moins un téléphone avec cordon dans la maison, en cas de panne de courant.
Liste de Pièces • 27951 Assurez-vous que la boîte contient les articles suivants: Base Combiné Bloc-pile de combiné Adaptateur CA Couvercle arrière du combiné Cordon téléphonique Exigences de la Prise Téléphonique Pour utiliser ce téléphone, vous devez disposer dans la maison d’une prise téléphonique modulaire de type RJ11C (CA11A), qui peut ressembler à celle illustrée ici. Si aucune prise modulaire n’est installée, en faire installer une par la compagnie de téléphone.
Installation Système de Sécurité Numérique Lorsque vous déposez le combiné sur la base, l’appareil vérifie son code de sécurité, qui empêche les fausses sonneries d’autres téléphones sans cordon. NOTE SUR L’INSTALLATION: Certains téléphones sans fil fonctionnent à des fréquences qui peuvent causer ou subir de l’interférence de téléviseurs, fours à micro-ondes et magnétoscopes situés à proximité.
• Ne jamais installer les câbles téléphoniques pendant un orage électrique. • Ne jamais installer de prises téléphoniques dans des endroits humides, à moins qu’elles soient spécialement conçue pour endroits humides. • Ne jamais toucher les fils ou bornes téléphoniques non isolés, à moins que la ligne téléphonique ait été débranchée de l’interface réseau. • Installer ou modifier les lignes téléphoniques avec soin.
Présentation de la Base Modèle 27950 Loquet du combiné Indicateur de compteur de messages charge/in use pour installation (indicador de carga/uso) sur un mur play/stop (bouton marche/arrêt du répondeur) rev (bouton réviser) skip (bouton évitement) ans on/off (bouton rep marche/arret) delete (bouton effacer) memo (bouton mémo) annc (bouton annonce) volume 5/6 (bouton volume 5/6) speaker (bouton haut-parleur) page (bouton localizador) page (bouton localizador) Modèle 27951 REVIEW (bouton réviser) haut-p
Installation du Téléphone Installation de la pile du combiné REMARQUE : Vous devez brancher la pile du combiné avant de l’utiliser. ATTENTION: Pour réduire le risque d’incendie ou de blessures, utilisez seulement la batterie approuvé par Thomson Inc. d’hydrure de Nickel-métal (Ni-MH) du model 5-2734, qui est compatible avec cette unité. 1. Repérez la pile qui est emballée dans un sac de plastique séparément du combiné. 2. Repérez le compartiment de la pile à l’arrière du combiné. 3.
Poste de Base 1. Choisissez un endroit près d’une prise de courant et d’une prise téléphonique murale (RJ11C) et placez le téléphone sans fil sur une surface plane, comme un bureau ou une table, ou fixez-le au mur. REMARQUE : Le modèle 27950 peut aussi être installé sur un mur. Modèle 27951 Modèle 27950 2. Branchez une extrémité du cordon téléphonique dans la prise TEL LINE situé sous la base et l’autre extrémité dans une prise murale modulaire. 3.
4. Vous pouvez déployer la béquille sous la base pour avoir un meilleur angle de vision lorsque l’appareil est sur un bureau. 5. Laissez le téléphone se charger pendant 14 heures avant l’utilisation initiale. Si vous ne chargez pas correctement le téléphone, le rendement de la pile sera compromis.
Montage au Mur 1. Sortez entièrement le loquet du combiné pour installation sur un mur et tournez-le de 180°. 2. Insérez le socle du combiné pour installation sur un mur dans la douille située sous la base. (pour retirer le socle pour installation sur un mur, renversez la base puis appuyez et gardez enfoncé le bouton situé sous la base et retirez le loquet en même temps. 3. Branchez l’adaptateur dans la prise de courant et le connecteur c.c. dans le accrocher à la base.
4. Branchez une extrémité du cordon téléphonique non spiralé dans la prise situé sous la base. 5. Faites courir le cordon dans le canal et branchez l’extrémité dans la prise modulaire. 6. Glissez les trous de montage (à l’arrière de la base) sur les tiges de la plaque murale et abaissez l’appareil en place (plaque murale non incluse.) Programmation du Repondeur Cette section indique comment programmer le répondeur pour recevoir les appels. Allumez le répondeur avant d’entreprendre la programmation.
Enregistrement du Message D’accueil Pour obtenir de meilleurs résultats lorsque vous enregistrez, placez-vous à environ neuf pouces du microphone et essayez le plus possible d’éliminer le bruit de fond. Vous pouvez enregistrer 2 messages d’accueil sur le répondeur ou sélectionner le message par défaut 1. Assurez-vous que le répondeur est à ACTIVÉ. 2. Appuyez et gardez enfoncé le bouton ANNOUNCE sur le socle jusqu’à ce que l’appareil émette le message “ENREGISTREZ LE MESSAGE D’ACCEUIL APRES LA TONALITE”. 3.
Fonctions de Programmation Le système utilise un menu structuré pour vous permettre d’avoir accès à toutes ses fonctionnalités. Vous pouvez programmer les caractéristiques suivantes à partir du menu principal: Intercom (Interphone), Setup HS (Config. combiné), Setup BS (Configurer BS), Date/Time (Date/Heure), Registration (Enregistrement) and Answer machine (Répondeur).
Langue Du Menu Setup HS (Config. combiné): 1. Appuyez sur le bouton CID/VOL (+ ou -) pour afficher Language (Langue). 2. Appuyez sur le bouton MENU pour ouvrir ce menu. 3. Utilisez le bouton CID/VOL (+ ou -) pour sélectionner English, Français o Espanol. Le paramètre par défaut est English. 4. Appuyez sur le bouton MENU pour enregistrer votre sélection. Volume de la Sonnerie Vous avez le choix entre quatre niveaux. Vous avez le choix entre Volume 1 à 3 et sonnerie désactivée. Du Menu Config. combiné: 1.
3. Utilisez le bouton CID/VOL (+ ou -) pour sélectionner l’élément que vous voulez programmer et appuyez sur le bouton MENU pour afficher le menu. Pile faible - Vous pouvez activer l’avertisseur sonore de pile faible pour vous rappeler que la pile doit être chargée. Utilisez le bouton CID/VOL (+ ou -) pour sélectionner On ou Off, appuyez ensuite sur le bouton MENU pour enregistrer la configuration. Le paramètre par défaut est Off.
2. Appuyez sur le bouton MENU pour ouvrir ce menu et utilisez le bouton CID/VOL (+ ou -) pour afficher votre sélection. Le paramètre par défaut est On. 3. Appuyez sur le bouton MENU pour enregistrer votre sélection. Nom du Combiné Du Menu Config. combiné: 1. Appuyez sur le bouton CID/VOL (+ ou -) pour afficher Nom du combiné. 2. Appuyez sur le bouton MENU pour ouvrir ce menu. Le paramètre par défaut Combiné. 3. Utilisez le clavier pour entrer un nom (jusqu’à 13 caractères).
Paramètres de Base 1. Assurez-vous que le téléphone est DÉSACTIVÉ (pas en mode conversation). 2. Appuyez sur le bouton MENU pour aller au menu principal. 3. Appuyez sur le bouton CID/VOL (+ ou -) pour afficher Configurer BS. 4. Appuyez sur le bouton MENU pour confirmer et pour programmer les paramètres suivants: Indic regional et Composition.
4. Appuyez sur le bouton MENU pour enregistrer votre sélection. Rétroéclairage de la Base Du Menu Configurer BS: 1. Appuyez sur le bouton CID/VOL (+ ou -) pour afficher Éclairage base. 2. Appuyez sur le bouton MENU pour ouvrir ce menu. 3. Utilisez le bouton CID/VOL (+ ou -) pour sélectionner on ou off. 4. Appuyez sur le bouton MENU pour enregistrer votre sélection. Date/Heure 1. Assurez-vous que le téléphone est DÉSACTIVÉ (pas en mode conversation). 2.
9. Appuyez sur le bouton MENU pour enregistrer la configuration. Mémorisé apparaît dans l’afficheur. REMARQUE : Si vous êtes abonnés au service d’identification de l’appelant, la date et l’heure courantes sont réglées automatiquement lorsque vous recevez les premières informations d’identification de l’appelant et remplacent la date et l’heure réglées manuellement. Enregistrement REMARQUE : Les procédures suivantes ne peuvent s’effectuer qu’avec les combinés supplémentaires 27950 et 27951.
3. Appuyez et tenez le bouton PAGE de la base pendant cinq secondes. 4. Le témoin charge/in use clignotera lentement pendant deux minutes, indiquant que la base est en mode d’enregistrement. 5. Si l’enregistrement réussit, le combiné affiche le message Réussi et émet une tonalité de confirmation pendant trois secondes. 6. Si l’enregistrement ne réussit pas (par dépassement du délai par exemple), le combiné affiche Pas de base et émet une tonalité d’erreur.
3. Appuyez sur le bouton CID/VOL (+ ou -) pour afficher Répondeur. 3. Appuyez sur le bouton MENU pour confirmer et pour programmer les paramètres suivants: Réponse on/off, Rép après sonn, Langue, and Code sécurité. Activation Et Désactivation du Répondeur Ce menu permet d’activer ou de désactiver le répondeur. Du Menu Répondeur: 1. Appuyez sur le bouton CID/VOL (+ ou -) pour afficher Réponse on/off. 2.
Sélection de La Langue du Message D’accueil Du Menu Répondeur: 1. Appuyez sur le bouton CID/VOL (+ ou -) pour afficher Langue. 2. Appuyez sur le bouton MENU pour ouvrir ce menu et utilisez le bouton 6 ou 5 pour choisir la langue désirée. 3. Appuyez sur le bouton MENU pour enregistrer votre sélection. REMARQUE : Si la langue de la voix du répondeur est modifiée, l’appareil utilise le message d’accueil par défaut pour cette langue.
Faire un Appel 1. Appuyer sur le bouton TALK/END et composez le numéro désiré. - OU Composez le numéro et appuyez sur le bouton TALK/END pour prévisualiser l’appel. 2. Pour raccrocher, appuyez sur le bouton TALK/END ou placez le combiné sur le poste de base. REMARQUE: si vous voulez supprimer le numéro en précomposition que vous avez saisi, appuyez sur le bouton MUTE/ringer on/off jusqu’à ce que tous les chiffres s’effacent. Repondre aux Appels 1.
Insertion D’une Pause dans la Sequence de Composition Appuyez sur le bouton #pause du clavier numérique du combiné pour insérer une pause dans la séquence de composition quand une pause est nécessaire pour attendre un signal de manœuvre (par exemple, après avoir fait le 9 pour obtenir une ligne extérieure ou pour attendre une tonalité d’accès à un ordinateur). La pause est affichée sous forme de la lettre P et chaque pause compte comme un chiffre dans la séquence de composition.
Modification d’un Numéro de Recomposition Avant de Composer 1. Assurez-vous que le téléphone est DÉSACTIVÉ (pas en mode conversation). 2. Appuyez d’abord sur le bouton redial et utilisez le bouton CID/ VOL (+ ou -) pour sélectionner le numéro à recomposer. 3. Appuyez sur le bouton MENU. 4. Appuyez sur le bouton CID/VOL (+ ou -) pour afficher Choisir. 5. Appuyez sur le bouton MENU pour passer en mode d’édition. 6. Appuyez sur le bouton (+ ou -) pour déplacer le curseur vers l’avant ou l’arrière.
7. Appuyez sur le bouton MENU pour sauvegarder. Mémorisé apparaît dans l’afficheur. Reprenez les étapes 2 à 7 pour mémoriser d’autres numéros. Effacement d’un Numéro de Recomposition 1. Assurez-vous que le téléphone est DÉSACTIVÉ (pas en mode conversation). 2. Appuyez d’abord sur le bouton redial et utilisez le bouton CID/ VOL (+ ou -) pour sélectionner le numéro à recomposer. 3. Appuyez sur le bouton MENU. 4. Appuyez sur le bouton CID/VOL (+ ou -) pour afficher Effacer?. 5.
REMARQUE: Appuyez sur le bouton FLASH/exit pour revenir au mode en attente sans effacer de numéros de recomposition. Minuterie D’appel Après que vous avez appuyé sur le bouton TALK/END du combiné, la minuterie d’appel intégrée apparaît dans l’afficheur et commence le décompte de la durée de l’appel en minutes et en secondes. Attente Automatique Si vous déposez le combiné sur le socle pendant que le combiné est décroché (pendant un appel), le combiné coupe automatiquement la communication.
Enmudecedor Utilisez la fonction SILENCIEUX pour converser en privé, hors ligne. La personne en ligne ne peut vous entendre, mais vous pouvez l’entendre. 1. Appuyez sur le bouton MUTE/ringer on/off. Le combiné affiche MUTE. 2. Appuyez sur le bouton MUTE/ringer on/off pour annuler et retourner à votre conversation téléphonique. Recherche La fonction de recherche aide à repérer un combiné égaré. 1. Appuyez sur le bouton PAGE de la base.
Interphone entre Deux Combinés 1. Assurez-vous que le combiné initiateur n’est PAS en fonction (pas en mode conversation). 2. Appuyez sur le bouton MENU et utilisez le bouton CID/VOL (+ ou -) pour afficher Interphone. 3. Appuyez sur le bouton MENU pour ouvrir ce menu. INT Numéro ? apparaît dans l’afficheur. 4. Utilisez le clavier pour saisir le numéro du combiné que vous voulez rechercher. (Exemple: appuyez sur 1 pour rechercher le combiné 1.) 5. Le combiné recherché est rejoint et émet une tonalité.
3. Losque vous avez terminé, appuyez sur le bouton TALK/END (ou replacez le combiné sur la base) et appuyez sur le bouton SPEAKER pour raccrocher. Remarque : Si le système comprend plus d’un combiné, seuls deux combinés et la base peuvent tenir une téléconférence. Lorsqu’un troisième combiné tente de joindre la conférence, le message Non disponible s’affichera et le combiné émettra des bips d’erreur.
Afficheur D’appel en Attente Dans la mesure où vous êtes abonné au service d’afficheur d’appel en attente offert par la compagnie de telephone; si vous recevez un appel d’arrivée et vous emplyez la GE fixez multi le système à la main, un signal sonore indique que la presence d’une attente d’appel invitent la ligne. L’information d’identification de visteur d’attente d’appel sera montrée et stocké dans l’histoire de tous les combines dans le système.
Composition d’un Numéro D’appelant À mesure que les appels sont reçus et mémorisés, l’afficheur est mis à jour pour vous indiquer le nombre d’appels reçus. Pour faire défiler les dossiers d’appelants: 1. Assurez-vous que le téléphone est DÉSACTIVÉ (pas en mode conversation). 2. Appuyez sur le bouton CID/VOL (+ ou -) pour réviser les appels plus anciens et défiler vers les plus récents. 3. Appuyez sur le bouton CID/VOL (+ ou -) pour réviser les appels plus récents et défiler vers les plus anciens.
1. Assurez-vous que le téléphone est DÉSACTIVÉ (pas en mode conversation). 2. Utilisez le bouton CID/VOL (+ ou -) pour atteindre le dossier d’appelant désiré. 3. Utilisez le bouton FORMAT pour aller au format désiré. 4. Appuyez sur le bouton TALK/END. Le numéro formaté est composé automatiquement. Formats disponibles: Nombre de chiffres Explication Exemple Onze chiffres code d’interurbain “1 ” 1-317-888-8888 + indicatif à 3 chiffres + numéro de téléphone à 7 chiffres.
4. Appuyez sur le bouton CID/VOL (+ ou -) pour afficher Numéro mémorisé. 5. Appuyez sur le bouton MENU pour passer en mode d’édition. Vous pouvez modifier le nom si désiré. Consultez la section Nom du Combiné pour la procédure de changement de nom. REMARQUE: Si le dossier ILA ne comprend pas de nom, le message Entrer nom s’affiche. 6. Appuyez sur le bouton MENU pour sauvegarder.
Suppression de Tous les Dossiers D’appelants 1. Assurez-vous que le téléphone est DÉSACTIVÉ (pas en mode conversation). 2. Utilisez le bouton CID/VOL (+ ou -) pour atteindre le dossier d’appelant désiré. 3. Appuyez sur le bouton MENU. 4. Appuyez sur le bouton CID/VOL (+ ou -) pour afficher Tout effacer? 5. Appuyez sur le bouton MENU. Confimer? apparaît dans l’afficheur. 6. Appuyez de nouveau sur le bouton MENU pour confirmer. Tout effacé apparaît dans l’afficheur.
6. Appuyez sur le bouton MENU. Entrar Nombre apparaît dans l’afficheur. Consultez la section Nom du Combiné pour la procédure de changement de nom. 7. Appuyez sur le bouton MENU pour sauvegarder. Si le message Mémoire pleine est affiché et si l’appareil émet trois bips, vous devriez effacer un ou plusieurs dossiers moins utiles et reprendre les étapes ci-dessus pour continuer à mémoriser des numéros. Révision des Dossier du Répertoire Téléphonique 1.
4. Appuyez sur le bouton MENU pour pouvoir modifier le nom. Vous pouvez modifier le nombre si désiré. Consultez la section Nom du Combiné pour la procédure de changement de nom. 5. Appuyez sur le bouton MENU pour sauvegarder. REMARQUE: Appuyez une fois sur le bouton FLASH/exit pour conserver les paramètres précédents (sans modification) et retourner en mode attente. Suppression d’un Dossier du Répertoire Téléphonique 1.
2. Appuyez sur le bouton ph. book pour aller à l’annuaire téléphonique. 3. Utilisez le bouton CID/VOL (+ ou -) ou le clavier pour aller au dossier désiré. 4. Appuyez sur le bouton MENU pour composer le numéro. - OUComposition d’un dossier du répertoire pendant sa révision: 1. Assurez-vous que le téléphone est DÉSACTIVÉ (pas en mode conversation). 2. Appuyez sur le bouton ph. book pour aller à l’annuaire téléphonique. 3. Utilisez le bouton CID/VOL (+ ou -) ou le clavier pour aller au dossier désiré. 4.
Vous pouvez mémoriser chacune des parties d’une séquence (comme le numéro d’accès à l’interurbain, un code d’autorisation et un numéro d’interurbain que vous appelez souvent) dans le répertoire et reprendre les étapes 2 à 4 de la section Composition d’un dossier du répertoire en mode de conversation pour les composer une à une. Programmation du Répondeur Cette section traite des boutons et des fonctions du répondeur.
j) Ar clignote sur l’affichage -- le message d’accueil est en cours d’enregistrement ou de lecture. REMARQUE: Lors de l’écoute des messages, le compteur de messages affiche les messages dans l’ordre de leur réception. REMARQUE : le temps maximum alloué à chacun des messages est de 2 minutes. Reproducción de Mensajes Le compteur de messages vous avertissent si vous avez des messages ou de nouveaux messages. Pour écouter les messages, appuyez sur le bouton PLAY/STOP.
Pour effacer tous les messages écoutés d’une boîte vocale : 1. Assurez-vous que le téléphone est DÉSACTIVÉ (pas en mode conversation). 2. Appuyez et tenez le bouton DELETE jusqu’à ce que le message Tous les ancient messages sont effacé s’affiche. Accès à Distance du Répondeur Vous pouvez accéder au répondeur à partir de tout appareil à tonalité en entrant votre code de sécurité de 3 chiffres pendant l’écoute du message d’accueil ou à la suite de ce message. 1.
Mémoire Pleine Lorsque la mémoire du répondeur est pleine, le système répond après dix sonneries, affiche memoires est remplis et attend que vous saisissiez le code de sécurité à trois chiffres. Si un code de sécurité n’est pas entré dans les 7 secondes, le téléphone raccroche. Effacez quelques messages pour que le répondeur puisse enregistrer les nouveaux messages. REMARQUE: L’appareil répond aussi après 10 sonneries s’il est éteint. Pour accéder au répondeur, entrez votre code de sécurité à 3 chiffres.
4. Insérez le nouveau bloc-pile et branchez le cordon dans la prise à l’intérieur du logement à pile. 5. Remettez la porte du logement à pile en place. 6. Placez le combiné sur la base pour charger. Laissez la pile du combiné se charger correctement (pendant 14 heures) avant l’utilisation initiale ou quand vous installez un bloc-pile neuf. Si vous ne chargez pas correctement le téléphone, le rendement de la pile sera compromis. Précautions à Prendre • Ne pas brûler, démonter, mutiler ni percer la pile.
Messages Affichés Les messages suivants indiquent l’état du téléphone, fournissent l’information d’appelant ou vous aident à programmer et à utiliser votre téléphone. BLOQUE La transmission du nom et du numéro de l’appelant est bloquée. Demande si vous souhaitez effacer EFFACER TOUT? tous les dossiers. Message demandant si vous voulez EFFACER? effacer le dossier courant . Indique que vous avez atteint la fin de FIN DE LISTE la liste. ENTRER NOM Message indiquant d’entrer un nom.
REPT APPEL INCONNU/ NOM INCONNU/ NUMERO INCONNU Indique un appel répété. Indique qu’un nouvel appel du même numéro a été reçu plus d’une fois. L’appel provient d’une région non desservie par le service d’afficheur ou l’information n’a pas été envoyée.
La tonalité de composition est bonne, mais je ne peux faire un appel • Vérifiez que le type de service téléphonique auquel vous êtes abonné est à tonalité ou à impulsion et que le réglage du mode de composition de l’appareil y correspond. (Consultez la section Mode de composition sous Paramètres de Base pour la configuration.) Le combiné ne sonne pas • Assurez-vous que l’interrupteur de sonnerie du combiné est activé. • Sinon, il faut peut-être charger la pile. Rapprochez-vous de la base.
L’appareil bloque et aucune communication entre la base et le combiné sans cordon • Débranchez l’alimentation de la prise de courant et à l’arrière de la base. Retirez la pile du combiné. Attendez 30 secondes et rebranchez l’alimentation dans la base et la prise murale. Rebranchez la pile et chargez-la pendant 14 heures. Le combiné affiche "RECHERCHE..." • Rapprochez-vous de la base.
Solutions- Pile Si vous éprouvez l’un ou l’autre des problèmes suivants, même après avoir rechargé complètement la pile, vous devrez peut-être remplacer la pile. • Courte période de conversation • Mauvaise qualité du son • Portée limitée Causes de Mauvaise Réception • Parements en aluminium. • Endos métallique d’isolation. • Conduites de chauffage et autre construction métallique pouvant bloquer les signaux radio. • Trop près d’appareils comme un four micro-ondes, une cuisinière, un ordinateur, etc.
Soins et Entretien Voici quelques conseils simples pour préserver le bon fonctionnement et l’apparence de ce téléphon: • Éviter d’échapper le combiné et de l’utiliser abusivement. • Nettoyer le téléphone avec un chiffon doux. (Ne pas oublier de débrancher d’abord le téléphone de la prise murale.) • N’utilisez jamais d’agents de nettoyage, de diluants à peinture, de poudre abrasive, d’alcool ni autres produits chimiques pour nettoyer l’appareil. Vous endommageriez ainsi le fini.
Garantie Thomson Digital Technologies Ltd., garantit à l’acheteur de cet appareil ou à la personne qui le recevrait en cadeau, que si cet appareil présente un défaut de fabrication pendant l’année suivant la date d’achat, il sera remplacé sans frais. Les frais de transport de retour sont payés. Cette garantie ne couvre pas les dommages attribuables aux accidents, à une mauvaise utilisation ni à des piles qui fuient. Si cet appareil ne fonctionne pas convenablement pendant qu’il est sous garantie: 1.
Index A Accès à Distance du Répondeur 46 Afficheur (CID) 35 Afficheur D’appel en Attente 36 Ajout de Dossiers dans le Répertoire 40 Attente Automatique 32 Avant de Commencer 7 C Causes de Mauvaise Réception 53 Code de Sécurité 27 Commande de Volume du Recepteur 33 Compatibilité avec les Prothèses Auditives 4 Composition d’un Dossier du Répertoire Téléphonique 42 Composition d’un Numéro D’appelant 37 Composition d’un Numéro D’appelant Avant de Composer 37 Composition en Chaine a Partir de la Memoire 43 Compt
Index L L’indicateur Charge/In Use sur la Base 27 Laisser une Note 47 Licensing 4 Liste de Pièces • 27950 7 Liste de Pièces • 27951 8 M Marcar un Número del Identificador de Llamadas 37 Mémoire Pleine 47 Memorisation de Dossiers D’appelants (Dans la Memoire de L’afficheur) 36 Mémorisation des Dossiers D’identification des Appelants Dans le Répertoire 38 Messages Affichés 49 Minuterie D’appel 32 Modification d’un Dossier du Répertoire Téléphonique 41 Montage au Mur 15 P Paramètres de Base 22 Paramètres du Co
Information pour Accessoires DESCRIPCIÓN NÚMERO DE CATÁLOGO Pile de remplacement pour combiné 5-2734 Adaptateur CA. 5-2757 Filtre DSL 5-2802 Pour commande, appelez le distributeur le plus proche pour votre secteur; Ontario: (905) 624-8516 Manitoba: (204) 783-2088 British Columbia: (604) 438-8001 Quebec: (514) 352-9071 Des frais d’expédition et de manutention seront ajoutés au montant de la commande.
Modèle 27950/27951 00021470 (Rév. 0 Can E/F) 07-34 Imprimé en Chine Thomson Digital Technologies Ltd. © 2007 Thomson Digital Technologies Ltd.