27958 2.4GHz Speakerphone and Answering System with Cordless Handset and Call Waiting Caller ID User’s Guide 1 We bring good things to life.
IMPORTANT INFORMATION NOTICE: This product meets the applicable Industry Canada technical specifications. The equipment must be installed using an acceptable method of connection. The customer should be aware that compliance with the above conditions may not prevent degradation of service in some situations. Repairs to certified equipment should be made by an authorized Canadian maintenance facility designated by the supplier.
TABLE OF CONTENTS IMPORTANT INFORMATION ....................... 2 INTERFERENCE INFORMATION ................... 2 HEARING AID COMPATIBILITY (HAC) ........ 2 INTRODUCTION ..................................... 5 HANDSET AND CHARGE CRADLE LAYOUT .. 7 BASE LAYOUT ...................................... 7 BEFORE YOU BEGIN .............................. 8 PARTS CHECKLIST ............................. 8 TELEPHONE JACK REQUIREMENTS ........ 8 IMPORTANT INSTALLATION INFORMATION ....
TABLE OF CONTENTS SPEAKERPHONE OPERATION .............. 21 RECEIVING A CALL WITH SPEAKERPHONE .................... 21 MAKING A CALL WITH SPEAKERPHONE .................... 21 SWITCHING BETWEEN SPEAKERPHONE AND HANDSET 22 INTERCOM OPERATION ..................... 22 MAKING AN INTERCOM CALL ..... 22 ANSWERING AN INTERCOM CALL 22 RECEIVING AN INCOMING TELEPHONE CALL DURING AN INTERCOM CALL .............. 22 USING INTERCOM WITH A TELEPHONE CALL ................. 23 TWO-WAY INTERCOM CALLS ...
INTRODUCTION CAUTION: When using telephone equipment, there are basic safety instructions that should always be followed. Refer to the IMPORTANT SAFETY INSTRUCTIONS provided with this product and save them for future reference. Congratulations on purchasing this GE telephone/answering system. This system operates in the 2.4GHz/900MHz frequency range, and is unique to conventional cordless telephones. When the base is connected to electrical power and a telephone line, it can support a cordless handset.
IMPORTANT: In order to use all of the features of this telephone, you must subscribe to two separate services available from your local telephone company: the standard Name/Number Caller ID Service to know who is calling when the phone rings and Caller ID with Call Waiting Service to know who is calling while you are on the phone. INSTALLATION NOTE: Some cordless telephones operate at frequencies that may cause or receive interference with TVs, microwave ovens, and VCRs.
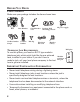
HANDSET AND CHARGE CRADLE LAYOUT Display cid/vol (caller ID/volume button) answerer/format (button) TALK/callback (button) redial (button) review (button) charge cradle with power supply play/stop (button) erase (button) skip (button) *TONE/cancel (button) chan/delete (button) flash/program (button) mem/conferenec (button) BASE LAYOUT charge indicator intercom (button) ringer (switch) FORMAT (button) ANSWERER ON/OFF (button) ANNOUNCE (button) new message display (indicator) memo (button) PLAY/
BEFORE YOU BEGIN PARTS CHECKLIST Make sure your package includes the items shown here. Base Base Handset Coiled handset cord Desktop/Wall Mounting pedestal AC power supply GE CHAR Cordless handset charger Cordless handset Belt clip Telephone line cord Handset battery TELEPHONE JACK REQUIREMENTS To use this phone, you need an RJ11C type modular telephone jack, which might look like the one pictured here, installed in your home.
IMPORTANT INSTALLATION GUIDELINES • Install telephone near both a telephone (modular) jack and an electrical power outlet. • Avoid sources of noise, such as a window by a busy street, and electrical noise, such as motors, microwave ovens, and fluorescent lighting. • Avoid heat sources, such as heating air ducts, heating appliances, radiators, and direct sunlight. • Avoid areas of excessive moisture or extremely low temperature. • Avoid dusty locations.
CAUTION: Use only the ATLINKS USA, Inc. 5-2596 (black) and 5-2625 (gray color adapter for white unit) power supply that came with this unit. Using other power supplies may damage the unit. 2. Plug the handset charge cradle into an electrical outlet. NOTE: The charge indicator on the handset charge cradle turns on to indicate the handset battery is charging Allow the handset to charge for 12 hours prior to first use. If you don't properly charge the system, battery performance is compromised.
4. Plug the telephone line cord into the jack marked PHONE LINE on the back of the base and the other end into a modular phone jack. 5. Feed the telephone line cord and power supply cord through the grooves on the pedestal to allow the unit to rest flat against the wall. 6. Slip the mounting holes on the pedestal over the wall plate posts and firmly slide the unit into place. (Wall plate not included.) 7. Remove the handset hook, turn it upside down, and put it back in the slot.
1. Press the FLASH/PROGRAM button until SET CONTRAST shows in the display. “1” is the default setting. 2. Press 1, 2 or 3 on the base touch-tone pad to enter your selection, or use the MESSAGES/CID ( or ) button on the base to scroll to your selection. 3. Press FLASH/PROGRAM again to store your selection. NOTE: You can press FLASH/PROGRAM at any time to go to the next option. RINGS TO ANSWER NOTE: This setting may only be made with the base.
2. Use the touch-tone pad to enter your new 3-digit security code. For example, press the 6, 2, and 8 number keys for security code 628. The default security code is 123. NOTE: If you want to re-enter the security code, enter the numbers again and press the FLASH/PROGRAM button. The new numbers replace the old numbers. 3. Press FLASH/PROGRAM again to store your selection. You will hear a confirmation tone, and the new security code shows in the display.
TONE/PULSE NOTE: This setting may only be made with the base. Most telephone systems use tone dialing, however, some may still use pulse dialing. Depending on your telephone system, set the dialing mode as follows: 1. Press the FLASH/PROGRAM button until SET TONE/PULSE shows on the display. The default setting is TONE. 2. Use the touch-tone pad to select 1TONE or 2 PULSE, or press the MESSAGES/CID ( or ) button to scroll to 1TONE or 2 PULSE. 3. Press FLASH/PROGRAM again to store your selection.
6. Press FLASH/PROGRAM again to store your selection. LOCAL AREA CODE NOTE: This setting may be made with the base or the cordless handset. 1. Press the FLASH/PROGRAM button until SET AREA CODE - - - or AREA CODE - - - shows in the display. - - - is the default setting. 2. Use the cordless handset or base number pad to enter your three digit area code. 3. Press FLASH/PROGRAM again to store your selection. NOTE: You can press FLASH/PROGRAM at any time to go to the next option.
2. Press 1 or 2 on the cordless handset or base touch-tone pad or use the MESSAGES/CID ( or ) button on the base or the cid/vol ( or ) button on the handset to scroll to 1YES or 2NO. NOTE: If you choose “YES ” all settings in the programmable menu return to factory defaults except day and time. 3. Press FLASH/PROGRAM again to store your selection. BASIC OPERATION ANSWERING A CALL Check the display to see who is calling. CORDLESS HANDSET 1. Press the TALK/callback button on the handset. 2.
CORDED HANDSET 1. Lift the handset and wait for a dial tone. Dial the desired number. -Or2. Dial the number, then lift the handset. 3. When finish, put the handset back on the cradle to hang up. SPEAKERPHONE 1. Press the SPEAKER/CALLBACK button. 2. Wait for a dial tone, then dial the desired number. Or, dial the number and then press the SPEAKER/CALLBACK button. 3. When finished, press SPEAKER/CALLBACK to hang up.
BASE UNIT The base ringer volume is set through the programming menu. Refer to Telephone Set Up for more information. FLASH Use the FLASH/PROGRAM buttons on the base and cordless handset to activate custom calling services such as call waiting or call transfer, which are available through your local phone company. TIP: Don’t use the TALK/callback (handset) or SPEAKER/CALLBACK (base) button to activate custom calling service such as call waiting, or you’ll hang up the phone.
If you get a busy signal, and want to keep dialing the number, press the redial button to quickly redial the number again. HOLD Press the HOLD button on the base to put a call on hold. The hold indicator light turns on. To take a call off hold, press the HOLD button again, and the hold indicator light turns off. • To switch a call on hold from the base to the cordless handset, press TALK/callback on the cordless handset.
when you call your bank you may need to enter your account number. Using the temporary tone allows you to temporarily make your phone touch tone compatible. 1. Dial the telephone number and wait for the line to connect. 2. When your call is answered, press the *TONE button on your cordless handset or base number pad to temporarily change from pulse dialing to tone dialing. 3. Follow the automated instructions to get the information you need. 4.
SPEAKERPHONE OPERATION For best speakerphone performance, avoid the following: • Areas with high background noise. (The microphone might pick up these sounds.) • Surfaces affected by vibration. • Recessed areas such as in a corner, under a cupboard, or next to a cabinet, which can generate an echo effect. Note the following guidelines when using the speakerphone. • Stay reasonably close to the phone so that you can be clearly heard by the person to whom you are speaking.
SWITCHING BETWEEN SPEAKERPHONE AND HANDSET You can switch between speakerphone and handset after dialing a number, or any time during a conversation. Speaker to Handset — Press TALK/callback on handset, and then press SPEAKER/CALLBACK on the base or lift the corded handset. Speak into the handset. Corded/Cordless Handset to Speaker — Press SPEAKER/CALLBACK, then hang up the handset. Speak into the Speakerphone.
Base - Speakerphone rings. To take the call, press the SPEAKER/CALLBACK button or lift the corded handset. USING INTERCOM WITH A TELEPHONE CALL During a telephone call, you can use the intercom/paging function to page the base or cordless handset and set up a private (2-way) intercom conversation with another user while the telephone call is placed on hold. Or, you can create a 3-way conversation between the telephone caller, the base, and the cordless handset. TWO-WAY INTERCOM CALLS 1.
NOTE: A handset or the base may enter a conversation directly by pressing the TALK/callback button on the handset or the SPEAKER/CALLBACK button on the base while the other handset or the base is engaged with an external call. MEMORY The cordless handset and base each have their own separate memory storage areas. Store ten 15-character names and 24-digit telephone numbers in the handset memory, ten 15-character names and 24-digit telephone numbers in the base memory.
NOTE: If you make a mistake, press the DELETE button on the base or chan/ delete on the handset to backspace and erase the wrong character(s) or number(s). 6. Use the touch-tone pad to enter the area code followed by the telephone number (up to 24 digits, including pauses) and press the memory button again to save your selection. The unit beeps to confirm. 7. To enter another name and number in a different memory location, return to step 1 and repeat the process. STORING A REDIAL NUMBER 1.
To Change: Follow the steps under Storing a Name and Number in Memory except replace the stored name or number with the new information. To Delete: Press MEMORY/CONFERENCE (base) or mem/conference (cordless handset) button, then press the MESSAGES/CID ( or ) button (base) or the cid/vol ( or ) button (cordless handset) to scroll to a desired memory. 1. While the entry displays, press DELETE (base) or chan/delete (cordless handset) button to mark the entry for deletion. The display shows DELETE? 2.
-Or1. Make sure the phone is OFF (not in talk mode). 2. Press the MEMORY/CONFERENCE button. 3. Press the desired memory location button (0-9), or use the MESSAGES/ CID ( or ) button to scroll to the desired telephone number. 4. Press the SPEAKER/CALLBACK button. The number dials automatically. CHAIN DIALING FROM MEMORY Use this feature to make calls that require a sequence of numbers, such as a frequently used long distance card number.
CALLER ID (CID) Caller ID (CID) is a service available from your local telephone company. For Caller ID to work on this system, you must subscribe to Caller ID service. To receive Caller ID information for a Call Waiting call, you must subscribe to the combined Call Waiting Caller ID service. This telephone system receives and displays CID information transmitted by your local telephone company. This information can include the phone number, date and time; or the name, phone number, and date and time.
• Press the MESSAGES/CID up arrow ( )button (base) or the cid/vol up arrow ( ) button (cordless handset) to review the oldest call records and scroll to newer records. When you reach the newest call, the display shows END OF LIST. • Press the MESSAGES/CID down arrow ( )button (base) or the cid/vol down arrow ( ) button (cordless handset) to review new call records and scroll to older call records. When you reach the oldest record, the display shows END OF LIST.
DIALING A CALLER ID NUMBER When reviewing any call record in the Caller ID memory, you can dial back the caller’s number. 1. Make sure the phone is OFF (not in talk mode). 2. Press MESSAGES/CID ( or ) button (base) or cid/vol ( or ) button (cordless handset) until the desired call record is displayed.
NOTES: If you find it necessary to dial all local calls with the area codes included press and hold flash/program until SET AREA CODE appears, then enter 000. If the number is corrupted, such as a number in a name or an alphabetical character in a number, an error tone comes from the handset and the number won't dial. DELETING THE CURRENT CALLER ID RECORD To delete only the record in the display: 1.
CALL WAITING CALLER ID Provided you subscribe to Caller ID with Call Waiting service from your phone company, you may see who is calling when you hear the call waiting tone in the receiver. The CID information appears in the display after you hear the tone. Press FLASH/PROGRAM to put the current call on hold and answer the incoming call. Press FLASH/PROGRAM again when you want to return to the first call.
2. Press and hold the ANNOUNCE button on the base while you record the announcement. 3. Begin speaking after you hear the beep. 4. Release the button after you finish your announcement. If you choose not to record an outgoing announcement, the default announcement plays. To return to the default announcement after you have recorded your personal announcement, press and release the ANNOUNCE button on the base when you hear the beep.
• Press the PLAY/STOP button to stop the message playback. • Press and release the MESSAGES/CID ( ) button to restart the current message; continue to press and release the MESSAGES/CID ( ) button to go to previous messages. • Press and release the MESSAGES/CID ( ) button to go to the next message. • Press the PLAY/STOP button to stop message playback. MEMORY FULL When the memory is full, the system answers after 10 rings. You should erase some messages so the answering system can record new messages.
2. Begin speaking after you hear the beep. 3. Release the MEMO button after you are finished. REMOTE ACCESS This section explains two types of remote access: using the cordless handset to access the answering system and accessing the answering system from another phone. You may access the answering system on the base with the handset buttons. You may also access your answering system from any touch-tone phone by entering a 3-digit security code after you hear the outgoing announcement.
When the answering system picks up: 1. Press the answerer/format button on the cordless handset to access the answering system. 2. Listen as the caller leaves a message. 3. Press the TALK/callback button to speak to the caller, or press the answer/format button to stop screening the call. MEMORY FULL When the answering system’s memory is full, the system answers after 10 rings, beeps, and waits for you to enter the 3-digit security code.
Skip message Turn off/on answering system Review voice menu options 3 4 7 The base LCD shows REMOTE ACCESS ANSWERING CALL. TIP: You can bypass the outgoing announcement by pressing any numbered key on the touch-tone pad while the announcement is playing. Then, you can enter your security code to access the answering system. CHANGING THE SECURITY CODE The default security code for accessing the answering system from another location is 1 2 3. The security code is set through the programming menu.
BATTERY SAFETY PRECAUTIONS • Do not burn, disassemble, mutilate, or puncture. Like other batteries of this type, toxic materials could be released which can cause injury. • Keep batteries out of the reach of children. • Remove batteries if storing over 30 days. CAUTION: To reduce the risk of fire or personal injury, use only the battery listed in the instruction book.
DISPLAY MESSAGES The following indicators show the status of a message or of the unit. ERROR Caller information has been interrupted during transmission or the phone line is excessively noisy. ENTER NAME Prompt telling you to enter the name in one of the 10 memory locations. DELETE ALL? Prompt asking if you want to erase all Caller ID records. DELETE CALL ID? Prompt asking if you want to erase the current Caller ID record that is shown on the display.
REPT Repeat call message. Indicates that a new call from the same number was received more than once. NO DATA No Caller ID information was received. WAITING HANDSET REGISTRATION Prompt telling you to enter registration mode of handset NO BATTERY No battery is installed in the handset or the battery is not properly connected to the battery jack inside the battery compartment.
• Did the handset beep when you pressed the TALK/callback button? The battery may need to be charged. • Place handset in charge cradle for at least 20 seconds. Dial tone is OK, but can’t dial out • Make sure the TONE/PULSE setting on the base is set to the type of phone service you are subscribed to. Handset/Base does not ring • Make sure the handset ringer switch is turned on and the base ringer is programmed to HI. • The cordless handset may be out of range. Move closer to the base.
Memory Dialing doesn't work • Did you program the memory location keys correctly? • Did you follow proper dialing sequence? Unit locks up and no communication between the base and cordless handset • Unplug the AC power supply from the wall outlet and the back of the base. Remove the handset battery. Wait for 30 seconds and plug the power supply back into the base and wall outlet. Reconnect the battery and charge for 12 hours.
GENERAL PRODUCT CARE To keep your unit working and looking good, follow these guidelines: • Avoid putting the phone near heating appliances and devices that generate electrical noise (for example, motors or fluorescent lamps). • DO NOT expose to direct sunlight or moisture. • Avoid dropping the handset, as well as other rough treatment to the phone. • Clean the phone with a soft cloth. • Never use a strong cleaning agent or abrasive powder because this will damage the finish.
TELEPHONE NETWORK INFORMATION Should your equipment cause trouble on your line which may harm the telephone network, the telephone company, where practicable, may notify you that temporary discontinuance of service may be required. Where prior notice is not practicable and the circumstances warrant such action, the telephone company may temporarily discontinue service immediately.
INDEX A Cordless Handset 16, 18, 20 Accessing the Answering System from Another Location 36 Accessory Order Form 44 Answering a Call 16 Answering an Intercom Call 22 Answering System 20 Answering System Indicator 35 Answering System Operation 32 Answering System Set Up 32 Auto Standby 17 D B Erasing Messages 34 Base Layout 7 Base Speakerphone 16, 18 Base Unit 18 Basic Operation 16 Battery Safety Precautions 38 Battery Solutions 42 Before You Begin 8 F C Call Timer 17 Call Waiting Caller ID 32 Caller
L S Language 11 Last Number Redial 18 Leaving a Memo 34 Local Area Code 15 Screening Calls from the Base 33 Screening Calls from the Handset 35 Security Code 12 Service 47 Setting Day/Time 14 Speakerphone 17, 20 Speakerphone Operation 21 Storing a Name/Number in Memory 24 Storing a Redial Number 25 Switching Between Speakerphone and Handset 22 M Making a Call 16 Making a Call with Speakerphone 21 Making an Intercom Call 22 Manual Channel Selection 17 Memory 24 Memory Full 34, 36 Message Playback from Ba
SERVICE ATLINKS Communications Canada, Inc., warrants to the purchaser or gift recipient that if any manufacturing defect becomes apparent in this product within 1 year from the original date of purchase, it will be replaced free of charge, including return transportation. This warranty does not include damage to the product resulting from accidents, misuse or leaking batteries. Should your product not perform properly during the warranty period, either: 1.
Model 27958B 55911630 (Rev. 1 E/F) 04-49 Printed in China ATLINKS Communications Canada Inc. © 2004 ATLINKS Communications Canada, Inc.
27958 Téléphone Mains Libres de 2,4 GHz et Répondeur à Combiné sans Cordon et Afficheur D’appel en Attente Guide de l'utilisateur 1 Les bonnes choses de la vie.
RENSEIGNEMENTS IMPORTANTS AVIS: Ce produit est conforme aux spécifications techniques applicables d’Industrie Canada. Avant d’installer cet appareil, l’utilisateur doit vérifier s’il est permis de le raccorder aux installations de la compagnie locale de télécommunications. L’installation doit de plus respecter les méthodes de raccordement approuvées. L’abonné doit savoir que le respect des conditions mentionnées ci-dessus n’empêche pas nécessairement la détérioration du service dans certaines situations.
TABLE DES MATIÈRES RENSEIGNEMENTS IMPORTANTS ....................... 2 RENSEIGNEMENTS SUR L’INTERFÉRENCE ........... 2 COMPATIBILITÉ AVEC LES PROTHÈSES AUDITIVES (CPA) ................................................ 2 INTRODUCTION ............................................. 5 PRÉSENTATION DU SOCLE DE CHARGEMENT ET DU COMBINÉ ............................................ 7 PRÉSENTATION DE LA BASE ............................ 7 AVANT DE COMMENCER ................................. 8 LISTE DE PIÈCES .........
TABLE DES MATIÈRES FONCTIONNEMENT DU HAUT-PARLEUR ........ 20 RECEVOIR UN APPEL AU HAUT-PARLEUR21 FAIRE UN APPEL AU HAUT-PARLEUR .. 21 COMMUTATION ENTRE LE HAUT-PARLEUR ET LE COMBINÉ .......................... 21 FONCTIONNEMENT DE L’INTERPHONE ........... 21 FAIRE UN APPEL D’INTERPHONE ........ 22 RÉPONDRE À UN APPEL D’INTERPHONE 22 RECEVOIR UN APPEL PENDANT UN APPEL D’INTERPHONE ........................... 22 UTILISATION DE L’INTERPHONE PENDANT UN APPEL TÉLÉPHONIQUE .............
INTRODUCTION ATTENTION : Vous devez respecter certaines règles de sécurité lorsque vous utilisez un appareil téléphonique. Reportez-vous aux INSTRUCTIONS IMPORTANTES DE SÉCURITÉ qui accompagnent ce produit et conservez-les pour référence ultérieure. Nous vous félicitons d’avoir acheté ce téléphone/système de messagerie GE. Ce système, qui fonctionne dans l’échelle de fréquences de 2,4GHz/900MHz, est unique par rapport aux téléphones sans cordon conventionnels.
IMPORTANT: Pour utiliser toutes les fonctions de ce téléphone, vous devez être abonné à deux services distincts offerts par la compagnie de téléphone : le service d’afficheur de nom/numéro standard pour savoir qui appelle quand le téléphone sonne, et le service d’afficheur d’appel en attente pour savoir qui appelle pendant que vous parlez au téléphone.
PRÉSENTATION DU SOCLE DE CHARGEMENT ET DU COMBINÉ Afficheur TALK/callback (bouton parlow/ rappeler) cid/vol (bouton ID appelant/volume) Socle de chargement à alimentation redial (bouton recomposition) answerer/format review (bouton révision) PLAY/STOP (bouton écoute/arrêt) erase (bouton d’effacement) skip (bouton d’évitement) cancel (bouton) #PAUSE (bouton) GE CHAR chan/delete (bouton chan/ supprimer) conference/mem (bouton conférence/ mémoire) flash/program (bouton) ringer (sélecteur sonnerie)
AVANT DE COMMENCER LISTE DE PIÈCES Assurez-vous que la boîte contient les articles suivants: Base Combiné de base Cordon spiralé de combiné Alimentation c.a.
IMPORTANTES LIGNES DIRECTRICES SUR L’INSTALLATION • Installez le téléphone près d’une prise téléphonique (modulaire) et d’une prise de courant. • Évitez les sources de bruit, comme une fenêtre donnant sur une rue achalandée, et le bruit électrique produit par les moteurs, les fours à micro-ondes et les lampes fluorescentes. • Évitez les sources de chaleur, comme les conduites d’air chaud, les appareils de chauffage et la lumière directe du soleil. • Évitez les endroits extrêmement humides ou froids.
ATTENTION : Utilisez seulement l’alimentation 5-2596(noir) 5-2625 (adaptateur gris pour appareil blanc) de ATLINKS USA, Inc. qui accompagne l’appareil. L’utilisation d’autres alimentations peut endommager l’appareil. 2. Branchez le socle de chargement des combinés dans une prise de courant. REMARQUE : L’indicateur de chargement du socle de chargement du combiné s’allume pour indiquer que la pile du combiné est en cours de chargement.
4. Branchez le cordon téléphonique dans la prise marquée PHONE LINE à l’arrière de la base et l’autre extrémité dans une prise téléphonique murale modulaire. 5. Acheminez le cordon téléphonique et le cordon d’alimentation dans les rainures du pied de manière que l’appareil repose à plat contre le mur. 6. Glissez les trous de montage du pied sur les tiges de la plaque murale et abaissez fermement l’appareil en place. (Plaque murale non comprise.) 7.
1. Appuyez sur le bouton FLASH/PROGRAM jusqu’à ce que PROGR CONTRASTE soit affiché. “1” est le réglage par défaut. 2. Appuyez sur 1, 2 ou 3 du clavier de la base pour entrer votre choix, ou utilisez le bouton MESSAGES/CID ( or ) de la base pour atteindre votre choix. 3. Appuyez de nouveau sur FLASH/PROGRAM pour mémoriser votre choix. REMARQUE : Vous pouvez appuyer sur FLASH/PROGRAM en tout temps pour passer à l’option suivante.
REMARQUE : Pour entrer le code de sécurité de nouveau, entrez de nouveau les chiffres et appuyez sur le bouton FLASH/PROGRAM. Les nouveaux numéros remplacent les anciens. 3. Appuyez de nouveau sur FLASH/PROGRAM pour mémoriser votre choix. Vous entendez une tonalité de confirmation et le nouveau code de sécurité apparaît dans l’affichage. NIVEAU DE SONNERIE REMARQUE : Ce réglage peut être effectué à la base seulement. 1. Appuyez sur le bouton FLASH/PROGRAM jusqu’à ce que NIVEAU SONNERIE soit affiché.
1. Appuyez sur le bouton FLASH/PROGRAM jusqu’à ce que REGLER TONE/PUL soit affiché. Le réglage par défaut est TONE. 2. Utilisez le clavier numérique pour choisir 1TONE ou 2 PUL, ou appuyez sur le bouton MESSAGES/CID ( ou ) pour choisir 1TONE ou 2 PUL. 3. Appuyez de nouveau sur FLASH/PROGRAM pour mémoriser votre choix. Vous entendrez une tonalité de confirmation.
2. Utilisez le clavier du combiné sans cordon ou de la base pour entrer l’indicatif à trois chiffres. 3. Appuyez de nouveau sur FLASH/PROGRAM pour mémoriser votre choix. REMARQUE : Vous pouvez appuyer sur FLASH/PROGRAM en tout temps pour passer à l’option suivante. ENREGISTREMENT (RELIER UN COMBINÉ SANS FIL) L’enregistrement relie la base à un combiné sans cordon. Une fois qu’un combiné est enregistré, vous pouvez utiliser la connexion téléphonique de la base.
FONCTIONNEMENT DE BASE RÉPONDRE À UN APPEL Vérifiez l’afficheur pour savoir qui appelle. COMBINÉ SANS CORDON 1. Appuyez sur le bouton TALK/callback du combiné. 2. Quand vous avez terminé, appuyez sur TALK/callback pour raccrocher. COMBINÉ À CORDON 1. Décrochez le combiné. 2. Quand vous avez terminé, replacez le combiné sur le socle pour raccrocher. HAUT-PARLEUR DE LA BASE 1. Appuyez sur le bouton SPEAKER/CALLBACK. 2. Quand vous avez terminé, appuyez sur SPEAKER/CALLBACK pour raccrocher.
HAUT-PARLEUR 1. Appuyez sur le bouton SPEAKER/CALLBACK. 2. Attendez le signal de manœuvre, puis composez le numéro désiré. Ou composez le numéro, puis appuyez sur le bouton SPEAKER/CALLBACK. 3. Quand vous avez terminé, appuyez sur SPEAKER/CALLBACK pour raccrocher. SÉLECTION DE VOIE MANUELLE Pendant que vous parlez, vous devrez peut-être à changer manuellement la voie afin de réduire les parasites causés par les moniteurs pour bébés, les ouvre-porte de garage ou d’autres téléphones sans cordon.
CONSEIL : N’utilisez pas le bouton TALK/callback (combine) ni le bouton SPEAKER/CALLBACK (base) pour activer un service d’appel personnalisé, comme l’appel en attente, sans quoi vous raccrocherez le téléphone. RECOMPOSITION DU DERNIER NUMÉRO Pour recomposer rapidement le dernier numéro composé : HAUT-PARLEUR DE LA BASE 1. Appuyez sur le bouton SPEAKER/CALLBACK. 2. Appuyez sur le bouton redial. -Ou3. Appuyez d’abord sur le bouton de recomposition, puis sur le bouton SPEAKER/ CALLBACK.
• Pour renvoyer un appel en garde de la base au combiné sans cordon, appuyez sur TALK/callback au combiné sans cordon. Si vous poursuivez l’appel sur un autre poste, le téléphone sans cordon libère la ligne pour le poste téléphonique et l’indicateur de garde s’éteint. RECHERCHE DU COMBINÉ SANS CORDON Cette fonction aide à repérer un combiné égaré. Appuyez sur le bouton de PAGE INTERCOM de la base. L’afficheur indique RECHERCHE COMBINE.
VOLUME HAUT-PARLEUR Réglez le volume du haut-parleur de la base à l’aide des boutons SPKR/VOL + et -. Il existe huit niveaux de volume et chaque pression du bouton de volume règle le volume du haut-parleur d’un niveau. Le téléphone émet deux bips quand vous atteignez le volume maximum ou minimum. COMBINÉ À CORDON Réglez le volume du combiné à cordon en appuyant sur le bouton HANDSET VOLUME de la base.
RECEVOIR UN APPEL AU HAUT-PARLEUR 1. Quand le téléphone sonne, appuyez sur le bouton SPEAKER/CALLBACK de la base et parlez normalement, à au moins 8 ou 9 pouces de distance, dans le microphone intégré. 2. Réglez le volume du haut-parleur en appuyant sur les boutons SPKR/VOL + et de la base. 3. Pour interrompre l’appel, appuyez de nouveau sur le bouton SPEAKER/ CALLBACK. FAIRE UN APPEL AU HAUT-PARLEUR 1. Appuyez sur le bouton SPEAKER/CALLBACK de la base et attendez le signal de manœuvre. 2.
FAIRE UN APPEL D’INTERPHONE 1. Assurez-vous que le téléphone est désactivé (pas en mode TALK). 2. Appuyez sur le bouton PAGE/INTERCOM (base) ou le bouton intercom (combiné sans cordon). Une tonalité de recherche se fait entendre à la base et au combiné sans cordon. 3. Quand vous avez terminé, appuyez sur le bouton PAGE/INTERCOM ou sur le bouton intercom. REMARQUE : Pour annuler l’appel par interphone, appuyez sur le bouton PAGE/INTERCOM (base) ou le bouton intercom (combiné sans cordon).
2. Pour répondre à l’interphone, appuyez sur le bouton PAGE/INTERCOM (base) ou le bouton intercom (combiné sans cordon). Quand vous avez terminé, appuyez sur le bouton PAGE/INTERCOM ou le bouton intercom pour parler à l’appelant extérieur. APPELS PAR INTERPHONE À TROIS 1. Appuyez sur le bouton PAGE/INTERCOM (base) ou le bouton intercom (combiné sans cordon) durant l’appel extérieur. L’appelant extérieur est mis en garde et une tonalité de recherche est émise à la base et au combiné sans cordon.
2. Appuyez sur le bouton d’emplacement-mémoire désiré (touches 0 à 9) ou utilisez sur le bouton MESSAGES/CID ( ou ) (base) ou le bouton cid/vol ( ou ) (combiné sans cordon) pour parcourir le d’emplacement-mémoire. Si l’emplacement-mémoire est occupé, le nom et le numéro mémorisés sont affichés. Si l’emplacement-mémoire est vide, VIDE apparaît dans l’afficheur. 3. Appuyez de nouveau sur le bouton MEMORY/CONFERENCE. L’affichage indique ENTRER NOM. 4.
6. Appuyez REDIAL pour afficher le numéro de recomposition et le nom. 7. Appuyez de nouveau sur le bouton MEMORY/CONFERENCE pour confirmer. REMARQUE : Si le numéro de recomposition comporte plus de 24 chiffres, le numéro de téléphone ne peut être mémorisé.
2. Appuyez sur le bouton d’emplacement désiré (0 à 9). Le numéro de téléphone mémorisé est composé automatiquement. -Ou1. Assurez-vous que le téléphone est désactivé (pas en mode TALK) . 2. Appuyez sur le bouton MEMORY/CONFERENCE. 3. Appuyez sur le bouton d’emplacement-mémoire désiré (0 à 9) ou utilisez le bouton cid/vol ( ou ) pour atteindre le numéro de téléphone désiré. 4. Appuyez sur le bouton TALK/callback. Le numéro de téléphone mémorisé est composé automatiquement.
Combiné : Assurez-vous que le téléphone est activé . 1. Appuyez mem/conference, puis sur 7. 2. À la tonalité d’accès, appuyez de nouveau mem/conference, puis sur 8. 3. À la tonalité d’accès suivante, appuyez mem/conference, puis sur 9. Base: Appuyez sur le bouton SPEAKER/CALLBACK ou décrochez le combiné à cordon. 1. Appuyez ( ou ), puis sur 7. 2. À la tonalité d’accès, appuyez ( ou ) puis sur 8. 3. À la tonalité d’accès suivante, appuyez sur MEMORY/CONFERENCE, puis sur 9.
RECEVOIR ET MÉMORISER LES DOSSIERS D’APPELANTS Quand vous recevez un appel, l’information est transmise par la compagnie de téléphone à votre téléphone entre la première et la deuxième sonneries. L’information d’appelant est affichée pendant que le téléphone sonne, vous donnant ainsi la possibilité de consulter l’information et de décider de prendre ou non l’appel.
• L’heure et la date de réception de l’appel. • NEW apparaît pour tous les appels qui n’ont pas déjà été consultés. REMARQUE : Renseignez-vous auprès de la compagnie de téléphone concernant la disponibilité du service d’affichage du nom. TRANSFERT DE DOSSIERS D’APPELANTS EN MÉMOIRE Vous pouvez transférer un dossier d’appelant dans la mémoire du téléphone. REMARQUE : Vous devez formater vos dossiers d’appelants correctement avant de les mémoriser.
Dix chiffres Sept chiffres indicatif à 3 chiffres + numéro de téléphone à 7 chiffres. 317-888-8888 numéro de téléphone à 7 chiffres. 888-8888 REMARQUE : Si la compagnie de téléphone ne fournit pas les dix chiffres d’un numéro d’appelant, vous ne pourrez régler le format de ce numéro. Faites défiler jusqu’au numéro à rappeler : 3. Si vous utilisez la base ou le combiné : appuyez sur le bouton MESSAGES/CID ( ou ) (base) ou le bouton cid/vol ( ou ) (combiné sans cordon). 4.
1. Utilisez le bouton MESSAGES/CID ( ou ) (base) ou le bouton cid/vol ( ou ) (combiné sans cordon) pour afficher un dossier d’appelant. 2. Maintenez le bouton DELETE (base) ou chan/delete (combiné sans cordon) enfoncé. L’affichage indique EFFACER TOUT? pendant plusieurs secondes. 3. Appuyez de nouveau le bouton DELETE (base) ou chan/delete (combiné sans cordon) dans les dix secondes pour supprimer tous les dossiers. L’afficheur indique PAS D APPEL.
INSTRUCTIONS VOCALES Si vous avez besoin d’aide additionnelle, appuyez sur le bouton memo de la base et suivez les instructions vocales. PROGRAMMATION DU RÉPONDEUR ENREGISTREMENT DU MESSAGE D’ACCUEIL Pour obtenir de meilleurs résultats lorsque vous enregistrez, placez-vous à environ neuf pouces du microphone et essayez le plus possible d’éliminer le bruit de fond. 1. Assurez-vous que le répondeur est à ON. 2. Maintenez le bouton ANNOUNCE de la base enfoncé pendant que vous enregistrez le message d’accueil.
CONSEIL : Assurez-vous que le volume de la base est suffisamment élevé pour entendre vos appels. ÉCOUTE DES MESSAGES À PARTIR DE LA BASE Pour écouter les messages, appuyez sur le bouton PLAY/STOP de la base. Pendant qu’un message joue, vous pouvez : • Appuyer sur le bouton PLAY/STOP pour interrompre le message. • Appuyez sur le bouton MESSAGES/CID ( ) pour recommencer le message en cours ; continuez d’appuyer sur le bouton MESSAGES/CID ( ) pour passer aux messages antérieurs.
LAISSER UNE NOTE Utilisez la fonction note pour laisser un message. 1. Maintenez le bouton MEMO enfoncé (base) jusqu’à ce que vous ayez terminé le message. 2. Commencez à parler après le bip. 3. Relâchez le bouton MEMO quand vous avez terminé. ACCÈSS À DISTANCE Cette section explique les deux types d’accès à distance : utiliser le combiné sans fil pour accéder au répondeur et accéder au répondeur à partir d’un autre téléphone. Vous pouvez accéder au répondeur de la base à l’aide des boutons du combiné.
Quand le répondeur répond : 1. Appuyez sur le bouton answerer/format du combiné sans fil pour accéder au répondeur. 2. Écoutez l’appelant laisser un message. 3. Appuyez sur le bouton TALK/callback pour parler à l’appelant, ou appuyez sur answerer/format pour cesser de filtrer l’appel. MÉMOIRE PLEINE Si la mémoire du répondeur est pleine, le système répond après 10 sonneries, émet un signal et attend que vous entriez le code de sécurité à 3 chiffres.
L’afficheur ACL de la base indique REPONDEUR ANSWERING CALL. CONSEIL : Vous pouvez contourner le message d’accueil en appuyant sur une touche numérotée du clavier pendant que le message joue. Vous pouvez alors entrer votre code de sécurité pour accéder au répondeur. CHANGEMENT DU CODE DE SECURITE Le code de sécurité par défaut pour accéder au répondeur de l’extérieur est 1 2 3. Le code de sécurité est programmé par le menu de programmation. Voir la programmation du téléphone pour en savoir plus.
PRÉCAUTIONS À PRENDRE • Ne pas brûler, démonter, mutiler ni percer la pile. Comme d'autres piles de ce type, des produits toxiques peuvent s'échapper et causer des blessures. • Garder les piles hors de la portée des enfants. • Retirez les piles si vous rangez l’appareil pour plus de 30 jours. ATTENTION : Utilisez seulement la pile indiquée dans le guide de l'utilisateur pour réduire les risques d'incendie ou de blessure.
MESSAGES AFFICHES Les indicateurs suivants indiquent l’état d’un message ou de l’unité. ERROR (ERREUR) L’information de l’appelant a été interrompue en cours de transmission ou la ligne téléphonique est excessivement bruyante. ENTER NAME (ENTRER NOM) Message indiquant d’entrer le nom dans l’un des 10 emplacements-mémoire. DELETE ALL? (EFFACER TOUT?) Demande si vous souhaitez effacer tous les dossiers d’appelants.
REPT (REPT) Message de répétition d’appel. Indique qu’un nouvel appel du même numéro a été reçu plus d’une fois. NO DATA (AUCUNE DONNEE) Aucune information d’appelant a été reçue. WAITING HANDSET REGISTRATION (ATT ENR COMB) Message indiquant d’accéder au mode d’enregistrement du combiné NO BATTERY (PAS DE PILE) Aucune pile installée dans le combiné ou la pile n’est pas correctement branchée dans la prise à l’intérieur du logement à pile.
• Le combiné a-t-il émis un bip quand vous avez appuyé sur le bouton TALK/ callback ? Il faut peut-être charger la pile. • Placez le combiné dans le socle de chargement pendant au moins 20 secondes. Signal de manœuvre, mais impossible de est communiquer • Assurez-vous que le mode de composition par TONALITÉ/IMPULSIONS est réglé à la base en fonction du type de service téléphonique auquel vous êtes abonné.
L’appareil bloque et aucune communication entre la base et le combiné sans cordon • Débranchez l’alimentation c.a. de la prise murale et communication entre la à l’arrière de la base. Retirez la pile du combiné. Attendez 30 secondes et rebranchez l’alimentation dans la base et la prise murale. Rebranchez la pile et chargez-la pendant 12 heures. SOLUTIONS - AFFICHEUR AUCUN AFFICHAGE • La pile est-elle complètement chargée ? Essayez de remplacer la pile.
SOINS ET ENTRETIEN Pour maintenir le bon fonctionnement et la belle apparence de votre appareil, suivez les lignes directrices ci-dessous : • Éviter de placer le téléphone près d’un appareil de chauffage ou d’un appareil produisant du bruit électrique (ex.: moteurs, lampes fluorescentes, etc.). • Ne pas exposer le téléphone directement au soleil ou à l’humidité. • Éviter d’échapper le combiné et de l’utiliser abusivement. • Nettoyer le téléphone avec un chiffon doux.
INFORMATION SUR LE RÉSEAU TÉLÉPHONIQUE Si cet appareil provoque des dérangements sur la ligne et, par conséquent, sur le réseau téléphonique, la compagnie de téléphone signalera, s’il y a lieu, qu’elle doit temporairement interrompre le service. Si elle est dans l’impossibilité de le faire et que les circonstances dictent une telle mesure, la compagnie de téléphone peut immédiatement interrompre le service pendant un certain temps.
INDEX A Accéder au Répondeur À Partir D’un Autre Téléphone 35 Accèss à Distance 34 Afficheur 27 Afficheur D’appel en Attente 31 Appels par Interphone à Deux 22 Appels par Interphone à Trois 23 Attente Automatique 17 Aucun affichage 41 Avant de Commencer 8 B Branchement du Combiné à Cordon 10 C Causes de Mauvaise Réception 42 Changement du Code de Securite 36 Combiné 17 Combiné à Cordon 16, 18, 20 Combiné sans Cordon 16, 18, 20 Commutation entre le Haut-Parleur et le Combiné 21 Compatibilité avec les Proth
L Laisser une Note 34 Langue 11 Liste de Pièces 8 M Mémoire 23 Mémoire Pleine 33, 35 Mémorisation D’un Nom et D’un Numéro 23 Mémorisation D’un Numéro de Recomposition 24 Messages Affiches 38 Minuterie D’appel 17 Mute 19 N Niveau de Sonnerie 13 P Précautions à Prendre 37 Présentation de la Base 7 Présentation du Socle de Chargement et du Combiné 7 Programmation du Répondeur 31, 32 Programmation du Téléphone 11 R Raccordement de la Ligne Téléphonique 10 Raccordement de la Pince-Ceinture 37 Raccordement de
SERVICE APRÈS-VENTE ATLINKS Communications Canada, Inc., garantit à l’acheteur de cet appareil ou à la personne qui le recevrait en cadeau, que si cet appareil présente un défaut de fabrication pendant l'année suivant la date d’achat, il sera remplacé sans frais. Les frais de transport de retour sont payés. Cette garantie ne couvre pas les dommages attribuables aux accidents, à une mauvaise utilisation ni à des piles qui fuient.
INFORMATION POUR ACCESSOIRES DESCRIPTION No. PIÈCE NOIR BLANC Alimentation c.a. 5-2596 5-2625 Pince-ceinture 5-2585 5-2583 Casque d'écoute 5-2444 Pile de remplacement pour combiné 5-2425 5-2459 Pour passer une commande, ayez votre carte Visa, MasterCard ou Discover à portée de la main et composez le numéro sans frais 1-800-338-0376. Des frais d’expédition et de manutention seront ajoutés au montant de la commande.
Modèle 27958B 55911630 (Rév. 1 E/F) 04-49 Imprimé en Chine ATLINKS Communications Canada Inc. © 2004 ATLINKS Communications Canada Inc.