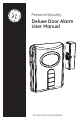
Personal Security eluxe Door Alarm D User Manual Do not use in wet locations
Deluxe Door Alarm Keypad Controlled Alarm/ Chime Switch Home/ Away Switch Magnet Indicator Light Keypad Learn button Screws LEARN Doublesided tape Battery Compartment Mounting Plate Low Battery Indicator The alarm unit has a low battery circuit. When the batteries reach a low level, the indicator light will flash slowly. Average battery life for typical usage is up to one year.
INSTALLING BATTERIES The keypad controlled door alarm requires three (3) AAA Alkaline batteries (not included). To install the batteries: 1. Remove screw from battery compartment door located on back of the unit. Slide off the door in the direction of the arrow. 2. Insert three (3) AAA batteries noting the polarity diagram inside the battery compartment. 3. Replace door and secure screw.
CREATING YOUR PERSONAL ALARM CODE The keypad allows you to set a personal 4-digit code for arming and disarming the alarm. 1. Remove screw from battery compartment door located on back of the unit. Slide off the door in the direction of the arrow. 2. Press the LEARN button. 3. The red light on the front of the alarm will blink for 15 seconds. During this time, input your 4-digit code. A beep will confirm each input.
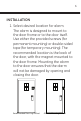
INSTALLATION 1. Select desired location for alarm. The alarm is designed to mount to the door frame or to the door itself. Use either the provided screws (for permanent mounting) or double-sided tape (for temporary mounting). The recommended location is the back of the door, with the magnet mounted to the door frame. Mounting the alarm to the door ensures that the alarm will not be damaged by opening and closing the door.
Note that the magnet may be mounted to either side of the alarm as long as the arrows line up. Distance must be less than 1/2” IMPORTANT: Whether mounting to the door or door frame, the gap distance between the alarm and magnet must be 1/2” or less. 2. Attach the mounting plate to the back of the alarm. Peel the protective covering from one side of the double-sided tape and then apply to mounting plate.
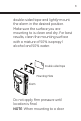
double-sided tape and lightly mount the alarm in the desired position. Make sure the surface you are mounting to is clean and dry. For best results, clean the mounting surface with a mixture of 50% isopropyl alcohol and 50% water. Double-sided tape Mounting Plate Alarm Do not apply firm pressure until location is final.
frame, the mounting plate mounts off-center to the left or right in order to position alarm closest to the edge of the door. 3. Using double-sided tape, lightly attach the magnet to the opposite edge next to the alarm. Line up the arrows of the alarm and the magnet. Ensure the distance between the two pieces is 1/2” or less. To test the gap distance, slide the ALARM/CHIME switch to CHIME and open the door. If chime sounds, then the gap distance is correct.
plate itself. Once secured, reattach the alarm to the mounting plate. . Apply firm pressure to the magnet to secure its position as well. OPERATING IN THE ALARM MODE 1. Locate ALARM/CHIME switch on right side of the alarm unit. 2. Slide switch to ALARM position. 3. Choose HOME or AWAY on the left side of the alarm unit. HOME MODE In HOME mode, the alarm will sound when the gap between the alarm and the magnet is greater than 1/2” (i.e. the door is opened).
AWAY MODE In AWAY mode, there will be a 45 second exit delay before the unit is armed. The alarm’s indicator light will flash red quickly, alerting you that the unit has been activated and has begun the 45-second count down. The delay allows time for you to leave the protected area without triggering the alarm. When returning to the protected area, there is a 30 second delay to allow time to enter 4-digit code before the alarm will sound. Arming the Alarm: 1. Arm the alarm by pressing your 4-digit code.
Disarming the Alarm: 1. Enter your 4-digit code to disarm the alarm. When the fourth digit of your code is entered, the unit will respond with two tones and will flash a green light twice. 2. Enter the correct code anytime after the alarm has sounded to deactivate. NOTE: When testing, a cloth can be used to cover the alarm to reduce risk of hearing damage. Incorrect Code If an incorrect code is entered, the unit will sound a louder beep and will flash red 3 times.
OPERATING IN THE CHIME MODE 1. Locate ALARM/CHIME switch on right side of unit. 2. Slide switch to CHIME mode. Activating the Chime: 1. The chime will now sound immediately if the distance between the alarm and magnet is greater than 1/2” (i.e. the door is opened). Deactivating the Chime: 1. To deactivate the chime slide ALARM/ CHIME switch to ALARM position. CARE AND MAINTENANCE To clean the alarm housing, use a soft cloth slightly dampened with water and wipe dry.
WARNING Limitations of Alarm Products This product should be tested periodically to make sure it is working properly. The product, if used properly, may reduce the risk of burglary, robbery, or other adverse events. However, JASCO is not an insurer, this product is neither insurance nor a guarantee that such an event will be prevented, and users should protect themselves with proper insurance.
WARNING Risk of personal injury • Prolonged exposure to alarm siren may cause permanent hearing loss Battery Warning • Remove batteries before storing the Alarm for extended periods • Batteries may leak harmful liquids or ignitable materials or explode causing injury and product damage • Do not mix old and new or other battery types • Replace all batteries at the same time • Replace fully discharged batteries immediately For indoor use only; do not use in wet locations.
NOTE: This equipment has been tested and found to comply with the limits for a Class B digital device, pursuant to Part 15 of the FCC Rules. These limits are designed to provide reasonable protection against harmful interference in a residential installation. This equipment generates, uses and can radiate radio frequency energy and, if not installed and used in accordance with the instructions, may cause harmful interference to radio communications.
Seguridad Personal Alarma De Lujo Para Puertas Manual Del Usuario No utilizar en lugares húmedos
Alarma de lujo para puertas Controlada por teclado Interruptor En casa/ Fuera de casa Interruptor de Alarma/ Campana Luz indicadora Imán Teclado Tornillos Placa de soporte Botón crear Cinta doble faz LEARN Compartimento para baterías Indicador de batería baja La unidad de alarma tiene un circuito de batería baja. Cuando las baterías lleguen a un nivel bajo, la luz indicadora se encenderá y se apagará lentamente. La vida promedio de las baterías es de hasta un año para una utilización normal.
CÓMO INSTALAR LAS BATERÍAS La alarma para puertas controlada por teclado funciona con tres (3) baterías alcalinas AAA (no vienen incluidas). Para instalar las baterías: 1. Retire el tornillo de la tapa del compartimento para baterías que se encuentra en la parte de atrás de la unidad. Deslice la tapa en dirección de la flecha. 2. Inserte tres (3) baterías AAA de acuerdo con el diagrama de polaridad que se encuentra en el compartimiento para baterías. 3. Vuelva a colocar la tapa y asegure el tornillo.
CÓMO CREAR SU CÓDIGO PERSONAL PARA LA ALARMA El teclado le permite fijar un código personal de 4 dígitos para activar y desactivar la alarma. 1. Retire el tornillo de la tapa del compartimento para baterías que se encuentra en la parte de atrás de la unidad. Deslice la tapa en dirección de la flecha. 2. Presione el botón CREAR. 3. La luz roja de la parte del frente de la alarma se encenderá intermitentemente durante 15 segundos. En ese tiempo usted debe ingresar el código de 4 dígitos.
quedado guardado. . Vuelva a colocar la tapa y asegure el tornillo. INSTALACIÓN 1. Elija la ubicación deseada para la alarma. La alarma está diseñada para ser ubicada en el marco de la puerta o en la puerta. Puede utilizar los tornillos suministrados (si desea dejarla colocada permanentemente) o la cinta doble faz (si desea colocarla temporalmente). Recomendamos colocar la alarma en la parte de atrás de la puerta, con el imán en el marco de la puerta.
Método recomendado para colocar la alarma Método alterno para colocar la alarma IMPORTANTE: Ya sea que coloque la alarma en la puerta o en el marco de la puerta, la distancia entre la alarma y el imán debe ser de ½” o menos. 2. Fije la placa de soporte a la parte de atrás de la alarma. Despegue un lado de la cinta doble faz y póngala en la placa de soporte.
en la posición deseada. Cerciórese de que la superficie en la que va a colocar la alarma esté limpia y seca. Para mejores resultados, limpie la superficie con una mezcla de 50% de alcohol isopropílico y 50% de agua. Cinta doble faz Placa de soporte Alarma No presione fuertemente hasta que el lugar donde va a colocar la alarma sea definitivo.
para que la alarma quede lo más cerca posible al borde de la puerta. 3. Con la cinta doble faz, fije suavemente el imán al borde opuesto al lado de la alarma. Haga concordar las flechas de la alarma y del imán. Asegúrese de que la distancia entre las dos piezas sea de ½” o menos. Para probar si la distancia es la adecuada, deslice el interruptor ALARMA / CAMPANA a la opción CAMPANA y abra la puerta. Si la campana suena, la distancia es la correcta.
10 asegurada, vuelva a colocar la alarma en la placa de soporte. . Presione firmemente el imán para asegurar su posición. CÓMO OPERAR EL MODO DE ALARMA 1. Ubique el interruptor de ALARMA / CAMPANA al lado derecho de la unidad de la alarma. 2. Deslice el interruptor a la posición de ALARMA. 3. Elija la posición EN CASA o FUERA DE CASA en el lado izquierdo de la unidad de la alarma.
11 MODALIDAD FUERA DE CASA En la modalidad FUERA DE CASA, habrá un lapso de 45 segundos para darle tiempo de que salga antes de que se accione la alarma. La luz indicadora roja de la alarma se encenderá de manera intermitente y rápida para avisarle que la unidad se ha activado y ha iniciado el conteo regresivo de 45 segundos. Este lapso le da tiempo para salir del área protegida sin que se accione la alarma.
12 ingresado incorrectamente, la unidad emitirá un sonido más alto y una luz roja se encenderá 3 veces de manera intermitente. Cómo desactivar la alarma: 1. Ingrese el código de 4 dígitos para desactivar la alarma. Cuando haya ingresado el cuarto dígito del código, la unidad responderá con dos tonos y una luz verde se encenderá dos veces. 2. Ingrese el código correcto en cualquier momento después de que la alarma ha sonado para desactivarla.
13 indicadora roja se encenderá 3 veces de manera intermitente. Vuelva a ingresar el código correcto después de que la luz haya dejado de encenderse. CÓMO OPERAR LA MODALIDAD DE CAMPANA 1. Ubique el interruptor ALARMA / CAMPANA en el lado derecho de la unidad. 2. Deslice el interruptor a la modalidad CAMPANA. Cómo Activar La Campana: 1. La campana sonará inmediatamente si la distancia entre la alarma y el imán es mayor a ½” (cuando se abra la puerta.
14 Cómo Desactivar La Campana: 1. Para desactivar la campana, deslice el interruptor ALARMA / CAMPANA a la posición ALARMA. CUIDADO Y MANTENIMIENTO Para limpiar la parte exterior de la alarma, pásele un paño levemente humedecido y luego un paño seco. No utilice químicos porque pueden dañar y desteñir la unidad. ADVERTENCIA Limitaciones de las alarmas Este producto debe ser revisado periódicamente para garantizar que esté funcionando bien.
15 comerciales, puede ser evadido, dañado y podría no dar la alerta por varias razones, entre otras: instalación o ubicación no adecuada, mantenimiento inadecuado, sabotaje, baterías insuficientes o mal instaladas, limitaciones en el sensor, fallas de los componentes, receptores; para los productos infrarrojos, las intrusiones pueden estar por fuera del rango diseñado para el producto y algunas condiciones ambientales podrían afectar el desempeño, y las señales audibles de la alarma podrían estar por fuera
16 lugares húmedos. Este producto de Jasco tiene una garantía limitada de 90 días. Contacte el Servicio al Cliente en 800-6548483, entre las 7:30 a.m. y las 5:00 p.m. CST o visite nuestro sitio web (www.jascoproducts.com) si la unidad sale defectuosa durante el período de garantía. es una marca registrada de General Electric Company y se utiliza bajo licencia a Jasco Products Company LLC, 10 E. Memorial Road, Oklahoma City, OK 73114.
17 NOTA: Este equipo ha sido probado y se ha encontrado que cumple con los límites para aparatos digitales clase B, de acuerdo a la sección 15 de las Reglas de la FCC. Estos límites están diseñados para brindar una protección razonable sobre interferencias perjudiciales en instalaciones residenciales. Este equipo usa, genera y puede transmitir energía de radio frecuencia. Si no se instala o usa de acuerdo a las instrucciones, puede causar interferencias perjudiciales a las comunicaciones de radio.