REV1
NOTE: Some features shown within the software may not be indicated in this version of the manual. Please check for latest updates by visiting our website or by using the ‘update checker’ built-into the software. CONTENTS OVERVIEW THE BASICS Viewing live video…………………………………………………………………………………………………………………………………………………………………………. How to view live video with motion and/or sound detection………………………………………………………………………………………………………… Sound Alert…………………………………………………………………………………………………………………………………………………………………….
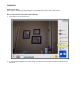
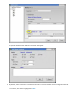
THE BASICS VIEWING LIVE VIDEO Video appears automatically when software is opened. Double-click to view in FULL-screen. How to view live video with video motion detection: 1. Click ‘Options’ on the main screen. 2. A new window will appear. In the left margin, click the pre-paired camera desired to activate motion detection.
3. Click the checkbox, ‘Enable Alarm’. 4. Click ‘Add’ highlighted in blue.
A separate window titled ‘Add alarm schedule’ will appear. 5. By default, motion activation is activated at all times. A custom schedule can be configured if desired. To continue, click ‘Select’ highlighted in blue.
A separate window titled ‘Add Alarm Action’ will appear. 6. There are several ways to be notified if a camera detects motion. A sound alert can be played, a video can be recorded and/or a particular program of choice can be configured to open automatically. SOUND ALERT A. Click the ‘Sound’ checkbox in the left margin.
B. Click the rectangular box with the word ‘Alarm’ inside. A drop-down menu will appear of sound files available for playback. C. After selecting the sound file desired, click the ‘Preview’ button to hear what the sound file will sound like once video motion is detected.
D. After selecting the sound file desired, click the ‘Preview’ button to hear what the alarm will sound like when video motion is detected. E. Alternatively, a custom sound file can be played. Click the bubble beside ‘Sound File’. The icon to the right (indicated in the red circle) will change yellow. F. Click to select the yellow icon. A separate window will appear allowing you to choose the location of the custom sound file desired.
VIDEO RECORDING Recording will stop15 seconds after video motion is no longer detected by camera. Recording will only begin when video motion is displayed on screen. In Quad view, cameras with video motion activity will record simultaneously. A. Click the ‘Record’ checkbox located in the left margin. B. Two checkboxes will appear to the right. Click the checkboxes desired.
OPENING A PARTICULAR PROGRAM OF CHOICE AUTOMATICALLY A. Click the ‘Call Application’ checkbox located in the left margin. B. Similar to adding a custom sound file, click the yellow folder icon.
C. A separate window will appear allowing you to choose the location of the desired program. D. Additional features are also available. Configure the program to run particular parameters if known. Enter inside the rectangular box, ‘Run Params’. Click the ‘Test’ button to preview what would happen if video motion is detected.
7. When finished choosing the available motion detection notification options, click ‘OK’ to save. 8. The ‘Add alarm schedule’ window re-appears. Notice the options selected are now shown under ‘Action’.
Click ‘OK’ to save.
9. The ‘Option Center’ window re-appears. Notice the options selected are now shown under ‘Time Selection’.
10. Adjusting ‘Alarm Duration’ changes the number of seconds the alarm transpires.
Click ‘OK’ to exit.
11. Camera motion detection alert notification can also be enabled and disabled in live view (once configured).
PLAYBACK MOTION DETECTION RECORDINGS NOTE: Files are automatically saved into the default recording location on the Operating System. There are two methods for playback: 1) Accessing the files directly from the default saved location, or 2) Using the software’s built-in player. The instructions below apply to the built-in player. 1. Click ‘Alarm Records’ on the main screen.
2. A new window will appear titled, ‘Alarm Record’. Note all new recordings triggered by motion detection will appear on this screen.
3. Click on one of the listed recordings. Note the contents of the recording and its location will be displayed where indicated.
4. Selecting a video, for example, will display many different options for playback (files ending in ‘.avi’).
5. Selecting one of the photos yields two options.
6. A few different options are available for managing recordings in the list.
7. When finished with playback, click the icon indicated below to return to the main menu.
MANUALLY RECORD NOTE: Files are automatically saved into the default recording location on the Operating System. There are two methods for playback: 1) Accessing the files directly from the default saved location, or 2) Using the software’s built-in player. The instructions below apply to the built-in player. 1. Click the desired camera to manually record.
2. Click ‘Record’ on the main screen. 3. To begin recording, click the ‘Record’ button. ‘Recording’ will appear on the display and the ‘Record’ icon will change to red in color.
4. To stop recording, click the ‘Record’ icon again. PLAYBACK MANUAL RECORDINGS NOTE: Files are automatically saved into the default recording location on the Operating System. There are two methods for playback: 1) Accessing the files directly from the default saved location, or 2) Using the software’s built-in player. The instructions below apply to the built-in player. 1. Click ‘Video Records’ on the main screen.
2. A new window will appear titled, ‘Video Records’.
3. Click on one of the listed recordings. Note the location of the recording will be displayed where indicated.
4. Selecting a video will display many different options for playback.
5. A few different options are available for managing recordings in the list.
6. When finished with playback, click ‘Close’ to exit.
TAKING SNAPSHOTS 1. Click the desired camera to take a snapshot. 2. Click ‘Snapshot’ on the main screen.
3. A separate window will appear on the display.
4. Click the camera icon on the screen. 5. A new window will appear with the screenshot taken from the camera. Several options are available as indicated below.
6. Click where indicated to exit.
ADVANCED FEATURES MOTION DETECTION OPTIONS Adjusting the Video Motion Sensitivity 1. Click ‘Options’ on the main screen. 2. A new window will appear. In the left margin, click the pre-paired camera desired to adjust motion detection sensitivity.
3. Click ‘Options of Motion Detection’ highlighted in blue. 4. A separate window will appear titled, ‘Motion Detection Options’. Note the indications below.
5. In addition, the area for motion detection shown on the display can be configured. Click the checkbox, ‘Enable Motion Detection Area’ and the button, ‘Edit’.
6. A separate window will appear. Click ‘Frame Select’ to choose an area where motion detection is NOT desired.
7. Alternatively, click ‘Block’ to ‘shade’ an area manually where motion detection is NOT desired. Three pre-set sizes are available.
8. To ‘erase’ an area selected where motion detection is NOT desired, click the ‘Invert Select’ button. Click & dragging an area where motion detection is NOT desired will cause the area to not be detected and vice versa.
9. Click the ‘OK’ button to save and exit.
10. Click ‘OK’ to save.
11. The ‘Motion Detection Options’ window reappears. Areas where motion detection is not desired are shown. 12. The ‘Option Center’ window re-appears. Click ‘OK’ to exit.
ADVANCED PLAYBACK A major advantage to using the software playback feature is the unique ability to watch the motion sensitivity level at the same time a video is played. In addition, the software will ‘bookmark’ each frame in the video at any specified motion sensitivity level threshold or specified area. There is nothing that needs to be pre-set. 1. Click ‘Alarm Records’ on the main screen.
2. The ‘Alarm Record’ window will appear. Click on one of the listed recordings.
3. Select a video in the contents (files ending in ‘.avi’).
4. Click the icon where indicated.
The window will change. A new section will appear.
5. Click the checkbox, ‘Enable intelligent motion detect’ to activate the ability to watch the motion sensitivity level at the same time the video is played.
6. Choose a sensitivity level and/or a specified area as indicated.
7. Click the ‘Play’ button. The software will display the motion sensitivity level at the same time the video is being played. Simultaneously, ‘bookmarks’ will be saved any time the specified sensitivity level threshold is exceeded.
8. Click the ‘Manual confirm’ checkbox to allow the video to pause during playback at each bookmark.
9. When finished with playback, click the icon indicated below to return to the main menu.
Changing the Default Location of Recordings 1. Click ‘Options’ on the main screen.
2. The ‘Option Center’ window will appear. The default location where recordings are stored on the hard drive can be changed where indicated.
Additional Settings 1. Click ‘Options’ on the main screen. 2. The ‘Option Center’ window will appear. The number of days recordings are saved on the hard drive and maximum minutes of each recording can be adjusted on this screen.
3. Click ‘OK’ to save.
USING WITH ADD-ON CAMERAS Enable/disable cameras 1. Click ‘Options’ on the main screen.
2. The ‘Option Center’ window will appear. Click ‘Camera’ in the left margin.
3. Select/deselect applicable camera checkboxes to enable/disable. 4. Click ‘OK’ to save changes.
More viewing modes 1. Quad (Multi-Camera view) View all paired cameras continuously at once. Double-click for FULL-screen.
2. Sequential (Scan) Displays each paired camera every 4-seconds. Double-click for FULL-screen.
3. Manual (Single Camera view) Display selected camera continuously. Double-click for FULL-screen. UPDATES NOTE: Internet access is required. Downloads Checking for the latest version of the software can be done within the software itself. 1. Click the icon below on the main screen.
2. Select ‘Check for Updates’. The program will advise if an update is available or if you already have the latest version. If provided, click the link to download.
TROUBLESHOOTING Camera image does not display on screen. After verifying the camera is pre-paired to the monitor, try performing each of the following (in order): 1. Switching to a different camera channel and back. 2. Switching to a different viewing mode and back (quad to scan, for example). 3. Switching between full screen and regular screen viewing. 4. Unplugging the USB cord from the monitor. 5. Slide the power switch on the monitor to ‘off’ and back to ‘on’. 6.
For product information, troubleshooting and warranty calls: 800-654-8483, option 1 For consumer/business sales: 800-654-8483, option 2 Mailing Address: Jasco Products Company, Attn CIC 10 E Memorial Rd, Bldg B Oklahoma City, OK 73114 Please contact technical support (using one of the above options) before attempting to ship product returns or warranty requests. Failure to do so may delay processing times considerably. SPECIFICATIONS Recording resolution…………………………………………………………………………………………………………………....