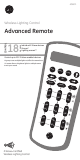
45601 Wireless Lighting Control Advanced Remote LCD remo CONTROL SmartHome 18 ™ • Individual Z-Wave devices • Groups* • Lighting scenes** Control up to 232 Z-Wave enabled devices. *A group turns multiple lights on/off at the same time. **A scene dims or brightens lights in multiple areas to suit your mood.
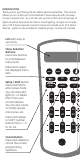
INTRODUCTION Thank you for purchasing the GE 45601 Advanced Remote. This remote allows you to control up to 18 individual Z-Wave devices with one easyto-use, compact unit. You can also set up and control up to 18 groups of lights as well as 18 scenes for task or mood lighting. Groups can include up to 232 Z-Wave devices and each scene can include up to 32 Z-Wave devices. Lights can be included in multiple groups.
lights from different groups. Your Z-Wave home control network can include up to 232 Z-Wave enabled devices. Additional features include: - Easy to use LCD menu system - Event programming which allows you to set timed events such as turning on all of your lights at a certain time every day. - Control of a Z-Wave enabled thermostat for your HVAC system.
If this remote is used as the primary controller, you must use it to create your control network. You can use multiple remote controls with your Z-Wave lighting control network, however, only one remote will act as the primary controller. The primary controller must be used to add or delete devices (lights / nodes) from your network.
Scene: A scene lets you establish preset brightness levels for multiple Z-Wave controlled lights and then control them with one command. This is ideal for mood or task lighting. Scene 1 could be the family room lights set to dim for watching TV. Scene 2 could have the same lights set to a different brightness level for other activities like reading or entertaining. Event: An event is something you want to happen at a specific time and day.
WIRELESS RANGE This device complies with the Z-Wave standard of open-air, line of sight transmission distances of 100 feet. Actual performance in a home depends on the number of walls between the remote controller and the destination device, the type of construction and the number of Z-Wave enabled devices installed in the control network. Every Z-Wave enabled device acts as a signal repeater and multiple devices result in more possible transmission routes which helps eliminate “RF dead-spots”.
Please Note: Z-Wave home control networks are designed to work properly alongside 802.11 wireless computer networks, Bluetooth and other 2.4GHz or 5.8GHz devices. Some baby cams, wireless video devices and older cordless phones using the 900MHz frequency range may cause interference and limit Z-Wave functionality. Many 900MHz products have a switch to select channel “A” or “B”. You may find that one of these channels will cause less interference than the other. NOTES ON NETWORK MANAGEMENT 1.
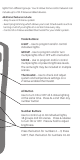
5. Press a digit (1-9) for the device location you wish to add. Press SETUP (SHIFT) and the digit (1-9) if you are adding devices 10 through 18. 6. Press OK and the screen will display SETUP WAITING. 7. Press the button on the device so that it communicates with the remote. 8. When the screen displays SUCCESS, you have successfully added the device to the number key and your network.
DELETING A DEVICE (LIGHT / NODE) FROM YOUR NETWORK This completely removes the device from your home control network and resets the device to its factory default settings. 1. Press and hold SETUP until screen displays LGHT SETUP 2. Press OK followed by pressing the cursor right key 2 times the screen will display DELETE. 3. Press OK. 4. Press the button on the device so that it communicates with the remote. 5. When the screen displays SUCCESS, you have successfully deleted the node/light from your network.
4. Press the OK key and the screen will display SEL DIGIT. 5. Press a digit (1-9) for the group you wish to remove the device from. Press SHIFT and the digit (1-9) if you are removing a device from groups 10 through 18. 6. Press the OK key and the screen will display SETUP WAITING. 7. Press the button on the device you wish to remove. 8. When the screen displays SUCCESS, you have successfully removed the device. Deleting a Group: This only deletes the specific group.
Removing a Light (Device / Node) from a Scene: This only removes the device from a specific scene. The device is still part of your home control network and the scene still exists (if there were more than one device in it to start). 1. Press and hold SETUP until screen displays LGHT SETUP. 2. Use either Arrow key to scroll until the display reads SCN SETUP. 3. Press OK followed by either Arrow key until the display reads REMOVE. 4. Press OK and the screen will display SEL DIGIT. 5.
To turn all devices on or off, perform the following steps: 1. Press ALL once. The screen will display ALL. 2. Press either ON or OFF. Any ON or OFF button can be pressed. (The screen will display ALL ON or ALL OFF depending on what key was pressed). Adding Devices (Lights / Nodes) to All Control: 1. Press and hold SETUP the screen displays LGHT SETUP. 2. Use either Arrow key to scroll until the display reads ALL SETUP. 3. Press OK and screen will display EX ON/OFF. 4.
NOTE: The DTS and Time Zone Settings are reserved for future use. NOTE: You will need to reprogram the Date and Time when the batteries are replaced. EVENTS The 45601 Advanced Remote allows you to program up to 15 automated events such as turning on or off your lights at a preset time and day. You must set the time and date before programming an Event. Adding an EVENT: 1. Press and hold SETUP until the screen displays LGHT SETUP. 2. Use either Arrow key to scroll until the display reads EVENTS. 3.
1. Press the DIGIT for the EVENT you want to DELETE. 2. Press OK and the screen will display SUCCESS. EVENTS-Enable ALL ON or OFF This feature allows you to ENABLE or DISABLE all programmed EVENTS ALL ON 1. Press and hold SETUP until the screen displays LGHT SETUP. 2. Use either Arrow keys to scroll until the display reads EVENTS. 3. Use either Arrow keys to scroll until the display reads ALL. 4. Press OK the screen will display ALL ON. 5. Press the OK key and screen will read SUCCESS. ALL OFF 1. 1.
ADVANCED CONFIGURATION Some Z-Wave devices provide advanced capabilities available only through the use of a remote control like the 45601 Advanced Remote. One example is the 45606 in-wall dimmer which allows the end user to create 3 different dim rates depending upon how the dimmer is activated (manually, via a normal Z-Wave “Dim” command or via an All-On or All-Off Z-Wave command). Each of the three can be set anywhere between 10 milliseconds and 4.
Copying Information to this Remote 1. Place the two remotes near each other. 2. Refer to the user manual for the primary remote for programming information. Put the primary remote into programming mode so that it sends information to the secondary remote. If the primary remote is a 45601 Advanced Remote, refer to the section above on Sending Network Information. 3. On the target 45601, use either Arrow key to scroll until the display reads TRANSFER. 4. Press OK and the screen will display PRIMARY. 5.
UPDATE NETWORK INFORMATION The Update function is used to request updated network information from an SUC (Static Update Controller). If you do not have an SUC in your network, trying to perform this action will result in a Failure. To have your remote receive a network update: 1. Press and hold SETUP until the screen displays LGHT SETUP. 2. Use either Arrow key to scroll until the display reads NETWORK. 3. Press OK and the screen will display RESET. 4.
WARRANTY JASCO Products warrants this product to be free from manufacturing defects for a period of two years from the original date of consumer purchase. This warranty is limited to the repair or replacement of this product only and does not extend to consequential or incidental damage to other products that may be used with this product. This warranty is in lieu of all other warranties, expressed or implied.
is a registered trademark of General Electric Company and is used under license to Jasco Products Company LLC, 10 E Memorial Rd., Oklahoma GE SmartHome City, Oklahoma 73114 Made in China Hecho en China ™ All brand names shown are trademarks of their respective owners. Todas las marcas que aparecen aquí son marcas registradas de sus respectivos dueños.