DIE CAST BLENDER Model Number: 169106 UPC: 681131691062 Customer Assistance 1 877 207 0923 (US) 1 877 556 0973 (Canada) Thank you for purchasing a GE small appliance. In keeping with the GE ecomagination initiative, please consider the option to recycle the packaging material and donate the appliance you are no longer using. To read about GE’s ecomagination commitment, visit http://ge.ecomagination.
IMPORTANT SAFEGUARDS When using electrical appliances, basic safety precautions should always be followed including the following: • • • • • • • • • • • • • • • • • Read all instructions. To protect against risk of electrical shock do not immerse power cord or blender base in water or other liquid. Close supervision is necessary when any appliance is used by or near children. Unplug from outlet when not in use, before putting on or taking off parts, and before cleaning. Avoid contacting moving parts.
If the power-supply cord is a grounding-type-3-wire cord with a grounding prong on the plug, the extension cord should also be a grounding-type-3-wire cord. GROUNDING INSTRUCTIONS This appliance must be grounded while in use to protect the operator from electrical shock. The appliance is equipped with a 3-conductor cord and a 3-prong grounding-type plug to fit the proper grounding-type receptacle. The appliance has a plug that looks like Figure A.
PARTS 7. 16. 6. 15. 14. 5. 11. 4. 13. 3. 10. 9. 2. 12. 1. 1. 2. 3. 4. 5. 6. 7. 8. 4 Die cast base Control panel (see detail) Jar collar Blade assembly Glass blending jar Jar lid Measuring cap Cord storage (bottom of base) On control panel 9. Speed selector (0-3 and crush) 10. Power indicator light 11. Pulse button Exploded view of glass jar 12. Glass blending jar 13. Jar collar 14. Silicone sealing ring 15. Blade assembly 16.
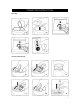
OPERATING INSTRUCTIONS Blending 1 2 4 5 6 7 8 9 10 11 3 Cleaning and Storage 5
INSTRUCTIONS FOR USE For your safety, always read and understand this Instruction Manual before attempting to use any electric appliance. Before Using: 1. Carefully unpack the blender. Remove all packaging materials. 2. Wash the lid, measuring cap, blade assembly, and glass jar in hot soapy water. Dry thoroughly. 3. Wipe exterior surfaces of the base with a soft, moist cloth to remove residue that may have collected during packing and handling. Dry thoroughly. Do not use abrasive cleaners.
Pulse Button: use this button to blend with a pulsing action. You can blend continuously by holding down the pulse button (see figure 5), or press and release the pulse button for multiple short bursts. 6. To stop blending, rotate the speed selector knob so the blue indicator dot is lined up with the off position “0”. 7. Be sure the blender is in the off “0” position when not blending. CLEANING AND STORAGE This appliance requires little maintenance. It contains no user-serviceable parts.