Self-Cleaning Radiant Ranges GEAppliances.com Safety Instructions . . . . . . . 2–6 Owner’s Manual Operating Instructions EER3000 EER3001 EER3002 JB600 JB700 JB710 JBP64 JBP66 JBP67 JBP68 JBP69 JBP71 JBP78 Clock and Timer . . . . . . . . . . .13 Oven . . . . . . . . . . . . . . . . . .10–18 Sabbath Feature . . . . . . . . . . .15 Self-Cleaning . . . . . . . . . .17, 18 Thermostat . . . . . . . . . . . . . .16 Timed Baking & Roasting . . .14 Surface Units . . . . . . . . . . . . .
WARNING! For your safety, the information in this manual must be followed to minimize the risk of fire, electric shock, or to prevent property damage, personal injury, or loss of life. WARNING ANTI-TIP DEVICE All ranges can tip and injury could result. Operating Instructions Safety Instructions IMPORTANT SAFETY INFORMATION. READ ALL INSTRUCTIONS BEFORE USING. To prevent accidental tipping of the range, attach it to the wall and floor by installing the Anti-Tip device supplied.
IMPORTANT SAFETY NOTICE The California Safe Drinking Water and Toxic Enforcement Act requires the Governor of California to publish a list of substances known to the state to cause cancer, birth defects or other reproductive harm, and requires businesses to warn customers of potential exposure to such substances. Fluorescent light bulbs contain mercury. If your model has a surface light, you must recycle the fluorescent light bulb according to local, state and federal codes.
WARNING! SAFETY PRECAUTIONS Do not operate the oven or cooktop controls if the glass is broken. Food splatter or cleaning solution may penetrate a broken control panel and create a risk of electrical shock. Contact a qualified technician immediately should your glass control panel become broken. ■ Do not store flammable materials in an oven or near the cooktop. Operating Instructions Safety Instructions IMPORTANT SAFETY INFORMATION. READ ALL INSTRUCTIONS BEFORE USING.
RADIANT SURFACE UNITS Use proper pan size—select cookware having flat bottoms large enough to cover the surface unit heating element. The use of undersized cookware will expose a portion of the surface unit to direct contact and may result in ignition of clothing. Proper relationship of cookware to surface unit will also improve efficiency. Troubleshooting Tips Consumer Support 5 Care and Cleaning ■ Do not operate the radiant surface units if the glass is broken.
WARNING! OVEN Stand away from the range when opening the oven door. Hot air or steam which escapes can cause burns to hands, face and/or eyes. ■ Do not heat unopened food containers. Pressure could build up and the container could burst, causing an injury. Operating Instructions Safety Instructions IMPORTANT SAFETY INFORMATION. READ ALL INSTRUCTIONS BEFORE USING. ■ Keep the oven vent unobstructed. ■ Keep the oven free from grease buildup.
GEAppliances.com Throughout this manual, features and appearance may vary from your model. How to Set Push the knob in and turn in either direction to the setting you want. Operating Instructions A HOT COOKTOP indicator light will glow when any radiant element is turned on, and will remain on until the surface is cooled to approximately 150°F. Indicator light will: At both OFF and HI the control clicks into position.
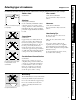
Safety Instructions Operating Instructions Throughout this manual, features and appearance may vary from your model. About the radiant surface units… SURFACE COOKING ;;;;;;;;;;;;; ;;;;;;;;;;;; ; ;;;; ;;; ;; ;;;;;;;; Never cook directly on the glass. Always use cookware. OFF CENTER ;;;;;;;;;;; ;;;;;;;;;;; ; ;;;; ;;; ;;;;;;;;;;; ; ;;; ;;; Always place; the pan in;the center of the surface unit you are cooking on.
GEAppliances.com The following information will help you choose cookware which will give good performance on glass cooktops. Stainless Steel: Glass-ceramic: recommended usable, but not recommended Poor performance. May scratch the surface. Aluminum: Stoneware: Operating Instructions Check pans for flat bottoms by using a straight edge. heavy weight recommended Good conductivity. Aluminum residues sometimes appear as scratches on the cooktop, but can be removed if cleaned immediately.
Throughout this manual, features and appearance may vary from your model. Operating Instructions Safety Instructions Using the oven controls. Care and Cleaning Oven Control, Clock and Timer Features and Settings COOK TIME ON/OFF Pad PREHEATED Light Press this pad and then press the HOUR and MIN. pads to set the amount of time you want your food to cook. Turn the Oven Temperature knob to the desired temperature. The oven will shut off when the Cook Time has run out.
GEAppliances.com To avoid possible burns, place the shelves in the desired position before you turn the oven on. Before you begin… The shelves have stops, so that when placed correctly on the supports, they will stop before coming completely out, and will not tilt. To remove a shelf, pull it toward you, tilt the front end up and pull it out. The oven has 6 shelf positions. To replace, place the end of the shelf (stop-locks) on the support, tilt up the front and push the shelf in.
Safety Instructions Operating Instructions To avoid possible burns, place the shelves in the desired position before you turn the oven on. How to Set the Oven for Broiling Place the meat or fish on the broiler grid in the broiler pan. Follow suggested shelf positions in the Broiling Guide. If your range is connected to 208 volts, rare steaks may be broiled by preheating the broiler and positioning the oven shelf one position higher. Leave the door open to the broil stop position.
GEAppliances.com Not all features are on all models. To Set the Clock Make sure the clock is set to the correct time of day. The clock must be set to the correct time of day for the automatic oven timing functions to work properly. The time of day cannot be changed during a timed baking or self-cleaning cycle. Press the CLOCK pad. Press the HOUR and MIN. pads until the time of day shows in the display.
Do not latch the oven door during timed cooking. The latch is used for self-cleaning only. NOTE: Foods that spoil easily–such as milk, eggs, fish, stuffings, poultry and pork–should not be allowed to sit for more than 1 hour before or after cooking. Room temperature promotes the growth of harmful bacteria. Be sure that the oven light is off because heat from the bulb will speed harmful bacteria growth.
(Designed for use on the Jewish Sabbath and Holidays) (On some models) GEAppliances.com The Sabbath feature can be used for baking/roasting only. It cannot be used for broiling, self-cleaning, or Delay Start cooking. NOTE: The oven light comes on automatically (on some models) when the door is opened and goes off when the door is closed. The bulb may be removed. See the Oven Light Replacement section. On models with a light switch on the control panel, the oven light may be turned on and left on.
You may find that your new oven cooks differently than the one it replaced. Use your new oven for a few weeks to become more familiar with it. If you still think your new oven is too hot or too cold, you can adjust the thermostat yourself. Do not use thermometers, such as those found in grocery stores, to check the temperature setting of your oven. These thermometers may vary 20–40°F. To Adjust the Thermostat Put the Oven Temperature knob in the OFF position.
GEAppliances.com Never force the latch handle. Forcing the handle will damage the door lock mechanism. Before a Clean Cycle We recommend venting your kitchen with an open window or using a ventilation fan or hood during the first self-clean cycle. Wipe up heavy soil on the oven bottom. The oven shelves can be self-cleaned, but they will darken, lose their luster and become hard to slide. Soil on the front frame of the range and outside the gasket on the door will need to be cleaned by hand.
How to Delay the Start of Cleaning Make sure the clock shows the correct time of day. Latch the door. Turn the Oven Temperature knob to CLEAN. On some models, you must push the knob in before turning. Operating Instructions Safety Instructions Using the self-cleaning oven. Press the START TIME ON/OFF pad. Press the HOUR and MIN. pads to set the time cleaning will start.
GEAppliances.com Be sure all controls are off and all surfaces are cool before cleaning any part of the range. If your range is removed for cleaning, servicing or any reason, be sure the anti-tip device is re-engaged properly when the range is replaced. Failure to take this precaution could result in tipping of the range and cause injury.
Safety Instructions Cleaning the Oven Door To clean the inside of the door: ■ Because the area inside the gasket is cleaned during the self-clean cycle, you do not need to clean this by hand. The gasket is designed with a gap at the bottom to allow for proper air circulation. Do not rub or clean the door gasket— it has an extremely low resistance to abrasion. If you notice the gasket becoming worn, frayed or damaged in any way or if it has become displaced on the door, you should have it replaced.
Painted Surfaces Painted surfaces include the sides, top of backguard and the drawer front. Clean these with soap and water or a vinegar and water solution. Do not use commercial oven cleaners, cleaning powders, steel wool or harsh abrasives on any painted surface. The oven vent is located behind the right rear surface unit. This area could become hot during oven use. It is normal for steam to come out of the vent and moisture may collect underneath it when the oven is in use.
Safety Instructions Operating Instructions Oven Light Replacement CAUTION: Before replacing your oven light bulb, disconnect the electrical power to the range at the main fuse or circuit breaker panel. Be sure to let the light cover and bulb cool completely. Wire cover holder. To remove the cover: To replace the cover: Place it into groove of the light receptacle. Pull wire forward to the center of the cover until it snaps into place. Connect electrical power to the range.
GEAppliances.com Normal Daily Use Cleaning ONLY use CERAMA BRYTE® Ceramic Cooktop Cleaner on the glass cooktop. Other creams may not be as effective. To maintain and protect the surface of your glass cooktop, follow these steps: Daily use of CERAMA BRYTE® Ceramic Cooktop Cleaner will help keep the cooktop looking new. Use a paper towel or CERAMA BRYTE® Cleaning Pad for Ceramic Cooktops to clean the entire cooktop surface. Use a dry cloth or paper towel to remove all cleaning residue. No need to rinse.
Metal Marks and Scratches Be careful not to slide pots and pans across your cooktop. It will leave metal markings on the cooktop surface. If pots with a thin overlay of aluminum or copper are allowed to boil dry, the overlay may leave black discoloration on the cooktop. These marks are removable using the CERAMA BRYTE® Ceramic Cooktop Cleaner with the CERAMA BRYTE® Cleaning Pad for Ceramic Cooktops. This should be removed immediately before heating again or the discoloration may be permanent.
GEAppliances.com Troubleshooting Tips Save time and money! Review the charts on the following pages first and you may not need to call for service. Improper cookware being used. • Use pans which are flat and match the diameter of the surface unit selected. Surface units do not work properly A fuse in your home may be blown or the circuit breaker tripped. • Replace the fuse or reset the circuit breaker. Cooktop controls improperly set.
Safety Instructions Operating Instructions Care and Cleaning Troubleshooting Tips Consumer Support Before you call for service… Troubleshooting Tips Problem Possible Causes Oven light does not work Light bulb is loose or defective. • Tighten or replace the bulb. Switch operating light is broken. • Call for service. Oven will not work Plug on range is not completely inserted in the electrical outlet. • Make sure electrical plug is plugged into a live, properly grounded outlet.
Power outage or surge. • Some models will automatically resume their setting once the power is restored. On models with a clock, you must reset the clock. If the oven was in use, you must reset it by turning the Oven Temperature knob back to OFF, setting the clock and resetting any cooking function. Storage drawer is crooked Rear drawer support is on top of the guide rail. • Reposition the drawer. See the Storage Drawer Removal instructions in the Care and cleaning of your range section.
Safety Instructions Operating Instructions Care and Cleaning Troubleshooting Tips Consumer Support Before you call for service… Troubleshooting Tips Problem Possible Causes What To Do Oven not clean after a clean cycle Oven controls not properly set. • See the Using the self-cleaning oven section. Oven was heavily soiled. • Clean up heavy spillovers before starting the clean cycle. Heavily soiled ovens may need to self-clean again or for a longer period of time.
GE Service Protection Plus™ GE, a name recognized worldwide for quality and dependability, offers you Service Protection Plus ™—comprehensive protection on all your appliances— No Matter What Brand! Benefits Include: • Backed by GE • All brands covered • Unlimited service calls • All parts and labor costs included • No out-of-pocket expenses • No hidden deductibles • One 800 number to call We’ll Cover Any Appliance. Anywhere. Anytime.
Consumer Product Ownership Registration Dear Customer: Thank you for purchasing our product and thank you for placing your confidence in us. We are proud to have you as a customer! Follow these three steps to protect your new appliance investment: 1 2 3 Complete and mail your Consumer Product Ownership Registration today. Have the peace of mind of knowing we can contact you in the unlikely event of a safety modification. Read your Owner’s Manual carefully.
All warranty service provided by our Factory Service Centers, or an authorized Customer Care® technician. To schedule service, on-line, 24 hours a day, visit us at GEAppliances.com, or call 800.GE.CARES (800.432.2737). Staple your receipt here. Proof of the original purchase date is needed to obtain service under the warranty. GE Will Provide: One Year From the date of the original purchase Any part of the range which fails due to a defect in materials or workmanship.
Consumer Support. GE Appliances Website GEAppliances.com Have a question or need assistance with your appliance? Try the GE Appliances Website 24 hours a day, any day of the year! For greater convenience and faster service, you can now download Owner’s Manuals, order parts, catalogs, or even schedule service on-line. You can also “Ask Our Team of Experts™” your questions, and so much more... Schedule Service GEAppliances.com Expert GE repair service is only one step away from your door.