Installation Instructions Advantium® 240V Built-In SpeedCook Ovens PSB2200 PSB2201 ZSC2200 ZSC2201 ZSC2202 49-40574-1 MFL06213302 02-08 JR
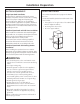
Safety Information BEFORE YOU BEGIN CONTENTS Read these instructions completely and carefully. Design Information Models Available......................................................................2 Product Dimensions and Clearances ............................3 Tools and Parts Required ....................................................3 Parts Supplied ..........................................................................3 Electrical Tools and Parts Required ................................
Design Information PRODUCT DIMENSIONS AND CLEARANCES NOTE: Appearance will vary by model. 21 1/2” 21-1/2” 29 3/4” 29-3/4” 1919” 1/32” 1” 13/16” 13” 13” ADVANCE PLANNING TOOLS AND PARTS REQUIRED (NOT SUPPLIED) • These ovens may be installed directly into a 30” wide oven cabinet. • Cutout dimensions are NOT the same for installation with or without an accessory storage drawer. Make sure to use the correct cutout when preparing the opening.
Installation Preparation ELECTRICAL REQUIREMENTS INSTALL JUNCTION BOX Single Speedcook Installation The conduit is located at the top right on the back of the oven. Product rating is 120/208 or 120/240 volt, 60 Hz, 30 amps. This product must be connected to a supply circuit of the proper voltage and frequency and protected by a time delay fuse or circuit breaker. Power should be supplied from a separate, dedicated 30-ampere branch circuit.
Installation Preparation Preparation WITHOUT an Accessory Storage Drawer PREPARE THE OPENING PREPARE THE OPENING (CONT.) The Advantium 240V can be installed in combination with other GE/Monogram appliances. Always follow each product’s Installation Instructions to complete the installation. Installation over a GE/Monogram Warming Drawer: 30” 23-1/2” Single Advantium 240V Installation: Order a 30” wide single oven cabinet or cut the opening in a wall to the dimensions shown.
Installation Preparation Preparation WITHOUT an Accessory Storage Drawer PREPARE THE OPENING (CONT.) PREPARE THE OPENING (CONT.) Installation over a GE/Monogram Oven: Installation over a GE/Monogram Oven and Warming Drawer: 30” 23-1/2” 25-1/4” 17-1/2” Construct Solid Bottom Min. 3/8” Plywood Supported by 2x4 or 2x2 Runners all Four Sides 30” 23-1/2” 25-1/4” 2” Min. (3” recommended) 17-1/2” Per Oven Requirement Construct Solid Bottom Min.
Installation Preparation Preparation WITH an Accessory Storage Drawer NOTE: MODEL ZSC2202 CANNOT BE INSTALLED WITH AN ACCESSORY STORAGE DRAWER. SEE INSTALLATION PREPARATION WITHOUT AN ACCESSORY STORAGE DRAWER FOR THIS MODEL. PREPARE THE OPENING PREPARE THE OPENING (CONT.) The Advantium 240V can be installed in combination with other GE/Monogram appliances. Always follow each product’s Installation Instructions to complete the installation. Single Advantium 240V Installation (cont.
Installation Preparation Preparation WITH an Accessory Storage Drawer NOTE: MODEL ZSC2202 CANNOT BE INSTALLED WITH AN ACCESSORY STORAGE DRAWER. SEE INSTALLATION PREPARATION WITHOUT AN ACCESSORY STORAGE DRAWER FOR THIS MODEL. PREPARE THE OPENING (CONT.) PREPARE THE OPENING (CONT.) Installation over a GE/Monogram Oven: Installation over a GE/Monogram Oven and Warming Drawer: 23-1/2” 30” 25-1/4” Min.* 21” Construct Solid Bottom Min.
Installation Instructions 1 REMOVE THE PACKAGING AND PARTS • Remove all packing material and tape. • Locate parts package containing mounting screws. • Remove the oven from the carton. Do not lift unit by handle or conduit. Two people are required to lift this oven. • Open the door and remove any packaging in oven.
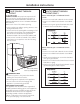
Installation Instructions 2 ROUTE CONDUIT THROUGH CUTOUT (CONT.) 2 ROUTE CONDUIT THROUGH CUTOUT When connecting to a 3-conductor branch circuit: • Connect oven red lead to branch circuit red lead. • Connect oven black lead to branch circuit black lead. • Connect oven green ground lead and white lead to branch circuit neutral (white or gray). CAUTION: Two people are required to lift the oven into the opening. Grasp the bottom at front and rear. Discard foam base.
Installation Instructions 4 INSTALL MOUNTING SCREWS 3 INSTALL BOTTOM TRIM NOTE: If installing the Advantium 240 Oven with an accessory storage drawer, the bottom trim is not required. Proceed to Step 4. • Align bottom trim tabs to slots in the bottom of the oven. • Slide the oven the remaining way into the opening so that the side flanges and control panel are against the cabinet frame. Make sure that the oven is centered in the opening.
Assembly Instructions Advantium® 240V Built-In Accessory Storage Drawer JX2200, JX2201, ZX2201 BEFORE YOU BEGIN MODELS AVAILABLE Profile Models: JX2200BB–Black JX2201SS–Stainless Steel Read these instructions completely and carefully. Read the Installation Instructions for the Advantium 240V oven completely and carefully for cutout dimensions and step-by-step instructions. Monogram Models: ZX2201SS–Stainless Steel IMPORTANT — Save these instructions for local inspector’s use.
ASSEMBLY TO ADVANTIUM 240V BUILT-IN SPEEDCOOK OVEN ASSEMBLING THE OVEN TO DRAWER (CONT.) 1 REMOVE PACKAGING AND PARTS • • • • Remove the drawer from the carton. Remove all packing material and tape. Open the drawer and remove any parts inside. Locate parts. C Remove the front two bottom screws on each side of the oven and the top center screw on each side of the storage drawer. D Place the side supports into the tabs on the drawer and secure using the screws supplied and the screws removed in Step C.
NOTE: While performing installations described in this book, safety glasses or goggles should be worn. NOTE: Product improvement is a continuing endeavor at General Electric. Therefore, materials, appearance and specifications are subject to change without notice. Printed in Korea GE Consumer & Industrial Appliances General Electric Company Louisville, KY 40225 ge.