0 Safety Instructions Operating Instructions Batteries ............................ Care and Cleaning ............... Remote Control Features ........ Installation | 0_ 0_ 0_ 0 91wwlmlm 2 ............ 3 6, 7 4, 5 AE1CD14DM / AEOCD14DM AE1CD2ODM / AEOCD2ODM Instructions Air Purging and LeakageTest ..... 15 Before You Begin ................... 8 Connection Tubing ............... 11 Dimensions ........................ 9 Drainage Hose ................... 11 Electrical Requirements.............
IMPORTANT SAFETY INFORMATION. READ ALL INSTRUCTIONS BEFORE USING. tl WARNING! For your safety, the information in this manual must be followed to minimize the risk of fire, electric shock or personal injury. SAFETY PRECAUTIONS Use this equipment onlg for its intended purpose as described in this Owner's Manual. This sgstem must be properlg installed in accordance with the Installation Instructions before it is used. @ All wiring should be rated appropriate for the current value listed on the rating plate.
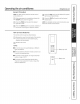
Operating the air conditioner. General GEAppliances.com Procedure NOTE:For best results, point the remote control at the indoor unit. [_] Pressthe FAN pad to set the desired fan speed (AUTO/Low/Medium/High). r-_ Hake sure power is connected and press the ON/OFF pad to start the sgstem. [_ F2-] Pressthe NODE pad to select the desired operation mode. NOTE:Fordetailed remote control instructions, see About the remote control section. Pressthe TENP +/- pads to set the desired temperature.
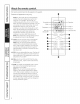
About the remote control. Theremote control transmits the signals to the system. Featuresand appearance may vary. AUTO--In this mode, the unit automatica% controls the room temperature within the range of 77°F and 68°F. The fan will run continuously while the unit is in AUTO mode. When the room temperature exceeds 77°F, the unit will go into COOLMode. When the room temperature drops to 73°F, the fan will continue to run but COOLMode will turn off.
About the remote control. contJ GEAppliances.com The remote control transmits the signals to the system. Features of the Remote Control O isplag Displagsall set contents when turned on. Displagsonlg the set temperature and time when turned off. 0 ON/OFF Pad Pressto turn the sgstem on and off. PressTIME- or TIME+ pads to set the start time in 1-minute increments. MODE Pad Pressto change the operation mode to AUTO,_ (COOL),666(DRY), dSf_(FAN ONLY) or _:_(HEAT).
Care and cleaning of the air conditioner. Indoor Unit Grille, Case and Remote Control Air Filters Turn the sgstem off before cleaning. To clean, wipe with a soft, drg cloth. Do not use bleach or abrasives. Air intakevent The two air filters behind the front grille should be checked and cleaned at least everg 30 dags or more often, if necessarg. Air outletvent r_ open the front access panel. F2-] Pull the filter tab slightlg forward to remove the filter.
GEAppliances.com Outdoor Unit The heat exchanger coils and panel vents of the outdoor unit should be checked regularlg. If clogged with dirt or debris, the heat exchanger and panel vents should be professionallg cleaned. Air intake vents NOTES: Air outlet vent m Power supplg must be disconnected before cleaning the outdoor unit. m Oirt_lor clogged coils wi!! reduce the operating e_ciency of the sgstem and cause higher operating costs. If you're closing up for the season...
I stall tio I structio Mi i Split-Sg te Air Co diti e BEFORE YOU BEGIN Read these instructions completely and ca refu IIg. • IMPORTANT - savethese instructions for local inspector's use. • IMPORTANT ELECTRICAL REQUIREMENTS • Becertain all wiring complies with local building codes and NECand that the supply voltage for this system iscorrect. The system supply voltage is connected to the outdoor unit only. - Observeallgoverningcodes and ordinances.
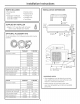
Installation PARTS INCLUDED Instructions INSTALLATION • Mounting plate • Sealer • Remote control • Screws (5for 10,000 and • Drainage hose • Insulation hose DIMENSIONS • Batteries AAA(2) la,000 BTU models/10 for 20,000 BTU models) • Two (2)filters _6" ormore space 6" or more SUPPLIED BY INSTALLER _ to the ceiling spaceto f'//' the wall f/ " 6" or more ...................... _...................
Installation Read these instructions completely Instructions and carefully; then follow step by step. SELECT THE BEST LOCATION r_ INDOOR UNIT []OUTDOOR UNIT • Do not allow ang heat or steam near the unit. • Select a location where there are no obstacles in front of the unit. • If an awning is built over the unit to prevent direct sunlight or rain exposure, make sure that heat radiation from the condenser is not restricted. • Make sure that condensate convenientlg routed awag.
Installation Instructions INSTALLATION [] INSTALL THE MOUNTING • Always mount the mounting PLATE I_ INSTALL THE CONNECTION plate horizontally. • Connect the copper tubing with the relevant union tubes of the indoor unit and tighten the flare nut of the connection tubes. • Attach the mounting plate at the selected location with screws supplied with the unit. NOTE: Be careful when bending the connection tubes to ovoid damaging them.
Installation Instructions INSTALLATION (cont.} [_] CONNECT ELECTRICAL WIRING BETWEEN INDOOR AND OUTDOOR UNITS F6]WIRE THE INDOOR NOTE: Wiring must be done by a qualified electrician according to the local codes and regulations and this manual. The connecting wire should be correctly connected to the circuit interface. • All wiring should be rated appropriately for the current value listed on the rating plate. • The power supply should accommodate voltage. UNIT {cont.
Installation Instructions INSTALLATION (cont.} [71 INSTALL THE INDOOR UNIT [2] INSTALL THE INDOOR UNIT (cont.} • Route the tubes and wiring from the right side of the indoor unit. Cut off the railings from the chassis as necessary. • Wrap the tubes and wiring and pull them through the cut-off-tailings hole. 1. Cut off tailings 1 when routing the wiring only. Wrappingtape 2. Cut off railings 1 and 2 (or railings 1, 2 and 3) when routing both the wiring and tubing.
Installation Instructions INSTALLATION (cont.} [_]WIRE THE OUTDOOR UNIT 1. Open the cover of the outdoor FsqWIRE THE OUTDOOR UNIT (cont.} NOTES: unit. • Wiring should be consistent with the above wiring diagrams. • Wiring must be correct. • Tighten the nut of the terminal board to keep the board secured. 2. The connecting wire lead from the terminal board of the indoor unit must be connected correctly. 3. The connecting wire should be a little longer so that it can be maintained easily.
Installation Instructions INSTALLATION (cont.} | INSTALL THE OUTDOOR UNIT • Install the connection I-_ tube i. Align the center of the tubing flare with the relevant valve. , tube specifications Spedficetions 10,000/14,00020,000 BTU Units BTU Units , 20 ft. 26.2 ft. Extra Refrigerant Charge PerFt.AboveDesignLength 0.16 oz./ft. 0.54 oz./ft. Outer Diameter Liquid Pipe 1/4" 3/8" Outer Diameter Gas Pipe 1/2" 5/8" Max.Distance Height 33 ft. 33 ft. Max. Distance Length 68 ft. 98 ft.
Installation Instructions _-_ TEST OPERATION AND CHECK AFTER INSTALLATION Test operation 1. Before test operation • Do not switch on power before installation • Electrical wiring must be connected • Shut-off valves of the connection • All impurities 2. Test operation is finished completely. correctly and securely. tubes should be opened. such us scraps and particulates must be cleared from the unit.
Before gou call for service... GEAppliances.com Troubleshooting Tips:Save time and moneg! Review the chart below first and gou mag not need to call for service. The sgstem does not start Possible Causes What To Do The fuse is blown/circuit breaker is tripped, • Check the house fuse/circuit breaker box and replace the fuse or reset the breaker. The Timer operation is not set correctly, • Check the Timer functions and make sure they are set to the desired settings. The unit does not operate when .
Split Sgstem Warrantg. All warrantg service provided bg our designated service network. To schedule service, call 866.404.5245. For service in Canada, contact Gordon Williams Corp. at 1.888.209.0999. Please have serial number and model number available when calling for service. Staple Four receipt here. Proof of the origina! purchase date is needed to obtain service under the warrant F.
Consignesde s_cufit_ ........... zo Condgnes d'utilisation Entretien et nettouage ................. 24 Fomctionsde la t616commande .... 22, 23 Piles ................................... 21 Instructions de montage Avant de commencer ................. Branchements ........................ 25 28 Branchement 61ectrique de I'unit6 ext6rieure ................... 31 Branchement 61ectrique de I'unit6 int6rieure .................... 29 C6blage 61ectrique................ C6ble 61ectrique.......................
J J IMPORTANTES CONSIGNES DE SECURITE. VEUILLEZ LIRE TOUTES LES CONSIGNES AVANT UTILISATION. AVERTISSEMENT! Pour votre s4curit4, les informations contenues dans ce manuel doivent 8tre suivies afin de minimiser les risques d'incendie, de chocs dlectriques ou de blessures corporelles. CONSIGNES DE SL-CURITE N'utilisez cet appareil qu'aux fins pr6vues d6crites dans le manuel d'utilisation. Ce sgst_me doit @trecorrectement install6 conform6ment aux Consignes de Montage avant toute utilisation.
Utilisation du climatiseur, Procedure www.electromenagersge.c g_n_rale REMARQUE: Pour obtenir de meilleurs r_sultats, pointez la t_l_commande en direction de I'unit_ int_rieure. I'appareilest branch_ h m Assurez-vousque I'alimentation _lectrique puis appuyez sur la touche ON/OFF (Morche/orr_g pour mettre I'appareil en marche.
A propos de la t#l#commande. ka tdl4commande transmet les signaux au sgst_me, kes fonctions et I'apparence peuvent varier. AUTO (Automatique)--Dans ce mode, I'unit_ maintient la temp@ature de la piece entre 25 °C (77°F)et 20 °C (68 °F).Le ventilateur fonctionne en continu pendant qua I'unit@est en mode AUTO. Lorsque la temperature de la piece d@asse 25 °C (77 °F),I'unit_ passe au mode COOL (Refroidissement).
A propos de la t#l#commande (suite). www.electromenagersge.ca La t_l_commande transmet los signaux au s.ust_me. Fonctions de la tdldcommande O ffichoge Affiche lesr@glages IorsqueI'appareil estmisen marche. Afficheseulement lerOglage dela tempOrature etderheureIorsquerappareilest@int. 0 ToucheON/OFF(Marche/Arr@t) Appugezsur cette touche pour allumerou _teindre I'appareil. AppuuersurlostouchesTIME-ouTIHE+pour r@gler I'heuredemiseen marcheparincr@ment d'uneminute.
Entretien et nettoyoge du climotiseur ,_ M ISE EN GARDE : Avant d'effectuer I'entretien devotre appareil, ddbranchez I'alimentation dlectrique. Unit_ int_rieure Grille, Logement etT_l_commonde Filtres _ Air Eteignez le sgst_me avant de le nettoger. Pour le nettoger, essugez-le avec un chiffon doux et sec. N'utilisez pas d'eau de Javel ou de nettogants abrasifs.
tise I structio r$ ibl c MISEEN GARDE: AVANT DE COMMENCER Lisezces instructions enti_rement et ottentivement. • N'utilisez pos de rollonges ovec cet opporeil. • - Conservez ces instructions pour I'inspecteur 61ectrique local. IMPORTANT • Un c6bloge en oluminium dons le domicile peut occosionner des probl_mes porticuliers-consultez un @lectricien quolifi& • IMPORTANT • Lorsque I'unit_ est en position STOP(Art@t}, les commondes sont toujours sous tension.
Instructions de manta PII_CES INCLUSES e DIMENSIONS • Plaquede montage • T616commande • Enduit • PilesAAA (2) . Vis (5 pour les modeles (_ i0 000 et 14 000 BTU et • Tugau de vidange • Tuyau d'isolation • Deux filtres (2) 10 pour les modules (_ 20 000 BTU) DE L'INSTALLATION _6 po ouplus entrele 6 po ou plus entrele climatiseur_ _!' climatiseuret le plafond etlemur _ FOURNIS PAR L'INSTALLATEUR J: _ i i _ \, ._ ,\ 6 poou plus entrele c matseur -,\ <_-- _%r Adaptateur Soupape Schrade
Instructions Lisez ces instructions enti_rement et attentivement, de monta puis suivez-les e _tape par _tape. # CHOISISSEZ L'EMPLACEMENT LE PLUS APPROPRIE FA]UNITE INTERIEURE [] UNITI_ EXTI_RIEURE • N'exposez pas votre unit6 5 la chaleur ou la vapeur. • Si une morquise est construite ou dessus de I'unit# pour Io prot6ger d'une exposition directe ou soleil ou 6 Io pluie, ossurez-vous que le rogonnement de choleur en provenance du condenseur ne soit pas restreint.
Instructions de manta e INSTALLATION [] INSTALLATION DU PLAGUE DE MONTAGE r_ INSTALLATION DES TUYAUX DE CONNEXION • Installez toujours horizontalement. • Branchez les tuLlaux de cuivre de connexion avec les raccords union de I'unit6 int@ieure et resserrez le plaque de montage • Fixez le plaque de montage 6 I'emplocement avec les vis fournies avec I'unit& choisi le raccord conique des tuLlaux de connexion. REMARQUE : Courbez d61icatement les tugaux de connexion pour 6viter de les endommager.
Instructions _] BRANCHEMENT de monta DU C,ABLAGE e I_] CABLAGE DE L'UNITI_ INTI_RIEURE (suite} I_LECTRIQUE ENTRE LES UNITIES EXTERIEURE ET INTI_RIEURE REMARQUE: Le c_blage doit _tre effectu6 par un @ctricien qualifi6 conform@mentaux codes Iocaux, aux I_gislations et 6 cette notice. Lefil de branchement doit _tre correctement branch_ 6 I'interface du circuit.
Instructions de monto e [_] INSTALLATION (suite} [2[] INSTALLATION DE L'UNITI_ INTI_RIEURE [2[]INSTALLATION DE L'UNITI_ INTI_RIEURE (suite} • Foites passer les tuyoux et le cabloge sur Io droite de I'unit6 int@ieure. D6coupez les parties en exc_s du chassis si n6cessoire. • Enveloppez les tULlauteries et le cabloge et tirez-les au travers du trou d#coup#. 1. D6coupez le rejet 1 Iorsque vous faites seulement passer le cablage. 2.
Instructions de monta I-8] C#,BLAGE DE L'UNITI_ E×TI_RIEURE e [] C#,BLAGE DE L'UNITI_ E×TI_RIEURE {suite} 1. Ouvrez le couvercle de I'unit6 ext@ieure. 2. Le c_ble de connexion provenant du bornier de I'unit6 int@ieure doit _tre branch6 correctement. REMARQUES : • Le c6blagedoit suivrelessch6mas de c6blageci-dessus. • Serrez1'6croudu bornier pour s'assurer que ce dernier est bien fix& 3. Ce c_ble doit _tre un peu plus long que n6cessaire pour permettre un entretien facile.
Instructions de manta e INSTALLATION (suite} | INSTALLATION E×TI_RIEURE • Installez le tugau DE L'UNITI_ [i_ PURGE DE L'AIR ET TEST DE FUITES i. Installez les tugaux de connexion int@ieure et ext@ieure. de connexion i. Alignez le centre de l'#vasement le robinet correspondant.
Instructions ESSAI DE FONCTIONNEMENT de montage ET VITRIFICATIONS APRILS INSTALLATION Essai de fonctionnement i. Avant l'essai de fonctJonnement • Ne branchez pas votre appareil avant que I'installation ne soit compl@tement • Le c@blage 61ectrique doit @tre branch@ de fa_on correcte • Les soupapes de d@tente des tugaux de connexion • Toutes les impuret6s 2. Procedure achev6e. et sGre. doivent @tre ouvertes.
Avant d°appeler un technician...
Garantie du syst me 6 blocs, www.electromenogersge.co Tous Its services en vertu de la garantie sont foumis par notre r4seau de maintenance sp4cialement pr4vu _ cat effet. Pour pr4voir un service, appelez le 866.404.5245. Pour un service au Canada, contactez Gordon Williams Corp. au ;_.888.209.0999.Veuillez avoir votre num4ro de s4rie et votre num4ro de module _ port4e de main Iorsque vous appelez pour obtenir un service. Nous remplacerons Un on A partir de la dote d'ochat original C..
Assistance _ ia dient_le. Site Intemet GE www.electromenagersge.ca Pour toute question ou pour un besoin d'assistance au sujet de votre appareil m@nager,consultez le site Internet ci-dessus,accessible 24 heures parjour, chaquejour de I'ann_e!A partir du site,vous pouvez t@l_chargerles manuels d'utilisation. Studio de conception rda/iste www.electromenugersge.cu Sur demande, GEpeut fournir une brochure sur I'am_nagement d'une cuisine pour les personnes mobilit_ r_duite.
Instrucciones de seguridud ............. Instrucciones de funcionamiento Cuidado g limpieza ......................... Funciones del control remora ............. Pilas ............................................ Instrucciones 3s ¢n 42, 43 40, 41 39 de instalaci6n Antes de comenzar ............................ Cableado de la unidad exterior ................ Cableado de la unidad interior ................ Cableado el6ctrico ........................ Conducto de la tuberia ........................
INFORMACION IMPORTANTEDE SEGURIDAD. LEA TODAS LAS INSTRUCCIONES ANTES DE USAR. iADVERTENCIA! Para su seguridad, siga las instrucciones de este manual a fin de minimizar riesgos de incendio, descargas el4ctricas o heridas personales. PRECAUCIONESDE SEGURIDAD Use este equipo s61o para su prop6sito original segOn se describe en el Manual del Propietario. Este sistema se debe instalar de forma apropiada de acuerdo con las Instrucciones de Instalaci6n antes de ser usado.
C6mo utilizar el acondicionador de aire. Procedimiento 6EAppliances.com general NOTA:Poroobtener mejores resultados, apunte el control remoto a la unidad interna. que el cable est@conectado g m Aseg0rese presione el bot6n de ENCENDIDO/APAGADO (ON/OFFIparaoctivor elsistema, bot6n MODO (MODE)para D Presioneel seleccionar el modo de funcionamiento deseado. I-_--1Presioneel bot6n VENTILADOR(FAN)para configurar Io velocidad deseada (Automdtico/Bajo/Hedio/Alto).
Sobreel control remoto del sistema. El control remoto transmite las se_ales al sistema. Los camcteristicas bl apariencia pueden variar. AUTO (autom6tico)--En este modo, la unidad controla autom6ticamente la temperatura ambiente dentro del rango de 77 °F y 68 °F. El ventilador funciona sin interrupci6n mientras la unidad se encuentra en el modo AUTO (autom6tico). Cuando la temperatura ambiente supera los 77 °F, la unidad pasa al Modo COOL (frio).
Sobreel control remoto del sistema (cont.). GEAppliances.com El control remoto transmite los se_alesal sistema. Caractefisticas del control remoto 0 Pantalla Huestra todos loscontenidosconfigurados cuandoseenciende. Huestra s61ola temperatura configurada y lahora cuandoseapaga. Bot6n ON/OFF fencendido/apagadol Presioneparaencendero apagarel sistema.
Cuidadog limpieza del acondicionador de aire. A ,.,n,-,..^, de corriente del sistema. Unidod de interior Rejilla, caja y control remoto Nitros de oire Apague el sistema antes de limpiarlo. Para limpiar, utilice un patio suave g seco. No use blanqueadores ni abrasivos. Losdos filtros de aire que se encuentran detr6s de la rejilla frontal se deberfan revisar g limpiar por Io menos cada 30 dfas o con una frecuencia magor, si fuera necesario.
GEAppliances.com Unidud de exterior Las bobinas de intercambio de calefacci6n y la ventilaci6n del panel de la unidad de exterior se deber[an revisar en forma regular. Si se bloquean con polvillo o part[culas, el intercambiador de calor g las ventilaciones del panel deben ser limpiados par un profesional. NOTAS: Ventilaci6n -de la entrada de aire Ventilaci6n de lasalida de aire • El cable de corriente se debe desconector antes de limpior lo unidod de exterior.
Jde Instrucciones instalaci6n Acondicionador de aire de sistema mini split J ANTESDE COIVlENZAR -4,PRECAUCION: Lea estas instruccionesen su totalidad • No use extensiones de cobles con este sistemo. g atentamente. • Los cobles de oluminio poro construcciones pueden presentor problemos especioles-consulte o un electricisto colificodo. • IMPORTANTE -Conserve estas instrucciones parausodelinspectorlocal. ordenanzasgubernamentales.
Instrucciones de instalaci6n PARTES INCLUIDAS DIMENSIONES • Placade montaje • Sellante • control remoto • Tornillos (5 por modelos de 10,000 y 14,000 BTU/IO por modelos de 20,000 BTU) • pilas AAA (2) • Manguera de drenaje • Manguera aislante • Dos (2)filtros SUMINISTRADO DE INSTALACI6N _6" 6" o m4s espacio hasta _ la paredf " POR EL INSTALADOR o m_s espacio _ hastael cielo raso ........ : ,, _:!:: '_ , \ 6" o m4s espaciohasta la pared Adaptador abierto macho de ¼" con v61vula Schrader x hem
Instrucciones de instalaci6n Lea estas instrucciones en forma completa g atentamente; luego sigalas paso a paso. ELIJA LA MEJOR UBICACION [] UNIDAD DE INTERIOR I-B-IUNIDAD DE EXTERIOR • No permita que haya calornivapor cerca de launidad. • Si coloca un toldo sabre la unidad a fin de • EIUa una ubicaci6n frente a la unidad. evitar la exposici6n directa a la luz solar o Iluvia, aseg0rese que @ste no restrinja la radiaci6n de calor del condensador.
Instrucciones de instalaci6n INSTALACI6N [TI INSTALACION MONTAJE DE LA PLACA DE INSTALACI6N DE LAS TUBERJAS DE CONEXI6N • Conecte las tuberfas de cobre de conexi6n con los tubos • Siempremonte la placade montajeenforma horizontal. • Adjuntela placade montajeen la ubicaci6nelegidaconlos tornillosincluidoscon la unidad. de uni6n de la unidad de interior g ajuste la tuerca c6nica de los tubos de conexi6n. NOTA:Incline los tubos de conexi6n cuidadosamente a fin de evitar daflarlos.
Instrucciones de instalaci6n INSTALACION (cont.) 13]CONECTE LA UNIDAD INTERIOR (cont.) EEICONE×I6N DEL CABLEADO ELECTRICO ENTRE LA UNIDAD INTERIOR ¥ EXTERIOR NOTA:El cableado debe ser realizado par un electricista calificado de acuerdo con los c6digos locales, regulaciones y este manual. El cable de conexi6n debeHa estar conectado correctamente a la interfase del circuito. • Todas las conexiones de cableado se deben ser adecuado con relaci6n al indice de voltaje.
Instrucciones de instalaci6n INSTALACION (cont.) ETIINSTALACION DE INTERIOR DE LA UNIDAD FTIINSTALACION DE LA UNIDAD DE INTERIOR (cont.) • Diriju lu tuberiu y cubleudo desde el ludo izquierdo o derecho de lu unidud de interior, corte los sobruntes del chusis segOn sea necesurio. 1. Corte el sobrunte 1 ul extender s61o el cubleudo. • Cubra la tuberia y el cableado e ins_rtelos a troves del conducto donde se cortaron los sobrantes. Cintade embalaje 2.
Instrucciones de instalaci6n INSTALACION (cont.) rs-1CABLEADO DE LA UNIDAD DE EXTERIOR rsi CABLEADO DE LA UNIDAD DE EXTERIOR (cont.) 1. Abr(] I(] cubiert(] de I(] unid(]d de exterior. NOTAS: 2. Elc(]ble de conexi6n desde I(] pl(]c(] de barnes de I(] unid(]d de interior debe est(]r correct(]mente conect(]do. • Elc(]ble(]do debe ser congruente con los di(]gr(]m(]s de c(]ble(]do de (]rrib(]. B. Elc(]ble de conexi6n deber[(] ser un poco m6s largo p(]r(] poder conserv(]rlo fdcilmente.
Instrucciones de instalaci6n INSTALACION (cont.) INSTALACI6N DE LA UNIDAD DE EXTERIOR • Instoloci6n PURIFIQ)UE EL AIRE Y HAGA UNA PRUEBA DE PERDIDAS del tubo de conexi6n I. Alifie el centro del conducto la valvula relevante. I.Instale las tuberias de conexi6n de interior/exterior. c6nico con 2. NO ABRA LAS VALVULAS DE GAS HASTA QUE EL PROCESO DE EVACUACION SE HAYA COMPLETADO. 2. Coloque la tuerca c6nica en forma manual g luego ajuste la misma con una Ilave de tuercas g una Ilave dinamom@trica.
Instrucciones de instalaci6n INSTALACION (cont.) OPERACI6N Y CONTROL DE PRUEBA LUEGO DE LA INSTALACION Operaci6n de prueba 1. Antes de la operaci6n de prueba • No conecte la corriente antes de completar la instalaci6n totalmente. • El cableado el_ctrico se debe conectar de forma correcta g segura. • Las valvulas de cierre de las tuberias de conexi6n se deberian abrir. manual • Todas las impurezas de suciedad g particulas se deben eliminar de la unidad. 2.
Antes de solicitor reparaciones... 6EAppliances.com Consejos para la Soluci6n de Problemas: jAhorre tiempo y dinero! Lea primero el cuadro que aparece a continuoci6n bl posiblemente go no necesite solicitor reporociones... El sistema no se enciende El sistema no enfria como deberia Causas Posibles Qu_ Hacer Se quem6 el fusible/ el disyuntor est6 activado. • Controle la caja de fusibles/disyuntor de su hogar y reemplace el fusible o reinicie el disyuntor.
Garan6a del sistema de split. Todo el servicio de garantfa se encuentra provisto par nuestra red de servicio designada. Para programar un servicio t)cnico, Ilame al 866.404.5245. Para atenci6n en Canadd, comunfquese con Gordon Williams Corp. al 1.888.209.0999. Tenga el nOmero de serie g de moddo a mano cuando Ilame paro solicitor un servicio t)cnico. Pegue aquf su recibo. Se requiere facilitar prueba de la fecha de compra original para obtener un servicio bojo la garantfo.
Apoyo al cliente. Sitio Web de GEAppliances GEAppliances.com zLTiene una consulta o necesita ayuda con su aparato? iVisite el SitioWeb de GEAppliances las 24 horas al dfa, todos los dfas del ari!! Para una mayor comodidad y un servicio m6s r6pido, ahora usted puede bajar los Hanuales del Propietario, solicitar piezas o programar atenci6n on-line. Progrome una reparaciOn 6EAppliances.
Consumer Support. GEAppliances Website GEAppliances.com Have a question or need assistance with your appliance? Try the GEAppliances Website 24 hours a day, any day of the year! For greater convenience and faster service, you can now download Owner's Manuals, order parts or even schedule service on-line. Schedule Service GEAppliances.com Expert GErepair service is only one step away from your door. Get on-line and schedule your service at your convenience any day of the year! Or call 800.GE.CARES (800.