
Manual


Installation Instructions
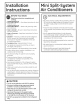
Read these instructions completely and carefully; then follow step by step.
SELECT THE BEST LOCATION
r_ INDOOR UNIT
• Do not allow ang heat or steam near the unit.
• Select a location where there are no obstacles
in front of the unit.
• Make sure that condensate drainage can be
convenientlg routed awag.
• Do not install near a doorwag.
• Ensure that the space around the left and right
of the unit is more than 6". The unit should be
installed as high on the wall as possible, allowing
a minimum of 6" from ceiling.
• Use a stud finder to locate studs for mounting and
to prevent unnecessarg damage to the wall.
• Install on studs and in a location from which
the condensation water can be drained out
convenientlg and that permits easg connection
with the outdoor unit.
• Do not cover the inlet and outlet so that the
outflow air can reach all parts of the room.
• Install in a location that is strong enough to
withstand the full weight and vibration of the unit.
• Be sure that the installation conforms to the
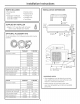
installation dimension diagram.
• Leave enough space to allow access for routine
maintenance. The height of the installed location
should be 79" or more awag from the floor.
• Install in a location that is 3 ft. or more awag from
other electrical appliances, such as televisions and
audio devices.
• Select a location that gives gou easg access to
remove and clean the filter.
Morethan6"
More f, _ , , .... More
Morethan79"
[]OUTDOOR UNIT
• If an awning is built over the unit to prevent direct
sunlight or rain exposure, make sure that heat
radiation from the condenser is not restricted.
• Ensure that the space around the back and sides
is more than 12". The front of the unit should have
more than 79" of space.
H
Morethan12"
Theplatformmust
supporta minimumof
Morethan79" 200Ibs.SeeInstallation
Dimensionsformounting
holespacing.
• Install in a location that is strong enough to permit
safe installation and to withstand the full weight
and vibration of the unit.
• Construct and anchor o strong and level mounting
base or pod for the outdoor unit.
• Anchor the outdoor unit through its four mounts,
using bolts.
• Select o location from which noise and outflow
air emitted bg the unit will not inconvenience
neighbors.
• In humid locations, the unit mog sweat and
condensation (water) mag drip from it. Take this
into consideration when choosing the location.
• Select a location that has sufficient ventilation.
• Do not cover the inlet and outlet.
• Install unit owog from flammable gas or corrosive
gas leaks.
• Be sure the installation conforms to the installation
dimension diagram.
• Rooftop Installations:
If the outdoor unit is installed on a roof structure,
be sure to level the unit. Ensure the roof structure
and anchoring method are adequate for the unit
location. Consult local codes regarding rooftop
mounting.
10