AIR CONDITIONERS ROOM SAFETY INFORMATION . . . . . . . . . 3 OPERATING INSTRUCTIONS. . . . 5 CARE AND CLEANING Owner’s Manual and Installation Instructions AEC08 AEC10 AEC12 AEC14 AHC14 AEK08 AEK10 AEK12 AEF08 Grille and Case. . . . . . . . . . . . . . . . . . . . . . . . 7 Air Filter. . . . . . . . . . . . . . . . . . . . . . . . . . . . . . 7 Outdoor Coils. . . . . . . . . . . . . . . . . . . . . . . . . 7 Installing Remote Batteries . . . . . . . . . . . . . 7 INSTALLATION . . . . . . . . . . . . .
THANK YOU FOR MAKING GE APPLIANCES A PART OF YOUR HOME. Whether you grew up with GE Appliances, or this is your first, we’re happy to have you in the family. We take pride in the craftsmanship, innovation and design that goes into every GE Appliances product, and we think you will too. Among other things, registration of your appliance ensures that we can deliver important product information and warranty details when you need them. Register your GE appliance now online.
READ ALL INSTRUCTIONS BEFORE USING THE APPLIANCE WARNING For your safety, the information in this manual must be followed to minimize the risk of fire, electric shock or personal injury. ■ Use this appliance only for its intended purpose as described in this Owner’s Manual. ■T urn the unit OFF and unplug your air conditioner before cleaning. ■T his air conditioner must be properly installed in accordance with the Installation Instructions before it is used.
SAFETY INFORMATION IMPORTANT SAFETY INFORMATION READ ALL INSTRUCTIONS BEFORE USING THE APPLIANCE WARNING USE OF EXTENSION CORDS RISK OF FIRE. Could cause serious injury or death. ■ D O NOT use an extension cord with this Window Air Conditioner. ■ D O NOT use surge protectors or multi-outlet adaptors with this Window Air Conditioner. HOW TO CONNECT ELECTRICITY Do not, under any circumstances, cut or remove the third (ground) prong from the power cord.
Controls Features and appearance will vary. Lights next to the touch pads on the air conditioner control panel indicate the selected settings. 8 Light indicates the unit is in the temperature set mode.
OPERATING INSTRUCTIONS Controls Cool Mode Use the Cool mode at Low, Med, High or Auto Fan Speed for cooling. Use the Temperature Increase + / Decrease - pads to set the desired temperature between 64°F and 86°F in 1°F increments. NOTE: If the air conditioner is off and is then turned on while set to a Cool setting or if turned from a fan setting to a Cool setting, it may take approximately 3 minutes for the compressor to start and cooling to begin.
Grille and Case Turn the air conditioner off and remove the plug from the wall outlet before cleaning. To clean, use water and a mild detergent. Do not use bleach or abrasives. Air Filter The air filter behind the front grille should be checked and cleaned at least every 30 days or more often if necessary. To remove: Pull the tab on the right side of the unit until the filter is out. Clean the filter with warm, soapy water. Rinse and let the filter dry before replacing it.
INSTALLATION INSTRUCTIONS Installation Instructions Questions? Call GE Appliances at 800.GE.CARES (800.432.2737) or Visit our Website at: GEAppliances.com BEFORE YOU BEGIN Read these instructions completely and carefully. IMPORTANT • — Save these instructions for local inspector’s use. IMPORTANT • — Observe all governing codes and ordinances. • Note to Installer – Be sure to leave these instructions with the Consumer. • Note to Consumer – Keep these instructions for future reference.
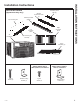
PARTS INCLUDED (Appearance may vary) Window sill and sash seal (2) Foam top window gasket Top mounting rail Right accordion panel Left accordion panel Air conditioner Accordion panel seal (2) Top mounting rail seal strip Foam Insulation (2) For all Models Type B Screw (6) 49-7805-3 Window locking bracket (1) For models: AEC08, AEF08, AEK08, AEC12, AEK12, AEC14, and AHC14 Type A Screw (4) INSTALLATION INSTRUCTIONS Installation Instructions For models: AEC10, AEK10, AEC12, AEK12, AEC14, and A
INSTALLATION INSTRUCTIONS Installation Instructions 1 WINDOW REQUIREMENTS ●T hese instructions are for a standard double-hung window. You will need to modify them for other types of windows. ●T he air conditioner can be installed without the accordion panels if needed to fit in a narrow window. See the window opening dimensions. ●A ll supporting parts must be secured to firm wood, masonry or metal. ●T he electrical outlet must be within reach of the power cord.
4 PREPARE THE AIR CONDITIONER (cont.) 5 P REPARE THE WINDOW Cut the window seal (2 long strips) to the proper length. Peel off the backing and attach the seal to the underside of the window sash. One attached to sash and one attached to sill. C Remove the backing from the accordion seal (two short strips). Stick one sealing strip respectively on the left side and right side of the accordion panels, as shown.
INSTALLATION INSTRUCTIONS Installation Instructions 7 INSTALL SUPPORT BRACKET AND FOAM TOP WINDOW GASKET A CAUTION To prevent broken glass or damage to windows, on vinyl or other similarly constructed windows, attach the window locking bracket to the window side jamb with one screw. 8 INSTALL FOAM INSULATION Additional insulation is provided with your window air conditioner to reduce heat leakage into the home, reducing overall energy usage.
Save time and money! Review the charts on the following pages first and you may not need to call for service. Problem Possible Causes What To Do Air conditioner does not start The air conditioner is unplugged. •Make sure the air conditioner plug is pushed completely into the outlet. The fuse is blown/circuit breaker is tripped. •Check the house fuse/circuit breaker box and replace the fuse or reset the breaker. Power failure.
TROUBLESHOOTING / WIFI SETUP Troubleshooting Normal Operating Sounds ■ You may hear a pinging noise caused by water being picked up and thrown against the condenser on rainy days or when the humidity is high. This design feature helps remove moisture and improve efficiency. ■ You may hear the thermostat click when the compressor cycles on and off. ■W ater will collect in the base pan during high humidity or on rainy days. The water may overflow and drip from the outdoor side of the unit.
How it Works Download the GE Appliances App Use the app to connect your room air conditioner to WiFi Once connected, use the app to turn down your air conditioner as you leave work. CHANGE TEMP CHANGE TEMP CHANGE TEMP TO 65 TO 65 TO 65 Getting Started To connect your room air conditioner, you’ll need the GE Appliances App. The app will walk you through the connection process. Download the app from iTunes or Google Play.
NOTES 16 Notes 49-7805-3
Staple your receipt here. Proof of the original purchase date is needed to obtain service under the warranty. For The Period Of: Will Replace: One Year From the date of the original purchase Replacement, repair, or refund of the original retail price for any product which fails due to a defect in materials or workmanship. If the unit is exchanged, the replacement unit is warranted for the remainder of your product’s original one-year warranty period.
CONSUMER SUPPORT Consumer Support GE Appliances Website Have a question or need assistance with your appliance? Try the GE Appliances Website 24 hours a day, any day of the year! You can also shop for more great GE Appliances products and take advantage of all our on-line support services designed for your convenience. In the US: GEAppliances.
PARA SALA ACONDICIONADOR DE AIRE INFORMACIÓN DE SEGURIDAD. . . . . . . . . . . . . . . . . 3 INSTRUCCIONES DE OPERACIÓN . . . . . . . . . . . . . . . . 5 CUIDADO Y LIMPIEZA Grille and Case. . . . . . . . . . . . . . . . . . . . . . . . 7 Filtro de aire. . . . . . . . . . . . . . . . . . . . . . . . . . 7 Bobinas para exteriores . . . . . . . . . . . . . . . . 7 Installing Remote Batteries . . . . . . . . . . . . . 7 INSTALLATION . . . . . . . . . . . . . . . . . . . 8 SOLUCIONAR PROBLEMAS. . . .
GRACIAS POR HACER QUE GE APPLIANCES SEA PARTE DE SU HOGAR. Ya sea que haya crecido usando GE Appliances, o que ésta es su primera vez, nos complace tenerlo en la familia. Sentimos orgullo por el nivel de arte, innovación y diseño de cada uno de los electrodomésticos de GE Appliances, y creemos que usted también. Entre otras cosas, el registro de su electrodoméstico asegura que podamos entregarle información importante del producto y detalles de la garantía cuando los necesite.
ADVERTENCIA ara su seguridad, siga las instrucciones de este manual a fin de minimizar riesgos de P incendio, descargas eléctricas o heridas personales. ■ Use este electrodoméstico sólo para su propósito original, como se describe en el Manual del Propietario. ■ Coloque la unidad en OFF (Apagado) y desenchufe el acondicionador de aire antes de usar el mismo. ■ Este acondicionador de aire se debe instalar de forma apropiada de acuerdo con las Instrucciones de Instalación antes de ser usado.
INFORMACIÓN DE SEGURIDAD INFORMACIÓN IMPORTANTE DE SEGURIDAD LEA TODAS LAS INSTRUCCIONES ANTES DE USAR ADVERTENCIA USO DE PROLONGADORES RIESGO DE INCENDIO. Podría ocasionar lesiones graves o la muerte. para múltiples tomacorrientes con este Acondicionador de Aire de Ventana. ■ NO use un prolongador con este Acondicionador de Aire de Ventana.
Las funciones y el aspecto pueden variar. Las luces al lado de las teclas de toque en el panel de control del acondicionador de aire indicarán los ajustes seleccionados. 8 La luz indica que la unidad está en el modo de Ajuste de temperatura. La luz indica que el temporizador de WiFi connection Power Auto High Cool Med Fan Low Eco Fan Mode Reset Filter WiFi NOTA: La pantalla muestra siempre la temperatura ambiente, excepto al configurar la temperatura Definida o el Sincronizador de retardo.
INSTRUCCIONES DE OPERACIÓN Controles Modo Cool (Frío) Use el modo Cool (Frío) a Low (Bajo), Med (Medio), High (Alto) o Auto Fan Speed (Velocidad de ventilador automática) para enfriar. Use las teclas de Temperature (Temperatura) Aumento + / Reducción – para ajustar a la temperatura deseada entre 64ºF y 86ºF en incrementos de 1ºF. Se usa un termostato electrónico para mantener la temperatura ambiente. El compresor hará ciclo entre apagado y encendido para mantener la habitación a la temperatura deseada.
Rejilla y caja Turn the air conditioner off and remove the plug from the wall outlet before cleaning. To clean, use water and a mild detergent. Do not use bleach or abrasives. Filtro de aire El filtro de aire detrás de la rejilla frontal debe inspeccionarse y limpiarse por lo menos cada 30 días o más a menudo si fuese necesario. Para retirarlo: Empuje la lengüeta del lado derecho de la unidad hasta haber retirado el filtro. Limpie el filtro con agua tibia y jabón.
INSTRUCCIONES DE INSTALACIÓN Instrucciones de instalación ¿Preguntas? Llame a GE Appliances en 800.GE.CARES (800.432.2737) o visite nuestra página en la red en: GEAppliances.com ANTES DE INICIAR Lea estas instrucciones completa y cuidadosamente. • IMPORTANTE — Guarde estas instrucciones para uso del inspector local. • IMPORTANTE — Observe todos los códigos y órdenes de ley. • N ota al instalador – Asegúrese de dejar estas instrucciones con el consumidor.
PARTES INCLUIDAS (Apariencia puede variar) Riel de montaje superior Sello de la banda de la ventana (2) Junta de espuma superior de la ventana Panel de acordeón derecho Panel de acordeón izquierdo Acondicionador de aire Sello del panel de acordeón (2) Banda de sellado del riel de montaje superior Aislante de Gomaespuma (2) Para todos los modelos Tipo A Tornillo (4) 49-7805-3 Tipo B Tornillo (6) Para modelos: AEC08, AEF08, AEK08, AEC12, AEK12, AEC14, and AHC14 Soporte para bloqueo de ventana (1
INSTRUCCIONES DE INSTALACIÓN Instrucciones de instalación 1 R EQUISITOS PARA LA VENTANA ●E stas instrucciones son para una ventana estándar de dos pliegues. Usted necesitará modificar el proceso para otros tipos de ventanas. ● El acondicionador de aire puede instalarse sin los paneles de acordeón para ajustarse a una ventana más estrecha. Ver las dimensiones de la abertura de la ventana. ● Todas las partes de apoyo deben quedar totalmente aseguradas a algún metal, mampostería o a la madera.
4 PREPARE EL ACONDICIONADOR DE AIRE (cont.) C Retire el apoyo del sello de acordeón (dos bandas cortas). Adhiera una banda de sellado respectivamente del lado izquierdo y del lado derecho de los paneles de acordeón, como se muestra. 5 P REPARE LA VENTANA Corte el sellador de la ventana (2 bandas largas) en la longitud apropiada. Pele la parte trasera y añada el sellador al lado inferior del marco de la ventana.
INSTRUCCIONES DE INSTALACIÓN Instrucciones de instalación 7 INSTALE UN SOPORTE DE CIERRE Y LA JUNTA DE ESPUMA SUPERIOR DE LA VENTANA A PRECAUCIÓN En ventanas construidas de vinil o de similar construcción, conecte el soporte de cierre de la ventana a el marco de la ventana con uno tornillo tipo B para prevenir daño a la ventana y vidro quebrado.
¡Ahorre tiempo y dinero! Primero revise los cuadros que aparecen en las siguientes páginas y es posible que no necesite solicitar reparaciones. Problema Causas posibles Qué hacer El acondicionador de aire no enciende El acondicionador de aire está desconectado. •Cerciórese de que el acondicionador de aire está enchufado totalmente en el tomacorriente. El fusible se disparó /el cortacircuitos se disparó.
SOLUCIONAR PROBLEMASN / CONFIGURACIÓN WIFI Solucionar problemas Sonidos de Funcionamiento Normal ■ Es posible que escuche un sonido metálico ocasionado por el agua recogida y arrojada contra el condensador en días lluviosos o cuando el nivel de humedad sea alto. Esta función ayuda a eliminar la humedad y mejorar el nivel de eficiencia. ■ Es posible que escuche que el termostato hace clic cuando los ciclos del compresor se activan y desactivan.
Cómo Funciona Descargue la Aplicación de GE Appliances Use la aplicación para conectar su acondicionador de aire para sala al WiFi Una vez conectada, use la aplicación para apagar su acondicionador de aire al salir del trabajo. CHANGE TEMP CHANGE TEMP TO 65 CHANGE TEMP TO TO 65 65 Puesta en marcha A fin de conectar su acondicionador de aire para sala, necesitará la Aplicación de GE Appliances. La aplicación lo guiará a través del proceso de conexión. Descargue la aplicación de iTunes o Google Play.
NOTA 16 Nota 49-7805-3
Abroche su recibo aquí. Para acceder al servicio técnico de acuerdo con la garantía deberá contar con la prueba de la fecha original de compra. Por el Período de: Reemplazaremos: Un Año Desde la fecha de la compra original Reemplazo, reparación o reembolso del costo minorista original de cualquier producto que falle debido a un defecto en los materiales o la fabricación.
SOPORTE AL CLIENTE Soporte al Cliente GE Appliances Sitio Web ¿Desea realizar una consulta o necesita ayuda con su electrodoméstico? ¡Intente a través del Sitio Web de Electrodomésticos de GE Appliances las 24 horas del día, cualquier día del año! Usted también puede comprar más grandiosos productos de GE Appliances y sacar ventaja de todos nuestros servicios a través de Internet diseñados para su conveniencia. En EE.UU.: GEAppliances.