Room Air Conditioners GEAppliances.com Safety Instructions . . . . . . . . . . . . . 2, 3 Operating Instructions Controls . . . . . . . . . . . . . . . . . . . . . . . . . . . 4–6 Owner’s Manual and Installation Instructions AEE24 Care and Cleaning Air Filter . . . . . . . . . . . . . . . . . . . . . . . . . . . . . . 6 Outdoor Coils . . . . . . . . . . . . . . . . . . . . . . . . . 6 Installation Instructions . . . . . . 7–13 Troubleshooting Tips . . . . . . . . . . . .14 Normal Operating Sounds .
IMPORTANT SAFETY INFORMATION. READ ALL INSTRUCTIONS BEFORE USING. WARNING! For your safety, the information in this manual must be followed to minimize the risk of fire, electric shock or personal injury. SAFETY PRECAUTIONS Use this appliance only for its intended purpose as described in this Owner’s Manual. This air conditioner must be properly installed in accordance with the Installation Instructions before it is used. Never unplug your air conditioner by pulling on the power cord.
GEAppliances.com WARNING! USE OF EXTENSION CORDS RISK OF FIRE. Could cause serious injury or death. DO NOT use an extension cord with this Window Air Conditioner. DO NOT use surge protectors or multi-outlet adaptors with this Window Air Conditioner. READ AND FOLLOW THIS SAFETY INFORMATION CAREFULLY.
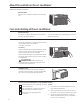
About the controls on the air conditioner. Features and appearance will vary. Lights next to the touch pads on the air conditioner control panel indicate the selected settings. NOTE: The display always shows the room temperature except when setting the Set temperature or the Delay timer. Light indicates the unit is in the temperature or delay time Set mode. Delay 1–24hr Heat Delay timer Decrease Delay timer Increase Mode select Auto Fan on Fan speed Decrease Light indicates the delay timer is set.
GEAppliances.com Heat Mode Use the Heat mode at Low, Med, High or Auto Fan Speed for heating. Use the Temperature Increase Ÿ / Decrease ź pads to set the desired temperature between 61°F and 86°F in 1°F increments. An electronic thermostat is used to maintain the room temperature. The heater will cycle on and off to keep the room at the set level of comfort. Cool Mode Use the Cool mode at Low, Med, High or Auto Fan Speed for cooling.
About the controls on the air conditioner Additional important information. Air Direction Use the lever to adjust the air direction left and right only. Care and cleaning of the air conditioner. Grille and Case Turn the air conditioner off and remove the plug from the wall outlet before cleaning. To clean, use water and a mild detergent. Do not use bleach or abrasives. Air Filter The air filter behind the front grille should be checked and cleaned at least every 30 days or more often if necessary.
Installation Instructions Air Conditioner Questions? Call 800.GE.CARES (800.432.2737) or Visit our Website at: GEAppliances.com In Canada, call 1.800.561.3344 or visit www.GEAppliances.ca CAUTION: BEFORE YOU BEGIN Do not, under any circumstances, cut or remove the third (ground) prong from the power cord. Do not change the plug on the power cord of this air conditioner. Aluminum house wiring may present special problems—consult a qualified electrician. Read these instructions completely and carefully.
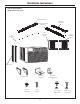
Installation Instructions PARTS INCLUDED (Appearance may vary) Top rail gasket (1) Window sash seal Foam top window gasket (1) Left accordion panel Top mounting rail Right accordion panel Side rail (2) V-supports (2) Type A screws (10) Sill angle bracket (2) Type C screws (5) 8 Window locking bracket (1) Type E bolt with nut (4) Type F bolt with nut (2)
Installation Instructions 1 WINDOW REQUIREMENTS 3 PREPARE THE AIR CONDITIONER t These instructions are for a standard double-hung window. You will need to modify them for other types of windows. t All supporting parts must be secured to firm wood, masonry or metal. t The electrical outlet must be within reach of the power cord. t Follow the dimensions in the table and illustration for your model. A Pull the top of the front panel out and down. Remove the filter.
Installation Instructions 3 PREPARE THE AIR CONDITIONER 4 PREPARE THE CASE (continues) A Attach the top rail gasket to the bottom of the top mounting rail. E Remove the shipping screws located on the top of the case. B Install the top mounting rail with 4 type A screws from the inside of the case. Press firmly to drive the screws into the gasket and through the top mounting rail. F Remove the ground screws from each side of the case. Keep them in a safe location.
Installation Instructions 4 PREPARE THE CASE (continues) 5 PREPARE THE WINDOW AND INSTALL E Attach the side retainers to the case using 6 type A screws. Mount the screws from the inside of the wall case. D Assemble the V-support and Sill Angle bracket with Type F nut and bolt THE CASE (continues) Type E bolt and nut Left Sill angle bracket Right V-support Type F bolt and nut E Position the left V-support under the left side panel of the wall case and against the outside wall.
Installation Instructions 5 PREPARE THE WINDOW AND INSTALL 6 INSTALL THE AIR CONDITIONER THE CASE (continues) H IN THE CASE (continues) CAUTION: B To prevent broken Vinyl glass or damage to windows, on vinyl or other similarly constructed windows, attach the window locking bracket to the window side jamb. Attach the window locking Wood bracket with one Type C screw. IMPORTANT: THE GROUND SCREWS MUST BE REINSTALLED TO ENSURE PROPER GOUND. Cut the foam top window gasket to the window width.
Through-the-Wall Installation Instructions—Optional 1 IMPORTANT (cont.) The case may be installed through-the-wall in both existing and new construction. Read completely, then follow step-by-step. NOTE: Obtain all materials locally for mounting the air conditioner throughthe-wall. D Secure with 14 wood screws anchored at least an inch into the wall support structure. NOTE: Drill pilot holes, if necessary, for proper installation. If the frame is oversized, use shims to prevent case distortion.
Troubleshooting Tips. Problem Possible Causes What To Do Air conditioner does not start The air conditioner is unplugged. t Make sure the air conditioner plug is pushed completely into the outlet. The fuse is blown/circuit breaker is tripped. tCheck the house fuse/circuit breaker box and replace the fuse or reset the breaker. Power failure. tThe unit will automatically restart in the settings last used after the power is restored.
Notes.
Notes.
GE Air Conditioner—One Year Limited Warranty. (For customers in the U.S.A.) All warranty service provided by our Factory Service Centers, or an authorized Customer Care® technician. To schedule service, visit us on-line at GEAppliances.com, or call 800.GE.CARES (800.432.2737). Have serial number and model number available when calling for service. Staple your receipt here. Proof of the original purchase date is needed to obtain service under the warranty.
GE Air Conditioner—One-Year Limited Warranty. (For customers in Canada) All warranty service provided by our Factory Service Centers, or an authorized Customer Care® technician. For service, call 1.800.561.3344. Please have serial number and model number available when calling for service. Staple your receipt here. Proof of the original purchase date is needed to obtain service under the warranty.
Consignes de sécurité . . . . . . . . . . . . .20, 21 Consignes d’utilisation Commandes . . . . . . . . . . . . . . . . . . . . . . . . . .22–24 Entretien et nettoyage Filtre à air . . . . . . . . . . . . . . . . . . . . . . . . . . . . . . . . 24 Serpentins extérieurs . . . . . . . . . . . . . . . . . . . . . 24 Instructions de montage . . . . . . . . . .25–31 Conseils de dépannage . . . . . . . . . . . . . . 32 Bruits normaux de fonctionnement . . . . . . . .
IMPORTANTES CONSIGNES DE SÉCURITÉ. VEUILLEZ LIRE TOUTES LES CONSIGNES AVANT UTILISATION. AVERTISSEMENT! Pour votre sécurité, les informations contenues dans ce manuel doivent être suivies afin de minimiser les risques d’incendie, de chocs électriques ou de blessures corporelles. CONSIGNES DE SÉCURITÉ N’utilisez cet appareil qu’aux fins prévues décrites dans le manuel d’utilisation. Ce climatiseur doit être correctement installé conformément aux Instructions d’Installation avant toute utilisation.
www.electromenagersge.ca AVERTISSEMENT ! UTILISATION DE RALLONGES RISQUE D’INCENDIE. Peut occasionner des blessures graves ou la mort. NE PAS utiliser de rallonge avec ce climatiseur. 1( 3$6 XWLOLVHU GH SDUDVXUWHQVHXU RX d’adaptateur à prises multiples avec ce climatiseur. LISEZ ET SUIVEZ SOIGNEUSEMENT CES CONSIGNES DE SÉCURITÉ.
A propos des commandes du climatiseur. Les fonctions et l’aspect peuvent varier. Les témoins lumineux à côté des touches à effleurement sur le tableau de commandes du climatiseur indiquent les réglages sélectionnés. NOTE : L’écran affiche toujours la température de la pièce sauf lorsque vous programmez la température ou la minuterie. Le témoin indique que l’appareil est en mode Programmation de la température ou du délai.
www.electromenagersge.ca Mode HEAT (chaleur) Pour le chauffage, utilisez le mode Heat (chaleur) à la vitesse Low (faible), Med (moyenne), High (elevée) ou Auto Fan Speed (vitesse du ventilateur auto). Appuyez sur les touches Temperature Increase (augmentation de la température)Ÿ/ Decrease (diminution de la température)źpour programmer la température souhaitée entre 16 et 30 °C (61 et 86 °F) par incréments de 0,5 °C (1 °F).
A propos des commandes du climatiseur. Information supplémentaire importante. Direction de l’Air Utilisez le levier pour régler la direction de l’air vers la gauche ou vers la droite seulement. Entretien et nettoyage du climatiseur. Grille et Boîtier Eteignez et débranchez le climatiseur avant tout nettoyage. Pour le nettoyer, utilisez de l’eau et un détergent doux. N’utilisez pas d’eau de Javel ou de nettoyants abrasifs.
Instructions de montage Climatiseur Questions? Composez le 1.800.561.3344 ou visitez notre site web à : www.electromenagersge.ca MISE EN GARDE: AVANT DE COMMENCER Ne coupez pas ou n’enlevez pas, sous aucun prétexte, la troisième broche de mise à la terre du cordon d’alimentation. Ne changez pas la fiche du cordon d’alimentation du climatiseur. Un câblage en aluminium du domicile peut RFFDVLRQQHU GHV SUREOqPHV SDUWLFXOLHUV³FRQVXOWH] un électricien qualifié.
Instructions de montage Joint de rail supérieur (1) PIÈCES INCLUES (L’aspect peut varier) Joint d’étanchéité de la fenêtre à guillotine (fin, adhésif au dos) Joint en mousse supérieur de fenêtre (1) Panneau en accordéon gauche Rail de montage supérieur Panneau en accordéon droit Rail latéral Support en V (2) Type A vis (10) Ferrure de rebord de fenêtre (2) Type C vis (5) 26 Ferrure de verrouillage de la fenêtre (1) Boulon de type E avec 2 écrous (4) Boulon de type E avec 2 écrous (2)
Instructions de montage 1 INSTRUCTION RELATIVE 3 PRÉPARATION DU CLIMATISEUR À LA FENÊTRE A Tirez le haut de la grille frontale et inclinez-la vers le bas. Retirez le filtre. Inclinez la grille frontale et soulevez-la pour le retirer. Ces instructions sont valables pour une fenêtre standard à guillotine à deux châssis mobiles. Vous devrez modifier les instructions pour les autres types de fenêtres. Toute la ferrure de montage doit être solidement fixée au bois, à la maçonnerie ou au métal.
Instructions de montage 3 PRÉPARATION DU CLIMATISEUR (suite) 4 PRÉPARATION DU LOGEMENT E Retirez les vis d’expédition sur le dessus et les côtés du cadre. A Installez le joint du rail supérieur au fond du rail de montage supérieur. F Retirez les vis de mise à la terre de chaque côté du logement et gardez-les en lieu sûr. REMARQUE: Assurez-vous de conserver ces vis de mise à la terre, car vous en aurez besoin ultérieurement.
Instructions de montage 4 PRÉPARATION DU LOGEMENT (suite) 5 PRÉPARER LA FENÊTRE ET POSER LE CAPOT (SUITE) E Fixer les dispositifs de retenue latéraux sur le capot à l’aide de 6 vis de type A. Installez les vis par l’intérieur du logement. D Assemblez le support en V et la ferrure avec le boulon et l’écrou de Type E.
Instructions de montage 5 PRÉPARER LA FENÊTRE ET POSER LE 6 INSTALLATION DU CLIMATISEUR CAPOT (SUITE) H DANS SON LOGEMENT (SUITE) MISE EN GARDE: B Remettez en place les deux vis de mise à la terre retirées plus tôt, une de chaque côté du logement. IMPORTANT : Les vis de mise à la terre doivent être remises en place pour assurer une mise à la terre adéquate. C Fixez la grille frontale en insérant les languettes de la grille dans les fentes situées dans la partie supérieure avant du logement.
,QVWUXFWLRQV GH PRQWDJH SRXU XQH LQVWDOODWLRQ j WUDYHUV XQ PXU³(Q RSWLRQ 1 IMPORTANT (suite) Le logement peut être installé à travers un mur dans une habitation existante ou neuve. Veuillez lire entièrement ces instructions, puis les suivre étape par étape. REMARQUE : Excepté pour les supports en V (fournis), veuillez obtenir tous les matériaux localement pour l’installation du climatiseur à travers un mur. Fixez le logement à l’aide de 14 vis à bois ancrées d’au moins un pouce dans la structure du mur.
Avant d’appeler le service . . . Problème Causes possibles Que faire /H FOLPDWLVHXU QH VH met pas en marche /H FOLPDWLVHXU est débranché. $VVXUH] YRXV TXH OD ILFKH GX FOLPDWLVHXU VRLW ELHQ EUDQFKpH dans la prise murale. /H IXVLEOH D VDXWp le disjoncteur est ouvert. 9pULILH] OD ERvWH j IXVLEOH j GLVMRQFWHXUV HW UHPSODFH] OH IXVLEOH ou rebranchez le disjoncteur.
Notes.
Notes.
&OLPDWLVHXU *(³*DUDQWLH /LPLWpH '·XQ $Q Les services sous garantie sont dispensés par nos centres de réparation ou par nos réparateurs Customer Care® autorisés. Pour obtenir le service, appelez le 1.800.561.3344. Veuillez fournir le numéro de série et le numéro de modèle lorsque vous appelez pour obtenir le service. www.electromenagersge.ca Agrafez le reçu d’achat ici. Pour obtenir le service sous garantie, vous devrez fournir la preuve de l’achat original.
Assistance à la clientèle. Site Internet GE www.electromenagersge.ca Pour toute question ou pour un besoin d’assistance au sujet de votre appareil ménager, consultez le site Internet ci-dessus, accessible 24 heures par jour, chaque jour de l’année! À partir du site, vous pouvez télécharger les manuels d’utilisation. Studio de conception réaliste www.electromenagersge.ca Sur demande, GE peut fournir une brochure sur l’aménagement d’une cuisine pour les personnes à mobilité réduite.
Instrucciones de seguridad . . . . . . . . . 38, 39 Instrucciones de operación Controle . . . . . . . . . . . . . . . . . . . . . . . . . . . . . . . . . .40–42 Cuidado y limpieza Bobinas para exteriores . . . . . . . . . . . . . . . . . . . . . .42 Filtro de aire . . . . . . . . . . . . . . . . . . . . . . . . . . . . . . . . . .42 Instrucciones de instalación . . . . . . .43–49 Solucionar problemas . . . . . . . . . . . . . . . . . . .50 Sonidos de operación normales . . . . . . . . . . . . . .
INFORMACIÓN IMPORTANTE DE SEGURIDAD. LEA TODAS LAS INSTRUCCIONES ANTES DE USAR. ¡ADVERTENCIA! Por su seguridad, se debe seguir la información en este manual para minimizar el riesgo de incendios, descargas eléctricas o lesiones personales. PRECAUCIONES DE SEGURIDAD Use este electrodoméstico solamente para el propósito determinado según se describe en el Manual del propietario.
GEAppliances.com ¡ADVERTENCIA! USO DE PROLONGADORES RIESGO DE INCENDIO. Podría ocasionar lesiones graves o la muerte. NO use un prolongador con este Acondicionador de Aire de Ventana. NO use protectores contra picos de tensión ni adaptadores para múltiples tomacorrientes con este Acondicionador de Aire de Ventana. LEA Y SIGA ESTAS INSTRUCCIONES DE SEGURIDAD CUIDADOSAMENTE.
Acerca de los controles en el acondicionador de aire Las luces al lado de las teclas de toque en el panel de control del acondicionador de aire indicarán los ajustes seleccionados. NOTA: La pantalla muestra siempre la temperatura ambiente, excepto al configurar la temperatura Definida o el Sincronizador de retardo. La luz indica que la unidad está en el modo de Ajuste de temperatura o de Tiempo de retardo.
GEAppliances.com Modo Heat (Calor) Use el modo Heat (Calor) en Low (Bajo), Med (Medio), High (Alto) o Auto Fan Speed (Velocidad de Ventilador Automático) para calentar. Use las teclas Temperature Increase (Incremento de Temperatura) Ÿ/ Decrease (Reducción) źpara configurar la temperatura deseada entre 61°F y 86°F en incrementos de 1°F. El termostato de temperatura se usa para mantener la temperatura del ambiente.
Acerca de los controles en el acondicionador de aire. Información importante adicionale. Dirección del aire Use la palanca para ajustar la dirección del aire hacia la izquierda y la derecha solamente. Cuidado y limpieza del acondicionador de aire. Rejilla y caja Apague el acondicionador de aire y retire el enchufe del tomacorriente de la pared antes de limpiar. Para limpiar, use agua y un detergente suave. No use cloro o materiales abrasivos.
Instrucciones de instalación Acondicionador de aire ¿Preguntas? Llame 800.GE.CARES (800.432.2737) o visite nuestra página en la red en: GEAppliances.com REQUISITOS ELÉCTRICOS ANTES DE INICIAR Algunos modelos requieren tomacorrientes de 115/120 voltios de corriente alterna y 60 Hz conectados a tierra, protegidos con un fusible de dilatación de tiempo de 15 amperios o un cortacircuitos. El enchufe de tres púas con conexión a tierra minimiza la posibilidad de descargas eléctricas.
Instrucciones de instalación HERRAMIENTAS QUE NECESITARÁ Un destornillador con hoja plana Un destornillador de estrella Tijeras o cuchilla Lápiz Una regla o cinta métrica Nivel PARTES INCLUIDAS (Apariencia puede variar) Junta del riel superior (1) Riel de montaje superior Sello del marco de la ventana (fino, con adhesivo en la parte posterior) Empaque superior de espuma de la ventana (1) Panel de acordeón izquierdo Panel de acordeón derecho Riel lateral(2) Soportes en V (2) Tipo A tornillos (10
Instrucciones de instalación 1 REQUISITOS PARA LA VENTANA 3 PREPARE EL ACONDICIONADOR DE AIRE Estas instrucciones son para una ventana estándar de dos pliegues. Usted necesitará modificar el proceso para otros tipos de ventanas. Todas las partes de apoyo deben quedar totalmente aseguradas a algún metal, mampostería o a la madera. El tomacorriente eléctrico debe estar al alcance del cable eléctrico del acondicionador de aire. Siga las dimensiones de la tabla y la ilustración según su modelo.
Instrucciones de instalación 3 PREPARE EL ACONDICIONADOR DE AIRE 4 PREPARE LA CARCASA E Quite los tornillos de embalaje ubicados en la parte superior y en los costados de la carcasa. A Adhiera la junta del riel superior a la parte inferior del riel de montaje superior. B Instale el riel de montaje superior con 4 tornillos tipo A desde la parte interior de la carcasa. Presione firmemente para introducir los tornillos dentro de la junta y a través del riel de montaje superior.
Instrucciones de instalación 4 PREPARE LA CARCASA (suite) 5 PREPARE LA VENTANA E INSTALE LA CAJA E E Adjunte los soportes laterales a la caja usando 6 tornillos tipo A. Monte los tornillos desde la parte interior de la caja de pared. D Ensamble el soporte en V y el Soporte para Ángulo de Alféizar con una tuerca y tornillo Tipo F.
Instrucciones de instalación 5 PREPARE LA VENTANA E INSTALE LA 6 INSTALE EL ACONDICIONADOR EN LA CAJA H CARCASA PRECAUCIÓN: B Vuelva a instalar los 2 tornillos quitados antes, uno en cada lado de la carcasa. IMPORTANTE: Los tornillos de conexión a tierra deberán ser reinstalados para asegurar una conexión a tierra adecuada. C Sujete la parrilla frontal a la carcasa introduciendo las lengüetas de la parrilla dentro de las ranuras de la parte superior frontal de la carcasa.
,QVWUXFFLRQHV GH ,QVWDODFLyQ D 7UDYpV GH OD 3DUHG³2SFLRQDO La carcasa puede instalarse a través de la pared en construcciones existentes y nuevas. Lea por completo y luego siga todos los pasos. 127$ &RQ H[FHSFLyQ GH ORV PRQWDMHV GH VRSRUWHV HQ 9 (incluidos), obtenga todos los materiales en forma local para montar el acondicionador de aire a través de la pared. 1 IMPORTANTE (cont.
Solucionar problemas. Problema Causas posibles Qué hacer (O DFRQGLFLRQDGRU GH DLUH no enciende (O DFRQGLFLRQDGRU GH DLUH está desconectado. &HUFLyUHVH GH TXH HO DFRQGLFLRQDGRU GH DLUH HVWi enchufado totalmente en el tomacorriente. (O IXVLEOH VH GLVSDUy el cortacircuitos se disparó. ,QVSHFFLRQH ORV IXVLEOHV FDMD GH LQWHUUXSWRUHV GH OD FDVD y reemplace cualquier fusible o reajuste el interruptor. ,QWHUUXSFLyQ HQ HO suministro eléctrico.
Notas. GEAppliances.
Notas.
Notas. GEAppliances.
*DUDQWtD GH VX DFRQGLFLRQDGRU GH DLUH³JDUDQWtD OLPLWDGD GH XQ DxR. Todos los servicios de garantía los proporcionan nuestros Centros de Reparación de Fábrica o nuestros técnicos Customer Care® autorizados. Para concertar una cita de reparación, en línea, visítenos al GEAppliances.com, o llame al 800.GE.CARES (800.432.2737). Cuando llame para solicitar servicio, por favor tenga a mano el número de serie y el número de modelo. Grape aquí su recibo.
Apoyo al consumidor. Página Web de GE Appliances GEAppliances.com ¿Tiene alguna pregunta sobre su electrodoméstico? ¡Pruebe la página Web de GE Appliances 24 horas al día, cualquier día del año! Para mayor conveniencia y servicio más rápido, ya puede descargar los Manuales de los Propietarios, pedir piezas o incluso hacer una cita en línea para que vengan a realizar una reparación. Real Life Design Studio (VWXGLR GH GLVHxR SDUD OD YLGD UHDO GEAppliances.
Consumer Support. GE Appliances Website In the U.S.A.: GEAppliances.com Have a question or need assistance with your appliance? Try the GE Appliances Website 24 hours a day, any day of the year! For greater convenience and faster service, you can now download Owner’s Manuals, or even order parts on-line. In Canada: www.GEAppliances.ca Real Life Design Studio In the U.S.A.: GEAppliances.