Room Air Conditioners GEAppliances.com Safety Instructions . . . . . . . . . . . . . 2, 3 Operating Instructions Controls . . . . . . . . . . . . . . . . . . . . . . . . . . . 4–6 Care and Cleaning Air Filter . . . . . . . . . . . . . . . . . . . . . . . . . . . . . . 6 Outdoor Coils . . . . . . . . . . . . . . . . . . . . . . . . . 6 Installation Instructions. . . . . . 7–14 Troubleshooting Tips . . . . . . . . . . . .15 Normal Operating Sounds . . . . . . . . . . . .
IMPORTANT SAFETY INFORMATION. READ ALL INSTRUCTIONS BEFORE USING. SAFETY INFORMATION This is the safety alert symbol. This symbol alerts you to potential hazards that can kill or hurt you and others. All safety messages will follow the safety alert symbol and the word “DANGER”, “WARNING”, or “CAUTION”. These words are defined as: DANGER Indicates a hazardous situation which, if not avoided, will result in death or serious injury.
WARNING HOW TO CONNECT ELECTRICITY Do not, under any circumstances, cut or remove the third (ground) prong from the power cord. For personal safety, this appliance must be properly grounded. Where a 2-prong wall outlet is encountered, it is your personal responsibility and obligation to have it replaced with a properly grounded 3-prong wall outlet. DO NOT use an adapter plug with this appliance.
About the controls on the air conditioner. Features and appearance will vary. Lights next to the touch pads on the air conditioner control panel indicate the selected settings. Light indicates the unit is in the temperature or delay time Set mode. + Power On/Off Set Auto High Med Low Fan Reset Filter Delay 1–24hr Delay timer Decrease - Cool Fan Only Energy Saver Mode Light indicates the delay timer is set.
Do Not Operate in Freezing Outdoor Conditions This cool-only air conditioner was not designed for freezing outdoor conditions. It must not be used in freezing outdoor conditions. Remote Control To ensure proper operation, aim the remote control at the signal receiver on the air conditioner. Make sure nothing is between the air conditioner and the remote control that could block the signal. The remote control signal has a range of up to 20 feet.
About the controls on the air conditioner Additional important information. Air Direction Use the lever to adjust the air direction left and right only. Care and cleaning of the air conditioner. Grille and Case Turn the air conditioner off and remove the plug from the wall outlet before cleaning. To clean, use water and a mild detergent. Do not use bleach or abrasives. Air Filter The air filter behind the front grille should be checked and cleaned at least every 30 days or more often if necessary.
Installation Instructions Air Conditioner Questions? Call 800.GE.CARES (800.432.2737) or Visit our Website at: GEAppliances.com CAUTION: BEFORE YOU BEGIN Do not, under any circumstances, cut or remove the third (ground) prong from the power cord. Do not change the plug on the power cord of this air conditioner. Aluminum house wiring may present special SUREOHPV³FRQVXOW D TXDOLILHG HOHFWULFLDQ Read these instructions completely and carefully.
Installation Instructions PARTS INCLUDED (Appearance may vary) Top mounting rail Window sill and sash seal (2) Accordion panel seal (2) Foam top window gasket Left accordion panel Air conditioner Right accordion panel Top mounting rail seal strip Foam Insulation (2) Side rail (2) V-supports (2) Type A screws (10) Type B screws (2) Sill angle bracket (2) Type C screws (4) Window/accordion frame locking bracket (2) Type E bolt with nut (4) 8 Type F bolt with nut (2)
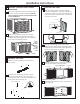
Installation Instructions 1 WINDOW REQUIREMENTS 3 PREPARE THE AIR CONDITIONER • These instructions are for a standard double-hung window. You will need to modify them for other types of windows. • All supporting parts must be secured to firm wood, masonry or metal. • The electrical outlet must be within reach of the power cord. • Follow the dimensions in the table and illustration for your model. A Pull down the front panel and remove the filter. Remove the front panel by lifting up at an angle.
Installation Instructions 3 PREPARE THE AIR CONDITIONER 4 PREPARE THE CASE E Remove the ground screw from the left side of the case. Keep it in a safe location. NOTE: Be sure to save this screw. You will need it later in the installation. C Slide each side retainer onto the edge of each according panel. The figure shows the orientation of each accordion panel and side retainer assembly relative to the case from a top view of the unit.
Installation Instructions 5 PREPARE THE WINDOW AND INSTALL 5 PREPARE THE WINDOW AND INSTALL A Cut the window seal (2 long strips) to the proper length. Peel off the backing and attach the seal to the underside of the window sash. One attached to sash and one attached to sill. E Position the V-supports on the case bottom so that they will be near the outside wall. Attach a V-support to each side of the bottom of the case V-support with Type E bolts, 2 for each support.
Installation Instructions 5 PREPARE THE WINDOW AND INSTALL 6 INSTALL THE AIR CONDITIONER THE CASE (continues) H CAUTION: To prevent broken glass or damage to windows, on vinyl or other similarly constructed windows, attach the window locking bracket to the window side jamb. Attach the window locking bracket with one Type C screw. This unit contains two window locking brackets. IN THE CASE (continues) B Vinyl Replace the 1 screw removed earlier, in the side of the case.
Installation Instructions 8 INSTALL FOAM INSULATION Additional insulation is provided with your window air conditioner to reduce heat leakage into the home, reducing overall energy usage. A After the air conditioner is installed in the window measure the length of the accordion for both sides. / + / + B Cut the foam insulation to the measured length of the left and right side accordion. NOTE: Be sure to measure each accordion because the length could be different on each side.
7KURXJK WKH :DOO ,QVWDOODWLRQ ,QVWUXFWLRQV³2SWLRQDO 1 IMPORTANT (cont.) The case may be installed through-the-wall in both existing and new construction. Read completely, then follow step-by-step. NOTE: Obtain all materials locally for mounting the air conditioner through-the-wall. D Secure with 14 wood screws anchored at least an inch into the wall support structure. NOTE: Drill pilot holes, if necessary, for proper installation. If the frame is oversized, use shims to prevent case distortion.
Troubleshooting Tips. Problem Possible Causes What To Do Air conditioner does not start The air conditioner is unplugged. • Make sure the air conditioner plug is pushed completely into the outlet. The fuse is blown/circuit breaker is tripped. • Check the house fuse/circuit breaker box and replace the fuse or reset the breaker. Power failure. •The unit will automatically restart in the settings last used after the power is restored.
*( $LU &RQGLWLRQHU³2QH
Instrucciones de seguridad . . . . . . . . . 18, 19 Instrucciones de operación Controle . . . . . . . . . . . . . . . . . . . . . . . . . . . . . . . . . . 20-22 Cuidado y limpieza Bobinas para exteriores . . . . . . . . . . . . . . . . . . . . . .22 Filtro de aire . . . . . . . . . . . . . . . . . . . . . . . . . . . . . . . . . .22 Instrucciones de instalación . . . . . . . 23-30 Solucionar problemas . . . . . . . . . . . . . . . . . . .31 Sonidos de operación normales . . . . . . . . . . . . . .
INFORMACIÓN IMPORTANTE DE SEGURIDAD. LEA TODAS LAS INSTRUCCIONES ANTES DE USAR. INFORMACIÓN DE SEGURIDAD Éste es el símbolo de alerta de seguridad. El mismo alerta sobre potenciales riesgos de muerte o lesiones tanto para usted con para otras personas. Todos los mensajes de seguridad estarán a continuación del símbolo de alerta de seguridad y con la palabra “PELIGRO”, “ADVERTENCIA” o “PRECAUCIÓN”.
ADVERTENCIA CÓMO CONECTAR LA ELECTRICIDAD Bajo ninguna circunstancia, corte o remueva la tercera púa (tierra) del cable eléctrico. En pos de la seguridad personal, este electrodoméstico debe siempre conectarse a tierra. NO use un enchufe adaptador con este electrodoméstico. El cable eléctrico de este electrodoméstico está equipado con un enchufe de tres púas (tierra) que combina con un tomacorriente estándar de tres tomas de pared para minimizar la posibilidad de una descarga eléctrica.
A propos des commandes du climatiseur. Les fonctions et l’aspect peuvent varier. Les témoins lumineux à côté des touches à effleurement sur le tableau de commandes du climatiseur indiquent les réglages sélectionnés. Le témoin indique que l’appareil est en mode Programmation de la température ou du délai. Power On/Off Set Auto High Med Low Fan Cool Fan Only Energy Saver Mode Reset Filter Le témoin lumineux indique que la minuterie est programmée.
Ne faites pas fonctionner votre appareil lorsque les températures extérieures sont en dessous de 0 °C (32 °F). Ce climatiseur froid seul n’est pas conçu pour fonctionner avec des températures extérieures en dessous de 0 °C (32 °F). Il ne doit pas être utilisé lorsque les températures extérieures sont en dessous de 0°C (32°F). Télécommande Pour vous assurer d’un fonctionnement correct, pointez la télécommande vers le récepteur de signal du climatiseur.
Acerca de los controles en el acondicionador de aire. Información importante adicionale. Dirección del aire Use la palanca para ajustar la dirección del aire hacia la izquierda y la derecha solamente. Cuidado y limpieza del acondicionador de aire. Rejilla y caja Apague el acondicionador de aire y retire el enchufe del tomacorriente de la pared antes de limpiar. Para limpiar, use agua y un detergente suave. No use cloro o materiales abrasivos.
Instrucciones de instalación Acondicionador de aire ¿Preguntas? Llame 800.GE.CARES (800.432.2737) o visite nuestra página en la red en: GEAppliances.com REQUISITOS ELÉCTRICOS ANTES DE INICIAR Algunos modelos requieren tomacorrientes de 115/120 voltios de corriente alterna y 60 Hz conectados a tierra, protegidos con un fusible de dilatación de tiempo de 15 amperios o un cortacircuitos. El enchufe de tres púas con conexión a tierra minimiza la posibilidad de descargas eléctricas.
Instrucciones de instalación HERRAMIENTAS QUE NECESITARÁ Lápiz Un destornillador con hoja plana Un destornillador de estrella Tijeras o cuchilla Nivel PARTES INCLUIDAS (Apariencia puede variar) Riel de montaje superior Junta de espuma superior de la ventana Sello de la banda de la ventana (2) Una regla o cinta métrica Sello del panel de acordeón (2) Panel de acordeón izquierdo Acondicionador de aire Panel de acordeón derecho Banda de sellado del riel de montaje superior Aislante de Gomaespuma (
Instrucciones de instalación 1 REQUISITOS PARA LA VENTANA 3 PREPARE EL ACONDICIONADOR DE AIRE • Estas instrucciones son para una ventana estándar de dos pliegues. Usted necesitará modificar el proceso para otros tipos de ventanas. • Todas las partes de apoyo deben quedar totalmente aseguradas a algún metal, mampostería o a la madera. • El tomacorriente eléctrico debe estar al alcance del cable eléctrico del acondicionador de aire. • Siga las dimensiones de la tabla y la ilustración según su modelo.
Instrucciones de instalación 3 PREPARE EL ACONDICIONADOR DE AIRE E Quite lo tornillo de lado de la carcasa. Consérvelo en una ubicación segura. NOTA: Asegúrese de guardar esto tornillo. Lo necesitará más adelante en la instalación. 4 PREPARE LA CARCASA Deslice cada soporte por el extremo de cada C panel correspondiente. La figura muestra la orientación de cada panel de acordeón y junta de soporte lateral relativos a la caja desde una vista superior de la unidad.
Instrucciones de instalación 5 PREPARE THE WINDOW AND INSTALL 5 PREPARE LA VENTANA E INSTALE LA A Corte el sellador de la ventana (2 bandas largas) en la longitud apropiada. Pele la parte trasera y añada el sellador al lado inferior del marco de la ventana. D Enlace el soporte en V y la ficha del soporte en V con una tuerca y un tornillo Tipo F.
Instrucciones de instalación 5 PREPARE LA VENTANA E INSTALE LA 6 INSTALE EL ACONDICIONADOR EN LA CAJA H CARCASA PRECAUCIÓN: B Vuelva a instalar lo tornillo quitados antes, en lado de la carcasa. IMPORTANTE: LO TORNILLO DE CONEXIÓN A TIERRA DEBERÁN SER REINSTALADOS PARA ASEGURAR UNA CONEXIÓN A TIERRA ADECUADA. C Reinstale el control en el espacio del panel reemplazando los 2 tornillos que retiró previamente.
Instrucciones de instalación 8 INSTALE EL AISLANTE DE GOMAESPUMA Aislante adicional es provisto con su acondicionador de aire de ventana a fin de reducir las fugas de calor dentro de la casa, reduciendo el uso de corriente total. A Una vez instalado el acondicionador de aire de ventana, mida la longitud del acordeón de ambos lados. / + / + B Corte el aislante de gomaespuma en la longitud medida del lado izquierdo y derecho del acordeón.
,QVWUXFFLRQHV GH ,QVWDODFLyQ D 7UDYpV GH OD 3DUHG³2SFLRQDO 1 IMPORTANTE (cont.) La carcasa puede instalarse a través de la pared en construcciones existentes y nuevas. Lea por completo y luego siga todos los pasos. NOTA: Con excepción de los montajes de soportes en V (incluidos), obtenga todos los materiales en forma local para montar el acondicionador de aire a través de la pared. Fije con 14 tornillos para madera sujetos por lo menos D una pulgada dentro de la estructura de soporte de la pared.
Solucionar problemas. Problema Causas posibles Qué hacer El acondicionador de aire no enciende El acondicionador de aire está desconectado. • Cerciórese de que el acondicionador de aire está enchufado totalmente en el tomacorriente. El fusible se disparó / el cortacircuitos se disparó. • Inspeccione los fusibles / caja de interruptores de la casa y reemplace cualquier fusible o reajuste el interruptor. Interrupción en el suministro eléctrico.
Notas.
Notas. GEAppliances.
Garantía de su acondicionador de aire³JDUDQWtD OLPLWDGD GH XQ DxR. Todos los servicios de garantía los proporcionan nuestros Centros de Reparación de Fábrica o nuestros técnicos Customer Care® autorizados. Para concertar una cita de reparación, en línea, 24 horas al día, visítenos al ge.com, o llame al 800. GE.CARES (800.432.2737). Cuando llame para solicitar servicio, por favor tenga a mano el número de serie y el número de modelo. Grape aquí su recibo.
Servicio al consumidor. Página Web de GE Appliances GEAppliances.com ¿Tiene alguna pregunta sobre su electrodoméstico? ¡Pruebe la página Web de GE Appliances, cualquier día del año! Para mayor conveniencia y servicio más rápido, ya puede descargar los Manuales de los Propietarios, pedir piezas o incluso hacer una cita en línea para que vengan a realizar una reparación. Real Life Design Studio (VWXGLR GH GLVHxR SDUD OD YLGD UHDO GEAppliances.com *( DSR\D HO FRQFHSWR GH 'LVHxR 8QLYHUVDO³SURGXFWRV VHUYLF
Consumer Support. GE Appliances Website GEAppliances.com Have a question or need assistance with your appliance? Try the GE Appliances Website 24 hours a day, any day of the year! For greater convenience and faster service, you can now download Owner’s Manuals, or even order parts on-line. Real Life Design Studio GEAppliances.com *( VXSSRUWV WKH 8QLYHUVDO 'HVLJQ FRQFHSW³SURGXFWV VHUYLFHV DQG HQYLURQPHQWV WKDW FDQ EH XVHG E\ people of all ages, sizes and capabilities.