Thermostat Gas Ranges GEAppliances.com For a Spanish version of this manual, visit our Website at GEAppliances.com. Para consultar una version en español de este manual de instrucciones, visite nuestro sitio de internet GEAppliances.com. In Canada contact us at: www.GEAppliances.ca Safety Information . . . . . . . . . . . . 2 Warranty . . . . . . . . . . . . . . . . . . . . . . . . 8 Owner’s Manual Assistance / Accessories . . . . . . 9 Using The Cooktop Surface Burners . . . . . . . . . . . . . . .
SAFETY INFORMATION IMPORTANT SAFETY INFORMATION. READ ALL INSTRUCTIONS BEFORE USING. WARNING If the information in this manual is not followed exactly, a fire or explosion may result, causing property damage, personal injury or death. - Do not store or use gasoline or other flammable vapors and liquids in the vicinity of this or any other appliance. - WHAT TO DO IF YOU SMELL GAS Ŷ Do not try to light any appliance. Ŷ Do not touch any electrical switch; do not use any phone in your building.
The California Safe Drinking Water and Toxic Enforcement Act requires the Governor of California to publish a list of substances known to the state to cause cancer, birth defects or other reproductive harm, and requires businesses to warn customers of potential exposure to such substances. WARNING This product contains one or more chemical known to the State of California to cause cancer, birth defects or other reproductive harm.
SAFETY INFORMATION IMPORTANT SAFETY INFORMATION. READ ALL INSTRUCTIONS BEFORE USING. WARNING GENERAL SAFETY INSTRUCTIONS (CONT.) Never block the vents (air openings) of the range. They provide the air inlets and outlets that are necessary for the range to operate properly with correct combustion. Air openings are located at the rear of the cooktop, at the top and bottom of the oven door, and at the bottom of the range under the broil drawer, lower oven drawer or kick panel.
Do not use water on grease fires. Never pick up If there is a fire in the oven during self-clean, turn a flaming pan. Turn the controls off. Smother a flaming pan on a surface burner by covering the pan completely with a well-fitting lid, cookie sheet or flat tray. If necessary, use a multi-purpose dry chemical or foam-type fire extinguisher. If there is a fire in the oven during baking, turn the oven off and keep the door closed until the fire goes out.
SAFETY INFORMATION IMPORTANT SAFETY INFORMATION. READ ALL INSTRUCTIONS BEFORE USING. WARNING OVEN SAFETY INSTRUCTIONS WARNING NEVER cover any slots, holes, or passages in the oven bottom or cover an entire rack with materials such as aluminum foil. Doing so blocks air flow through the oven and may cause carbon monoxide poisoning. Aluminum foil linings may also trap heat, causing a fire hazard.
The purpose of the broil drawer is to hold hot Use care when opening the drawer. Open the cooked foods at serving temperature. Bacteria will grow very rapidly in food that is between 40 and 140°F. Do not put cold food in broil drawer. Do not keep food in the broil drawer for more than 2 hours. Failure to follow these instructions may result in foodborne illness. Do not leave paper products, plastics, canned food or combustible materials in the drawer. They may ignite.
WARRANTY Thank You! ... for your purchase of a GE Brand appliance. Register Your Appliance: Register your new appliance on-line at your convenience! www.geappliances.com/service_and_support/register/ Timely product registration will allow for enhanced communication and prompt service under the terms of your warranty, should the need arise. You may also mail in the pre-printed registration card included in the packing material. GE Gas Range Warranty GEAppliances.
Try the GE Appliances Website (www.geappliances.com/service_and_support/) 24 hours a day, any day of the year! For greater convenience and faster service, you can now download Owner’s Manuals, order parts or even schedule service on-line. Schedule Service: Expert GE repair service is only one step away from your door. Get on-line and schedule your service at www.geappliances.com/service_and_ support/ Or call 800.GE.CARES (800.432.2737) during normal business hours.
USING THE COOKTOP: Surface Burners Surface Burners How to Light a Surface Burner WARNING Burners should be operated only when covered by cookware. Burner flames not covered by cookware present a risk of fire or clothing ignition. Never let flames extend beyond the sides of the cookware. Failure to comply may result in serious injury. Make sure all burners are in their correct locations and fully assembled before attempting to operate any burner.
Top-of-Range Cookware Aluminum: Medium-weight cookware is recommended because it heats quickly and evenly. Most foods brown evenly in an aluminum skillet. Use saucepans with tightfitting lids when cooking with minimum amounts of water. Stainless Steel: This metal alone has poor heating properties and is usually combined with copper, aluminum or other metals for improved heat distribution. Combination metal skillets usually work satisfactorily if they are used with medium heat as the manufacturer recommends.
USING THE OVEN: Using the clock and timer Using the clock and timer Throughout this manual, features and appearance may vary from your model. You have the choice of having the timer show the time counting down or the time of day. In either case, the timer will signal at the end of the timer period to alert you that the time is up. To Set the Clock change 10 minutes at a time. To change the time by single minutes, give the pads short taps.
Never block the vents (air openings) of the range. They provide the air inlet and outlet that are necessary for the range to keep cool and operate properly with correct combustion. Air openings are located at the rear of the cooktop, at the top and bottom of the oven door, and at the bottom of the range. Oven Racks and Rack Positions Main Oven Your oven has six rack positions in the main oven. Recommended rack positions for various types of foods are provided in the Cooking Guide.
Oven Temperature Knob (on some models) OVEN OFF TEMP Turn the OVEN TEMP knob to the setting you want. 0 20 Preheat the oven for 10 minutes for baking. AN CLE 40 0 0 45 The “oven on” light comes on when the burner is on. It will cycle on and off during cooking. 300 3 50 250 BROIL 500 Front of OVEN TEMP knob (knob appearance may vary) To Adjust the Thermostat (on models with an OVEN TEMP Knob) To decrease the oven temperature, move the top screw toward the left.
Your new oven has a variety of cooking modes to help you get the best results. These modes are described below. Refer to the Cooking Guide section for recommendations for specific foods. Remember, your new oven may perform differently than the oven it is replacing. Bake Broil The bake mode is for baking and roasting. This mode uses heat from the lower burner. When preparing baked goods such as cakes, cookies, and pastries always preheat the oven first. Follow recipe recommendations for food placement.
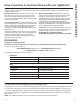
USING THE OVEN: Cooking Guide Cooking Guide RECOMMENDED MODE(S) RECOMMENDED RACK POSITION(S) ADDITIONAL SUGGESTIONS Layer cakes, sheet cakes, bundt cakes, muffins, quick breads, biscuits, scones on a Single Rack Bake 2 or 3 Use shiny cookware. Layer cakes* on Multiple Racks Bake 2 and 4 Ensure adequate airflow (see illustration below). Chiffon cakes (angel food) Bake 1 Use shiny cookware. Cookies, biscuits, scones on a Single Rack Bake 3 Use shiny cookware.
Be sure electrical power is off and all surfaces are cool before cleaning any part of the oven. Control Panel and Knobs Wipe the control panel after each use of the oven with a damp cloth. For cleaning, use mild soap and water or a 50/50 solution of vinegar and water. Rinse with clean water. Polish dry with a soft cloth. Do not use abrasive cleansers, strong liquid cleansers, plastic scouring pads or oven cleaners on the control panel—they will damage the finish.
CARE AND CLEANING: Cleaning The Oven / Cleaning The Cooktop Cleaning The Oven (Cont.) Oven Interior (continued) Self Clean Mode (on some models) Read Self-Cleaning Oven Safety Instructions at the beginning of this manual before using Self Clean Mode. Self clean uses very high temperatures to clean the oven interior. The oven door will lock when using this feature. Before operating the self-clean cycle, pre-wash inner door and inside window before self-cleaning. Wipe inner black door before self clean.
Cleaning The Burners Burner Caps Wash burner caps in hot, soapy water and rinse with clean water. You may scour with a plastic scouring pad to remove burned-on food particles. The round caps may also be cleaned in your dishwasher. Burner Heads Wash the burner heads routinely, especially after bad spillovers, which could clog the openings. Lift burners off when cool. Use hot, soapy water. Rinse with clean water. For more stubborn stains, use a brush with plastic bristles.
CARE AND CLEANING: Cleaning The Cooktop / Cleaning The Door and Drawer 20 Cleaning The Cooktop (Cont.) Burner Grates Grates should be washed in hot, soapy water and rinsed with clean water. To soften burned-on food, place grates in a plastic bag containing ¼-cup of household ammonia for several hours. Afterward, scrub grates with a plastic scouring pad soaked in hot, soapy water. Rinse well and dry. When replacing the grates, be sure to locate them correctly on the cooktop.
Oven Light Replacement WARNING SHOCK OR BURN HAZARD: Before replacing oven light bulb, disconnect the electrical power to the oven at the main fuse or circuit breaker panel. Failure to do so may result in electric shock or burn. CAUTION BURN HAZARD: The glass cover and bulb should be removed when cool. Touching hot glass with bare hands or a damp cloth can cause burns. Oven Light Bulb NOTE: The glass cover should be removed only when cold. Wearing latex gloves may offer a better grip.
TROUBLESHOOTING TIPS Troubleshooting tips ... Before you call for service Save time and money! Review the charts on the following pages first and you may not need to call for service. Problem Possible Cause What To Do My new oven doesn't cook like my old one. Is something wrong with the temperature settings? Your new oven has a different cooking system from your old oven and therefore may cook differently than your old oven. For the first few uses, follow your recipe times and temperatures carefully.
Problem Possible Cause What To Do Oven light does not work Light bulb is loose or defective. Tighten or replace bulb. Switch operating light is broken. Call for service. Oven will not self-clean The temperature is too high to set a self-clean operation. Allow the oven to cool and reset the controls. Oven controls improperly set. See the Cleaning the Oven section. Excessive smoking during clean cycle Excessive soil or grease.. Turn knob to Off. Open the windows to rid the room of smoke.
TROUBLESHOOTING TIPS Troubleshooting tips ... Before you call for service Problem Possible Cause What To Do Top burners do not light or do not burn evenly. (The front right burner is designed to have slightly smaller flames between the 6 and 9 o’clock positions. This is normal.) Plug on range is not completely inserted in the electrical outlet. Make sure electrical plug is plugged into a live, properly grounded outlet. Burner slits on the side of the burner may be clogged.