
Manual
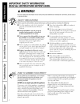

Usingthe dehumidifier.
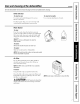
Always make sure the water bucket is locked into place on the dehumidifier.
Removing Collected Water
There are 2 ways to remove collected water."
[] Use the bucket "_,_hen tile bucket is removed,
the unit will shut off. Erupt' and replace the
bucket.
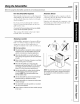
4. Secure the nozzle to the back of the unit
with the two screws pro_ided.
[]
NOTE:Supportbucketwith
bothhandswhen empb/ing.
IMPORTANT"Do not use the drain tube ff using
the bucket to collect water. Whenthe drain tube
is connected,water will flow through # onto the
floor insteadof into the bucket.
NOTES:
• Do not removethe bucket whilethe
dehumidifieris operatingor flit hasjust
stoppedoperating.Thismight causesome
water to drip from the drainpan.
• Thebucket mustbe in place andsecurely
seatedfor the dehumidifierto operate.
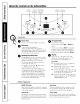
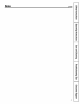
Use a hose._,%_tercan be automatically
emptied into a floor chain b) attaching tile
mfit's drain robe with nozzle and a garden
water hose (not included).
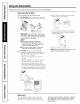
1. Remove tile bucket ti'om tile fl'ont of
the unit.
2. Remoxe tile plug coxer fl'om tile back of
the refit and store it in a sate location.
3. Insert tile robe through tile hole in tile
back ot the unit and securely press it onto
the comlecmr on the fl'ont ot the refit. Push
tile tube around tile fl'ont connector until
the nozzle is flush with the back ot the refit.
Backofunit
Backofunit
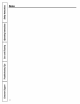
5. Cut (as needed) and thread a garden hose
(not supplied) onto the nozzle and lead it
to the floor drain.
6. Replace tile bucket in tile refit.
NOTE.:Thebucket must bein place andsecurely
seatedfor the dehumidifierto operate.
Inserttubethrougl_
holein backof unit.
Firmlypressthe tube
ontotile frontconnectoE
Frontof unit
Water Level
Tile dehumidifier will ttlrn off' automatically
when tile bucket is flfll, or when tile bucket is
removed or not replaced in tile proper position.
Thebucket must be replaced inthe properpositionfor
the dehumidifierto work. Thelight will be on andthe
dehumidifierwill not runff the bucketis not in the
proper position.