AIR CONDITIONER ROOM SAFETY INFORMATION . . . . . . . . .3 USING THE AIR CONDITIONER Controls . . . . . . . . . . . . . . . . . . . . . . . . . . . . . .4 Remote Control . . . . . . . . . . . . . . . . . . . . . . .5 Cool Mode . . . . . . . . . . . . . . . . . . . . . . . . . . . .5 Energy Saver Mode . . . . . . . . . . . . . . . . . . . .5 Air Direction . . . . . . . . . . . . . . . . . . . . . . . . . .6 OWNER’S MANUAL & INSTALLATION INSTRUCTIONS AHS14 AHS18 CARE AND CLEANING Grille and Case . . .
THANK YOU FOR MAKING GE APPLIANCES A PART OF YOUR HOME. Whether you grew up with GE Appliances, or this is your first, we’re happy to have you in the family. We take pride in the craftsmanship, innovation and design that goes into every GE Appliances product, and we think you will too. Among other things, registration of your appliance ensures that we can deliver important product information and warranty details when you need them. Register your GE appliance now online.
READ ALL INSTRUCTIONS BEFORE USING THE APPLIANCE WARNING For your safety, the information in this manual must be followed to minimize the risk of fire, electric shock or personal injury. Ŷ 8VH WKLV DSSOLDQFH RQO\ IRU LWV LQWHQGHG SXUSRVH DV described in this Owner’s Manual. Ŷ This air conditioner must be properly installed in accordance with the Installation Instructions before it is used. Ŷ Never unplug your air conditioner by pulling on the power cord.
USING THE AIR CONDITIONER Controls Features and appearance will vary. /LJKWV EHORZ WKH WRXFK SDGV RQ WKH DLU FRQGLWLRQHU FRQWURO SDQHO LQGLFDWH WKH VHOHFWHG VHWWLQJV /LJKW LQGLFDWHV WKH XQLW LV LQ WKH temperature or delay time Set mode. + Power On/Off Set Auto High Med Low Fan Mode Delay ± KU - Cool Fan Only Energy Saver Reset Filter /LJKW LQGLFDWHV WKH delay timer is set.
Do Not Operate in Freezing Outdoor Conditions This cool-only air conditioner was not designed for freezing outdoor conditions. It must not be used when the outdoor temperature is below freezing (32°F). Remote Control Ŷ To ensure proper operation, aim the remote control at the signal receiver on the air conditioner. Ŷ 0DNH VXUH EDWWHULHV DUH IUHVK DQG LQVWDOOHG FRUUHFWO\ DV indicated on the remote control.
USING THE AIR CONDITIONER Using the Air Conditioner Fan Only Mode 8VH WKH )DQ 2QO\ 0RGH DW /RZ 0HG RU +LJK IDQ VSHHG to provide air circulation and filtering without cooling. Since fan-only settings do not provide cooling, a Set temperature cannot be entered. The room temperature will appear in the display. NOTE: Auto Fan Speed cannot be used when in the Fan Only Mode.
Grille and Case Turn the air conditioner off and remove the plug from the wall outlet before cleaning. To clean, use water and a mild detergent. Do not use bleach or abrasives. Air Filter The air filter behind the front grille should be checked and cleaned at least every 30 days or more often if necessary. To remove: CAUTION DO NOT operate the air conditioner without a filter because dirt and lint will clog it and reduce performance.
INSTALLATION INSTRUCTIONS Installation Instructions Questions? Call 800.GE.CARES (800.432.2737) or Visit our Website at: GEAppliances.com BEFORE YOU BEGIN TOOLS YOU WILL NEED Read these instructions completely and carefully. • IMPORTANT – Save these instructions for local inspector’s use. • IMPORTANT – Observe all governing codes and ordinances. • Note to Installer ± %H VXUH WR OHDYH WKHVH instructions with the Consumer. • Note to Consumer ± .HHS WKHVH LQVWUXFWLRQV IRU future reference.
PARTS INCLUDED (Appearance may vary) Window sash seal Accordion panel seal (2) Foam top window gasket (1) Top rail gasket (1) /HIW accordion panel Top mounting rail Right accordion panel INSTALLATION INSTRUCTIONS Installation Instructions Foam Insulation (2) Side rail (2) V-supports (2) Type A screws (10) 49-7790 7\SH % screws (2) Sill angle bracket (2) Type C screws (4) Window locking bracket (2) Type E bolt with nut (4) Type F bolt with nut (2) 9
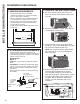
INSTALLATION INSTRUCTIONS Installation Instructions 3. PREPARE THE AIR CONDITIONER 1. WINDOW REQUIREMENTS • These instructions are for a standard double-hung window. You will need to modify them for other types of windows. • The air conditioner can be installed without the accordion panels if needed to fit in a narrow window. See the window opening dimensions. • All supporting parts must be secured to firm wood, masonry or metal. • The electrical outlet must be within reach of the power cord. A.
3. PREPARE THE AIR CONDITIONER (continues) E. Remove the ground screw from the left VLGH RI WKH FDVH .HHS LW LQ D VDIH ORFDWLRQ 127( %H VXUH WR VDYH WKLV VFUHZ
INSTALLATION INSTRUCTIONS Installation Instructions 5. PREPARE THE WINDOW AND INSTALL THE CASE 5. PREPARE THE WINDOW AND INSTALL THE CASE (continues) A. Cut the window sash seal to the proper length. E. Position the V-supports Peel off the backing and attach the seal to the underside of the window sash. on the case bottom so that they will be near the outside wall. Attach a V-support to each side of the bottom of the case V-support with Type E bolts, 2 for each support. F.
5. PREPARE THE WINDOW AND INSTALL THE CASE (continues) 8VH 7\SH % 6FUHZ WR LQVWDOO WKH ZLQGRZ ORFN bracket on top of the bottom window. H. CAUTION To prevent broken glass or damage to windows, on vinyl or other similarly constructed windows, attach the window locking bracket to the window side jamb with one 7\SH % VFUHZ 6. INSTALL THE AIR CONDITIONER IN THE CASE A. Slide the air conditioner into the case by the base pan. Do not push on the controls, foam air discharge housing or the finned coils.
INSTALLATION INSTRUCTIONS Installation Instructions 6. INSTALL THE AIR CONDITIONER IN THE CASE (continues) B. Replace the 1 screw removed earlier, one on each side of the case. ,03257$17 7+( *5281' 6&5(:6 0867 %( 5(,167$//(' 72 (1685( 3523(5 *5281' 7. INSTALL FOAM INSULATION Additional insulation is provided with your window air conditioner to reduce heat leakage into the home, reducing overall energy usage. A.
The case may be installed through-the-wall in both existing and new construction. Read completely, then follow step-by-step. NOTE: Obtain all materials locally for mounting the air conditioner through-thewall. 1. IMPORTANT Through-the-wall installation is not appropriate if any of the side or top louvers in the case will be obstructed by the wall. All side and top louvers in the case must project on the outdoor side of the wall.
TROUBLESHOOTING TIPS Troubleshooting Tips... %HIRUH \RX FDOO IRU VHUYLFH Save time and money! Review the charts on the following pages first and you may not need to call for service. Problem Possible Causes What To Do Air conditioner does not start The air conditioner is unplugged. • Make sure the air conditioner plug is pushed completely into the outlet. 7KH IXVH LV EORZQ FLUFXLW breaker is tripped. &KHFN WKH KRXVH IXVH FLUFXLW EUHDNHU ER[ DQG UHSODFH the fuse or reset the breaker.
All warranty service provided by our Factory Service Centers, or an authorized Customer Care® technician. To schedule service, visit us on-line at ge.com, or call 800.GE.CARES (800.432.2737). Have serial number and model number available when calling for service. For The Period Of: GE Appliances Will Replace: One Year From the date of the original purchase Any part of the air conditioner which fails due to a defect in materials or workmanship.
CONSUMER SUPPORT Consumer Support GE Appliances Website Have a question or need assistance with your appliance? Try the GE Appliances Website 24 hours a day, any day of the year! You can also shop for more great GE Appliances products and take advantage of all our on-line support VHUYLFHV GHVLJQHG IRU \RXU FRQYHQLHQFH ,Q WKH 86 GEAppliances.
PARA SALA ACCONDICIONADORES DE AIRE INSTRUCCIONES DE SEGURIDAD . . . . . . . . . . . . . . . . . . .3 USO DEL ACONDICIONADOR DE AIRE MANUAL DEL PROPIETARIO Y INSTRUCCIONES DE INSTALACIÓN Controle . . . . . . . . . . . . . . . . . . . . . . . . . . . . . .4 CUIDADO Y LIMPIEZA AHS14 AHS18 Filtro de aire . . . . . . . . . . . . . . . . . . . . . . . . . .7 Bobinas para exteriores . . . . . . . . . . . . . . . .7 INSTRUCCIONES DE INSTALACIÓN . . . . . . . . . . . . . . . .8 SOLUCIONAR PROBLEMAS . . .
GRACIAS POR HACER QUE GE APPLIANCES SEA PARTE DE SU HOGAR. Ya sea que haya crecido usando GE Appliances, o que ésta es su primera vez, nos complace tenerlo en la familia. Sentimos orgullo por el nivel de arte, innovación y diseño de cada uno de los electrodomésticos de GE Appliances, y creemos que usted también. Entre otras cosas, el registro de su electrodoméstico asegura que podamos entregarle información importante del producto y detalles de la garantía cuando los necesite.
ADVERTENCIA Para su seguridad, siga las instrucciones de este manual a fin de minimizar riesgos de incendio, descargas eléctricas o heridas personales. Ŷ 8VH HVWH HOHFWURGRPpVWLFR VyOR SDUD VX SURSyVLWR RULJLQDO como se describe en el Manual del Propietario. Ŷ (VWH DFRQGLFLRQDGRU GH DLUH VH GHEH LQVWDODU GH IRUPD apropiada de acuerdo con las Instrucciones de Instalación antes de ser usado. Ŷ 1XQFD GHVHQFKXIH VX DFRQGLFLRQDGRU GH DLUH HPSXMDQGR el cable de corriente.
USO DEL ACONDICIONADOR DE AIRE Controles Las luces al lado de las teclas de toque en el panel de control del acondicionador de aire indicarán los ajustes seleccionados. Las funciones y el aspecto pueden variar. La luz indica que la unidad está en el modo de Ajuste de temperatura o de Tiempo de retardo. La luz indica que el temporizador de retardo está configurado.
No use en las condiciones externas debajo el punto de congelación (VWH DFRQGLFLRQDGRU GH DLUH QR HV GLVHxDGR SDUD XVDU HQ WHPSHUDWXUDV H[WHUQDV GHEDMR HO SXQWR GH FRQJHODFLyQ 1R XVH HQ ODV condiciones externas debajo el punto de congelación. Control Remoto Ŷ 3DUD JDUDQWL]DU XQD RSHUDFLyQ DSURSLDGD RULHQWH HO FRQWURO remoto hacia el receptor de señal del acondicionador de aire. Ŷ (O UHFHSWRU GH VHxDO WLHQH XQ UDQJR Pi[LPR GH SLHV Ŷ &HUFLyUHVH GH TXH QR KD\D QDGD HQWUH HO DFRQGLFLRQDGRU GH air
USO DEL ACONDICIONADOR DE AIRE Controles Modo de Fan Only (Solo ventilador) 8VH HO PRGR Fan only (Solo ventilador) a velocidad Low (Baja), Med (Media) o High (Alta) para proporcionar circulación de aire y filtración sin enfriamiento. Debido a que los niveles de ventilador únicamente no proporcionan enfriamiento, no se puede introducir una temperatura Definida. Aparecerá en pantalla la temperatura ambiente.
Rejilla y caja Apague el acondicionador de aire y retire el enchufe del tomacorriente de la pared antes de limpiar. 3DUD OLPSLDU XVH DJXD \ XQ GHWHUJHQWH VXDYH 1R XVH FORUR R materiales abrasivos. Filtro de aire El filtro de aire detrás de la rejilla frontal debe inspeccionarse y OLPSLDUVH SRU OR PHQRV FDGD GtDV R PiV D PHQXGR VL IXHVH necesario.
INSTRUCCIONES DE INSTALACIÓN Instrucciones de instalación ¿Preguntas? Llame 800.GE.CARES (800.432.2737) o visite nuestra página en la red en: GEAppliances.com ANTES DE INICIAR Lea estas instrucciones completa y cuidadosamente. • IMPORTANTE — Guarde estas instrucciones para uso del inspector local. • • • • • • • • • IMPORTANTE — 2EVHUYH WRGRV ORV FyGLJRV \ órdenes de ley. Nota al instalador ± $VHJ~UHVH GH GHMDU HVWDV instrucciones con el consumidor.
PARTES INCLUIDAS (Apariencia puede variar) Sello del panel GH DFRUGHyQ Sello de la banda de OD YHQWDQD Junta de espuma superior de la ventana 7RS UDLO JDVNHW Panel de acordeón izquierdo Banda de sellado del riel de montaje superior Panel de acordeón derecho INSTRUCCIONES DE INSTALACIÓN Instrucciones de instalación Aislante de Gomaespuma 5LHO ODWHUDO 6RSRUWHV HQ 9 Tipo A tornillos 49-7790 Tipo B WRUQLOORV Soporte angular SDUD DOIpL]DU Tipo C WRUQLOORV Trabas para P
INSTRUCCIONES DE INSTALACIÓN Instrucciones de instalación 1. REQUISITOS PARA LA VENTAN Ŷ Estas instrucciones son para una ventana estándar GH GRV SOLHJXHV 8VWHG QHFHVLWDUi PRGLILFDU HO proceso para otros tipos de ventanas. Ŷ (O DFRQGLFLRQDGRU GH DLUH SXHGH LQVWDODUVH VLQ ORV paneles de acordeón para ajustarse a una ventana más estrecha. Ver las dimensiones de la abertura de la ventana. Ŷ 7RGDV ODV SDUWHV GH DSR\R GHEHQ TXHGDU WRWDOPHQWH aseguradas a algún metal, mampostería o a la madera.
3. PREPARE EL ACONDICIONADOR DE AIRE E. Quite lo tornillo de lado de la carcasa. Consérvelo en una ubicación segura. 127$ $VHJ~UHVH GH JXDUGDU HVWR WRUQLOOR /R necesitará más adelante en la instalación. 4. PREPARE LA CARCASA C. Deslice cada soporte por el extremo de cada panel correspondiente. La figura muestra la orientación de cada panel de acordeón y junta de soporte lateral relativos a la caja desde una vista superior de la unidad.
INSTRUCCIONES DE INSTALACIÓN Instrucciones de instalación 5. PREPARE LA VENTANA E INSTALE LA CAJA A. &RUWH HO VHOODGRU GH OD YHQWDQD EDQGDV ODUJDV en la longitud apropiada. Pele la parte trasera y añada el sellador al lado inferior del marco de la ventana. 5. PREPARE LA VENTANA E INSTALE LA CAJA D. Enlace el soporte en V y la ficha del soporte en V con una tuerca y un tornillo Tipo F.
5. PREPARE LA VENTANA E INSTALE LA CAJA H. PRECAUCIÓN 6. INSTALE EL ACONDICIONADOR EN LA CARCASA B. Vuelva a instalar lo tornillo quitados antes, HQ ODGR GH OD FDUFDVD ,03257$17( /2 7251,//2 '( &21(;,Ï1 $ 7,(55$ '(%(5È1 6(5 5(,167$/$'26 3$5$ $6(*85$5 81$ &21(;,Ï1 $ 7,(55$ $'(&8$'$ En ventanas construidas de vinil o de similar construcción, conecte el Vinilo soporte de cierre de la ventana a el marco de la ventana para prevenir daño a la ventana y vidro quebrado.
INSTRUCCIONES DE INSTALACIÓN Instrucciones de instalación 7. INSTALE EL AISLANTE DE GOMAESPUMA Aislante adicional es provisto con su acondicionador de aire de ventana a fin de reducir las fugas de calor dentro de la casa, reduciendo el uso de corriente total. A. 8QD YH] LQVWDODGR HO DFRQGLFLRQDGRU GH DLUH de ventana, mida la longitud del acordeón de ambos lados. / / + + B. Corte el aislante de gomaespuma en la longitud medida del lado izquierdo y derecho del acordeón.
La carcasa puede instalarse a través de la pared en construcciones existentes y nuevas. Lea por completo y luego siga todos los pasos. 127$ &RQ H[FHSFLyQ GH ORV PRQWDMHV GH VRSRUWHV HQ 9 LQFOXLGRV REWHQJD WRGRV ORV PDWHULDOHV HQ IRUPD local para montar el acondicionador de aire a través de la pared. 1. IMPORTANTE La instalación a través de la pared no es apropiada si alguna de las persianas laterales o superiores de la carcasa quedarán obstruidas por la pared.
SOLUCIONAR PROBLEMAS Solucionar problemas Problema Causas posibles Qué hacer El acondicionador de aire no enciende El acondicionador de aire está desconectado. Cerciórese de que el acondicionador de aire está enchufado totalmente en el tomacorriente. El fusible se disparó / el cortacircuitos se disparó. Inspeccione los fusibles / caja de interruptores de la casa y reemplace cualquier fusible o reajuste el interruptor. Interrupción en el suministro eléctrico.
Todos los servicios de garantía los proporcionan nuestros Centros de Reparación de Fábrica o nuestros técnicos Customer Care® DXWRUL]DGRV 3DUD FRQFHUWDU XQD FLWD GH UHSDUDFLyQ HQ OtQHD KRUDV DO GtD YLVtWHQRV DO JH FRP R OODPH DO *( &$5(6 &XDQGR OODPH SDUD VROLFLWDU VHUYLFLR SRU IDYRU WHQJD D PDQR HO Q~PHUR GH VHULH \ HO Q~PHUR GH PRGHOR Por el período de: Un año A partir de la fecha de la compra original GE Appliances reemplazará: Cualquier parte del acondicionador de aire qu
SOPORTE AL CLIENTE Soporte al Cliente GE Appliances Sitio Web ¿Desea realizar una consulta o necesita ayuda con su electrodoméstico? ¡Intente a través del Sitio Web de Electrodomésticos GH *( $SSOLDQFHV ODV KRUDV GHO GtD FXDOTXLHU GtD GHO DxR 8VWHG WDPELpQ SXHGH FRPSUDU PiV JUDQGLRVRV SURGXFWRV GH *( $SSOLDQFHV \ VDFDU YHQWDMD GH WRGRV QXHVWURV VHUYLFLRV D WUDYpV GH ,QWHUQHW GLVHxDGRV SDUD VX FRQYHQLHQFLD (Q (( 88 GEAppliances.