AIR CONDITIONER ROOM SAFETY INFORMATION . . . . . . . . .3 USING THE AIR CONDITIONER Controls . . . . . . . . . . . . . . . . . . . . . . . . . . . . . .4 Remote Control . . . . . . . . . . . . . . . . . . . . . . .5 Cool Mode . . . . . . . . . . . . . . . . . . . . . . . . . . . .5 Energy Saver Mode . . . . . . . . . . . . . . . . . . . .5 Air Direction . . . . . . . . . . . . . . . . . . . . . . . . . .6 OWNER’S MANUAL AKLK18 AKLK24 CARE AND CLEANING Grille and Case . . . . . . . . . . . . . . . .
THANK YOU FOR MAKING GE APPLIANCES A PART OF YOUR HOME. Whether you grew up with GE Appliances, or this is your first, we’re happy to have you in the family. We take pride in the craftsmanship, innovation and design that goes into every GE Appliances product, and we think you will too. Among other things, registration of your appliance ensures that we can deliver important product information and warranty details when you need them. Register your GE appliance now online.
READ ALL INSTRUCTIONS BEFORE USING THE APPLIANCE WARNING For your safety, the information in this manual must be followed to minimize the risk of fire, electric shock or personal injury. Ŷ 8VH WKLV DSSOLDQFH RQO\ IRU LWV LQWHQGHG SXUSRVH DV described in this Owner’s Manual. Ŷ This air conditioner must be properly installed in accordance with the Installation Instructions before it is used. Ŷ Never unplug your air conditioner by pulling on the power cord.
SAFETY INFORMATION IMPORTANT SAFETY INFORMATION READ ALL INSTRUCTIONS BEFORE USING THE APPLIANCE HOW TO CONNECT ELECTRICITY Do not, under any circumstances, cut or remove the third (ground) prong from the power cord. For personal safety, this appliance must be properly grounded. DO NOT use an adapter plug with this appliance.
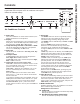
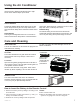
Features and appearance will vary. Lights beside the touch pads on the air conditioner control panel indicate the selected settings. 1 7 9 8 Remote Control 1 4 3 2 6 5 10 7 11 Air Conditioner Controls 3 1. Power Pad Turns air conditioner on and off. When turned on, the display will show the set temperature. 2. Display Shows the room temperature or time remaining on the Delay timer. Shows the Set temperature while setting the temperature in Cool, Dry or Eco modes. 7HPS DQG 'HOD\ ,QFUHDV
USING THE AIR CONDITIONER Using the Air Conditioner Do Not Operate in Freezing Outdoor Conditions This cool-only air conditioner was not designed for freezing outdoor conditions. It must not be used when the outdoor temperature is below 64.4°F. &RQWURO 3DQHO /LJKWV 2Q 2II )HDWXUH 7KLV DLU FRQGLWLRQHU KDV D FRQWURO SDQHO OLJKWV RQ RII feature where its lights will turn off when there is no activity with the controls for over one minute.
Air Direction 8VH WKH OHYHUV WR DGMXVW WKH DLU GLUHFWLRQ OHIW RU ULJKW Tilt the louver bank to adjust up and down. 6RXQG 21 2)) 7KH 6RXQG 21 2)) 0RGH ZLOO EH DEOH WR WXUQ 2Q DQG Off the beep function by the user. Beep will be active when Sound ON. Beep will be unfunctional when Sound OFF. 6RXQG 2Q 2)) Pressing and holding Filter button for 3-5 seconds to switch Sound function. Beep will be unfunctional when Sound OFF. When Beep ON, it will beep one time. When Beep OFF active, it will beep three times.
INSTALLATION INSTRUCTIONS Installation Instructions FOR MORE HELP, VISIT GEAPPLIANCES.COM BEFORE YOU BEGIN Read these instructions completely and carefully. • ,03257$17 ± Save these instructions for local inspector’s use. • • • • • • • • ,03257$17 ± Observe all governing codes and ordinances. Note to Installer – Be sure to leave these instructions with the Consumer. Note to Consumer – Keep these instructions for future reference.
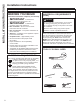
PARTS INCLUDED (Appearance may vary) Side Curtain Foam (2) Window Sash Foam Seal Top Mounting Rail Air Conditioner Remote Control Side Curtain and Frame WoodWindow Lock Bracket (1) Weather Stripping Foam (5) ´ /RFNLQJ Screw and Flat Washer (2) 49-5000525 Rev.
INSTALLATION INSTRUCTIONS Installation Instructions 1. WINDOW REQUIREMENTS • These instructions are for a standard double-hung window. You will need to modify them for other types of windows. • The air conditioner can be installed without the side curtain panels if needed to fit in a narrow window. See the window opening dimensions. • All supporting parts must be secured to firm wood, masonry or metal. • The electrical outlet must be within reach of the power cord.
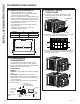
3. PREPARE THE AIR CONDITIONER (cont) D. Disconnect the connector. 4. PREPARE THE CASE A. Attach top rail foam gasket to top of case over holes. B. Mount top rail and side retainers to case. (10 screws) E. Remove the six shipping screws holding the unit. Two at the top, and two on each side along the base. Shipping Screws ´ ORQJ hex-head C. Slide window accordions into side retainers on each side of the case. The accordion panel frames are marked LEFT and RIGHT.
INSTALLATION INSTRUCTIONS Installation Instructions 5. PREPARE WINDOW FOR INSTALLATION 6. INSTALL OUTER CASE IN WINDOW (cont) A. Measure the width of the window opening. B. Mark the center line on the inside windowsill. B. Align the case with the center line marked on the sill. A B A. Width of window opening B. Center line C. 6HFXUH WKH RXWHU FDVH WR WKH VLOO XVLQJ WKH ´ RU ´ /RQJ +H[ KHDG VFUHZV SURYLGHG 6. INSTALL OUTER CASE IN WINDOW A. Place outer case in window.
8. INSTALL OUTER CASE SUPPORT BRACKETS 9. EXTEND WINDOW ACCORDIONS A. Hold each support bracket flush against the outside of the sill, and tight to the bottom of the outer case. Mark the brackets at the top level of the sill and then remove. A. Carefully raise window to access the accordion panel locking screws. Loosen screws so the accordion panels slide easily. B. Extend panels to fill window opening completely. Tighten locking screws on top. C. Close window behind top rail. D.
INSTALLATION INSTRUCTIONS Installation Instructions 10. COMPLETE WINDOW PREP A. Insert the foam seal behind the top of the lower window sash and against the glass of the upper window. A 11. RETURN CHASSIS TO THE OUTER CASE B. Attach the other end of the ground wire to the unit with the remaining grounding screw. Here B C. Replace the front panel on the unit, reversing the steps followed in 3A-3D. D. Measure and cut foam backed sheet. Slide down into the window accordion channels. A.
Before you call for service Save time and money! Review the charts on the following pages first and you may not need to call for service. Problem Possible Cause What To Do Air conditioner does not start. The unit is unplugged. Make sure the air conditioner plug is pushed completely into the outlet. 7KH IXVH LV EORZQ FLUFXLW EUHDNHU is tripped. &KHFN WKH KRXVH IXVH FLUFXLW EUHDNHU ER[ DQG UHSODFH the fuse or reset the breaker. Power Failure.
TROUBLESHOOTING TIPS Normal Operating Sounds Ŷ
How it Works Download the GE Appliances App 8VH WKH DSS WR FRQQHFW \RXU URRP DLU conditioner to WiFi Once connected, use the app to turn down your air conditioner as you leave work. CHANGE TEMP TO 65 Getting Started To connect your room air conditioner, you’ll need the GE Appliances App. The app will walk you through the connection process. Download the app from iTunes or Google Play.
Notes 49-5000525 Rev.
All warranty service provided by our Factory Service Centers, or an authorized Customer Care® technician. To schedule service, visit us on-line at GEAppliances.com. For The Period Of: GE Appliances Will Replace: One Year From the date of the original purchase Any part of the air conditioner which fails due to a defect in materials or workmanship. During this limited one-year warranty, GE Appliances will also provide, free of charge, all labor and related service to replace the defective part.
CONSUMER SUPPORT Consumer Support GE Appliances Website Have a question or need assistance with your appliance? Try the GE Appliances Website 24 hours a day, any day of the year! You can also shop for more great GE Appliances products and take advantage of all our on-line support VHUYLFHV GHVLJQHG IRU \RXU FRQYHQLHQFH ,Q WKH 86 GEAppliances.
PARA SALA ACCONDICIONADORES DE AIRE INFORMACIÓN DE SEGURIDAD . . .3 USO DEL ACONDICIONADOR DE AIRE Controles . . . . . . . . . . . . . . . . . . . . . . . . . . . . .4 Control Remoto . . . . . . . . . . . . . . . . . . . . . . .5 Modo de Frío . . . . . . . . . . . . . . . . . . . . . . . . .5 Modo de Ahorro de Energía . . . . . . . . . . . .5 Dirección del Aire . . . . . . . . . . . . . . . . . . . . .6 MANUAL DEL PROPIETARIO AKLK18 AKLK24 CUIDADO Y LIMPIEZA Parrilla y Caja . . . . . . . . . . . . . .
GRACIAS POR HACER QUE GE APPLIANCES SEA PARTE DE SU HOGAR. Ya sea que haya crecido usando GE Appliances, o que ésta es su primera vez, nos complace tenerlo en la familia. Sentimos orgullo por el nivel de arte, innovación y diseño de cada uno de los electrodomésticos de GE Appliances, y creemos que usted también. Entre otras cosas, el registro de su electrodoméstico asegura que podamos entregarle información importante del producto y detalles de la garantía cuando los necesite.
ADVERTENCIA Para su seguridad, siga las instrucciones de este manual a fin de minimizar riesgos de incendio, descargas eléctricas o heridas personales. Ŷ 8VH HVWH HOHFWURGRPpVWLFR VyOR SDUD VX SURSyVLWR RULJLQDO como se describe en el Manual del Propietario. Ŷ 6L HO UHFHSWiFXOR QR FRLQFLGH FRQ HO HQFKXIH HO FDPELR GHO mismo deberá ser realizado por un electricista calificado.
INFORMACIÓN DE SEGURIDAD INFORMACIÓN IMPORTANTE DE SEGURIDAD LEA TODAS LAS INSTRUCCIONES ANTES DE USAR CÓMO CONECTAR LA ELECTRICIDAD 1XQFD EDMR QLQJXQD FLUFXQVWDQFLD FRUWH R HOLPLQH HO WHUFHU FDEOH WLHUUD GHO FDEOH GH FRUULHQWH 3DUD VX VHJXULGDG SHUVRQDO HVWH electrodoméstico debe estar adecuadamente conectado a tierra. Contrate a un electricista calificado para que controle el tomacorriente y el circuito eléctrico para asegurar que el enchufe esté correctamente conectado a tierra.
/DV IXQFLRQHV \ OD DSDULHQFLD SRGUiQ YDULDU /DV OXFHV DO ODGR GH ODV WHFODV WiFWLOHV GHO SDQHO GH FRQWURO GHO acondicionador de aire indican las configuraciones seleccionadas. 1 4 3 1 7 9 8 2 6 5 10 7 11 3 5 4 10 Controles del Acondicionador de Aire Control Remoto 1. Tecla de Power (Encendido) Apaga y prende el acondicionador de aire. Al encenderse, la pantalla mostrará la temperatura ambiente. 2.
USO DEL ACONDICIONADOR DE AIRE Uso del Acondicionador de Aire No Utilizar con Condiciones Climáticas Exteriores de Congelación Este acondicionador de aire sólo frío no fue diseñado para uso con condiciones climáticas exteriores de temperatura helada. 'HEHUi VHU XVDGR FXDQGR OD WHPSHUDWXUD H[WHUQD VHD LQIHULRU D 64.4°F.
Dirección del Aire 8VH OD SDODQFD SDUD DMXVWDU OD GLUHFFLyQ GHO DLUH KDFLD OD izquierda o derecha. Incline la rejilla para hacer ajustes hacia arriba o abajo. 6RXQG 21 2)) 6RQLGR (QFHQGLGR $SDJDGR (O PRGR 6RXQG 21 2)) OH SHUPLWLUi DO XVXDULR HQFHQGHU \ apagar la función del pitido. El pitido estará activo en la función Sound ON El pitido no estará activo en la función Sound OFF. 6RQLGR (QFHQGLGR $SDJDGR 0DQWHQJD SUHVLRQDGR HO ERWyQ )LOWHU GXUDQWH HQWUH \ segundos.
INSTRUCCIONES DE INSTALACIÓN Instrucciones de instalación Preguntas? Visite nuestro sitio web en: GEAppliances.com ANTES DE INICIAR Lea estas instrucciones completa y cuidadosamente. • ,03257$17( ± Guarde estas instrucciones para uso del inspector local. • • • • • ,03257$17( ± 2EVHUYH WRGRV ORV códigos y órdenes de ley. Nota al instalador – Asegúrese de dejar estas instrucciones con el consumidor. Nota al consumidor – Conserve estas instrucciones para referencia futura..
PARTES INCLUIDAS (La apariencia puede variar) &RUWLQD /DWHUDO GH *RPDHVSXPD Sello de la banda de la ventana Riel de Montaje Superior Aire acondicionado Control Remoto &RUWLQD /DWHUDO \ 0DUFR Sellado Inferior y Sellados /DWHUDOHV Wood :LQGRZ /RFN %UDFNHW 1x Ground Wire and [ *URXQG 6FUHZV Tornillo de %ORTXHR GH ´ \ $UDQGHOD 3ODQD 49-5000525 Rev. 0 Soporte del Ángulo del $OIpL]DU 9LQ\O :LQGRZ /RFN %UDFNHW Tornillo de Cabeza +H[DJRQDO /DUJR GH ô´ R ò´ 7RUQLOOR /D
INSTRUCCIONES DE INSTALACIÓN Instrucciones de instalación 1. REQUISITOS PARA LA VENTANA • Estas instrucciones son para una ventana estándar GH GRV SOLHJXHV 8VWHG QHFHVLWDUi PRGLILFDU HO proceso para otros tipos de ventanas. • El acondicionador de aire puede instalarse sin los paneles de acordeón para ajustarse a una ventana más estrecha. Ver las dimensiones de la abertura de la ventana. • Todas las partes de apoyo deben quedar totalmente aseguradas a algún metal, mampostería o a la madera.
3. PREPARE EL ACONDICIONADOR DE AIRE (cont) D. 'HVFRQHFWH HO FRQHFWRU 4. PREPARE LA CAJA A. Coloque la junta de espuma del riel superior en la parte superior de la caja sobre los orificios. B. Monte el riel superior y los soportes laterales a la FDUFDVD WRUQLOORV E. Retire los seis tornillos de embalaje que VRVWLHQHQ OD XQLGDG 'RV HQ OD SDUWH VXSHULRU \ dos a cada lago de la base. Tornillos de Embalaje Cabeza hexagonal ODUJD GH ´ C.
INSTRUCCIONES DE INSTALACIÓN Instrucciones de instalación 5. PREPARE LA VENTANA PARA LA INSTALACIÓN 6. INSTALE LA CAJA EXTERNA EN LA VENTANA (cont) A. Mida el ancho de la abertura de la ventana. B. Marque la línea central del alféizar interno. B. Alinee la carcasa con la línea central marcada sobre el alféizar. A B A. Ancho de la abertura de la ventana B. /tQHD FHQWUDO 6. INSTALE LA CAJA EXTERNA EN LA VENTANA A.
8. INSTALE LOS SOPORTES DE APOYO EN LA CARCASA EXTERIOR A. Sostenga cada soporte de apoyo nivelado contra la parte exterior del alféizar, y ajustado sobre la parte inferior de la carcasa exterior. Marque los soportes en el nivel superior del alféizar y luego retire los mismos. 9. EXTIENDA LOS ACORDEONES DE VENTANA A. Con cuidado eleve la ventana para acceder a los tornillos de bloqueo del panel tipo acordeón. Afloje los tornillos de modo que los paneles tipo acordeón se deslicen con facilidad. B.
INSTRUCCIONES DE INSTALACIÓN Instrucciones de instalación 10. PREPARACIÓN COMPLETA DE LA VENTANA A. Inserte el sello de gomaespuma detrás de la parte superior del marco de la ventana y contra el vidrio de la ventana superior. A 11. REGRESE EL CHASIS A LA CAJA EXTERNA A. 8QD YH] TXH OD FDMD HVWp DGKHULGD GH IRUPD VHJXUD a la ventana, vuelva a instalar el acondicionador de DLUH 'RV SHUVRQDV GHEHQ OHYDQWDU HO DFRQGLFLRQDGRU de aire y deslizar el mismo sobre la caja. % A.
¡Ahorre tiempo y dinero! Primero revise los cuadros que aparecen en las siguientes páginas y es posible que no necesite solicitar reparaciones. Problema Causas posibles Qué hacer El acondicionador de aire no enciende El acondicionador de aire está desconectado. Cerciórese de que el acondicionador de aire está enchufado totalmente en el tomacorriente. (O IXVLEOH VH GLVSDUy HO cortacircuitos se disparó.
CONSEJOS PARA LA SOLUCIÓN DE PROBLEMAS Sonidos de operación normales Ŷ 4XL]iV HVFXFKH XQ VRQLGR PHWiOLFR FDXVDGR SRU HO DJXD WRPDGD \ WLUDGD FRQWUD HO FRQGHQVDGRU HQ ORV GtDV OOXYLRVRV R FXDQGR la humedad es alta. Esta característica de diseño ayuda a remover la humedad y mejora la eficiencia. Ŷ 4XL]iV HVFXFKH TXH HO WHUPRVWDWR KDFH FOLF FXDQGR HO FRPSUHVRU KDFH FLFOR HQWUH HQFHQGLGR \ DSDJDGR Ŷ (O DJXD VH DFXPXOD HQ OD EDQGHMD GXUDQWH GtDV OOXYLRVRV R FRQ PXFKD KXPHGDG (O DJXD SRGUtD GHUUDPDUVH \ JR
Cómo Funciona 'HVFDUJXH OD $SOLFDFLyQ GH *( Appliances 8VH OD DSOLFDFLyQ SDUD FRQHFWDU VX acondicionador de aire para sala al WiFi 8QD YH] FRQHFWDGD XVH OD DSOLFDFLyQ para apagar su acondicionador de aire al salir del trabajo. CHANGE TEMP TO 65 Puesta en marcha A fin de conectar su acondicionador de aire para sala, QHFHVLWDUi OD $SOLFDFLyQ GH *( $SSOLDQFHV /D DSOLFDFLyQ OR JXLDUi D WUDYpV GHO SURFHVR GH FRQH[LyQ 'HVFDUJXH OD aplicación de iTunes o Google Play.
Notas 49-5000525 Rev.
Todo el servicio de garantía es provisto por nuestros Centros de Servicio de Fabricación, o un técnico DXWRUL]DGR GHO &XVWRPHU &DUH 6HUYLFLR DO &OLHQWH 3DUD SURJUDPDU XQD YLVLWD GHO VHUYLFLR WpFQLFR D WUDYpV GH Internet, visítenos en GEAppliances.com.
SOPORTE PARA EL CONSUMIDOR Soporte al Cliente GE Appliances Sitio Web ¢'HVHD UHDOL]DU XQD FRQVXOWD R QHFHVLWD D\XGD FRQ VX HOHFWURGRPpVWLFR" £,QWHQWH D WUDYpV GHO 6LWLR :HE GH (OHFWURGRPpVWLFRV GH *( $SSOLDQFHV ODV KRUDV GHO GtD FXDOTXLHU GtD GHO DxR 8VWHG WDPELpQ SXHGH FRPSUDU PiV JUDQGLRVRV SURGXFWRV GH *( Appliances y sacar ventaja de todos nuestros servicios a través de Internet diseñados para su conveniencia. (Q (( 88 GEAppliances.