AIR CONDITIONER Portable Room IMPORTANT SAFETY INFORMATION . . . . . . . . . . . . . 3 CONTROLS. . . . . . . . . . . . . . . . . . 4 CARE AND CLEANING . . . . . . . 7 INSTALLATION INSTRUCTIONS . . . . . . . . . . . . . 9 OWNER’S MANUAL AND INSTALLATION INSTRUCTIONS APCA09 APCA10 APCA12 APWA12 TROUBLESHOOTING . . . . . . . . 13 WIFI SETUP . . . . . . . . . . . . . . . 14 LIMITED WARRANTY . . . . . . . . 15 CONSUMER SUPPORT .
THANK YOU FOR MAKING GE APPLIANCES A PART OF YOUR HOME. Whether you grew up with GE Appliances, or this is your first, we’re happy to have you in the family. We take pride in the craftsmanship, innovation and design that goes into every GE Appliances product, and we think you will too. Among other things, registration of your appliance ensures that we can deliver important product information and warranty details when you need them. Register your GE appliance now online.
READ ALL INSTRUCTIONS BEFORE USING THE APPLIANCE IMPORTANT SAFETY INSTRUCTIONS WARNING To reduce the risk of fire, electrical shock, injury to persons, or damage when using the air conditioner, follow basic precautions, including the following: • Read all of the instructions before using this appliance. • Plug into a grounded 3 prong outlet. • Do not remove ground prong. • Do not use an adapter. • Do not use an extension cord.
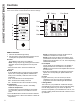
USING THE AIR CONDITIONER Controls Features and appearance will vary. Lights next to the touch pads on the air conditioner control panel indicate the selected settings. A Cool Fan Dry Low Med High Temp / Time B G C F D C D Controls A. CONTROL PANEL DISPLAY D isplays the Set Temperature in degrees Fahrenheit or degrees Celsius, or the hours remaining in a Time Delay. The corresponding indicator light will illuminate. B. Power Button T urns ON/OFF power to the air conditioner.
The display will always default to show the room temperature. When the air conditioner is turned on, it will automatically start in the last mode and fan settings selected. Cool Mode Use the COOL mode for cooling. To set the COOL mode: 1. P ress the MODE pad until the COOL indicator light is lit. 2. P ress the FAN pad to set HIGH, MEDIUM, or LOW fan speed. 3. P ress + or - to set the desired temperature between 61°F and 89°F in 1°F increments.
USING THE AIR CONDITIONER Controls Features and appearance may vary. Icons on the remote control indicate the selected settings. WiFi Swing ℃ Cool A B C D E ℃ Fan C C Dry Heat F REMOTE CONTROL 1. Insert the two batteries (provided). 2. Aim the remote control at the signal receiver on the control panel to operate the air conditioner. A. Power Turns ON/OFF power to the air conditioner. NOTE: Turning off power by pressing the Power button does NOT disconnect the appliance from the power supply.
CLEANING WARNING Electrical Shock Hazard Disconnect power before cleaning. Failure to do so can result in death or electrical shock. Air Filter The air filters should be cleaned at least every two weeks for your unit to operate at optimum efficiency. CAUTION DO NOT operate the air conditioner without a filter because dirt and lint will clog it and reduce performance. 49-5000440 Rev. 1 1. Unplug or disconnect power. 2. Use only a soft cloth dampened with water to clean the cabinet.
CARE AND CLEANING Care and Cleaning Internal Water Tank The Water Full indicator (“FL” on the control panel display) illuminates when the internal water tank has filled with condensed water. To Empty the Internal Water Tank: 1. Unplug or disconnect power. 2. Place a shallow 1 quart or larger pan (not included) below the lower drain located on the back (near the bottom) of the air conditioner. 3. Remove the cap and the rubber plug and drain the water tank. 4.
Questions? Call GE Appliances at 800.GE.CARES (800.432.2737) or visit our Website at: GEAppliances.com. In Canada, call 1.800.561.3344 or visit our Website at: www.GEAppliances.ca BEFORE YOU BEGIN Read these instructions completely and carefully. • IMPORTANT — Save these instructions for local inspector’s use. • IMPORTANT — Observe all governing codes and ordinances. • N ote to Installer – Be sure to leave these instructions with the Consumer.
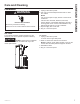
INSTALLATION INSTRUCTIONS Installation Instructions PARTS INCLUDED (Appearance may vary) 1 2 6 9 7 11 8 10 12 13 3 14 1. 2. 3. 4. Control Panel Swing Air Louvers Casters Exhaust hose assembly 5. Window sealing plate assembly 10 6. Remote Control 7. Filter Panel 8. Power Cord Hook (2) 9. Handle (2) 10. Air Vent - exhaust 11. Continuous Drainage hole 12. Air inlet grille 13. Drainage hole 14. Power Cord and plug 49-5000440 Rev.
1. U NPACK AIR CONDITIONER WARNING Excessive Weight Hazard Use two or more people to move and install air conditioner. Failure to do so can result in back or other injury. •R emove packaging materials. Save the carton and the foam packaging for storing the air conditioner when not in use. NOTE: There are NO packing materials inside the air conditioner to remove—Do Not open the cabinet. •P roperly dispose of/recycle all packing material. •H andle the air conditioner gently.
INSTALLATION INSTRUCTIONS Installation Instructions 4. C onnect Exhaust Hose to the Window Panel Place the Air Conditioner close to the window ensuring there is at least 20” of clearance from the wall and any other obstructions. Extend the hose so that it reaches the Window Kit. Insert the Exhaust Hose Adapter into the opening in the Window Kit and slide it into the locking position. Ensure that the hose runs straight to the window with no excess extension.
Problem Possible Causes Unit does not start or operate Power supply cord is not plugged into an Plug the power cord into a grounded 3 prong outlet. outlet. Power supply cord has tripped. Solution Press and release the RESET button on the power supply cord. The Power button has not been pressed. Press the Power button on the Control Panel or Remote Control to turn ON the air conditioner. There is no power to the electrical outlet. Plug a working lamp into the outlet to check for power.
WIFI SETUP WiFi Setup (on some models) GE Appliances WiFi Connect (for customers in the United States) GE Appliances U+ Connect Enabled* If your Air Conditioner (AC) has a Connected Appliance Information label located on the outside as shown below, your AC is GE Appliances U+ Connect Enabled. A WiFi communication card is built into the product allowing it to communicate with your smart phone for remote monitoring, control and notifications. Please visit GEAppliances.
For The Period Of: Will Replace: One Year From the date of the original purchase Replacement, repair, or refund of the original retail price for any product which fails due to a defect in materials or workmanship. If the unit is exchanged, the replacement unit is warranted for the remainder of your product’s original one-year warranty period.
CONSUMER SUPPORT Consumer Support GE Appliances Website Have a question or need assistance with your appliance? Try the GE Appliances Website 24 hours a day, any day of the year! You can also shop for more great GE Appliances products and take advantage of all our on-line support services designed for your convenience. In the US: GEAppliances.
PARA SALA ACCONDICIONADORES DE AIRE INFORMACIÓN IMPORTANTE DE SEGURIDAD . . . . . . . . . . . . . 3 CONTROLES. . . . . . . . . . . . . . . . 4 CUIDADO Y LIMPIEZA . . . . . . . 7 INSTRUCCIONES DE INSTALACIÓN . . . . . . . . . . . . . . . 9 MANUAL DEL PROPIETARIO Y INSTRUCCIONES DE INSTALACIÓN APCA09 APCA10 APCA12 APWA12 SOLUCIONAR PROBLEMAS . . 13 CONFIGURACIÓN WIFI . . . . . . 14 GARANTÍA LIMITADA. . . . . . . . 15 SOPORTE AL CLIENTE. . . .
GRACIAS POR HACER QUE GE APPLIANCES SEA PARTE DE SU HOGAR. Ya sea que haya crecido usando GE Appliances, o que ésta es su primera vez, nos complace tenerlo en la familia. Sentimos orgullo por el nivel de arte, innovación y diseño de cada uno de los electrodomésticos de GE Appliances, y creemos que usted también. Entre otras cosas, el registro de su electrodoméstico asegura que podamos entregarle información importante del producto y detalles de la garantía cuando los necesite.
INSTRUCCIONES IMPORTANTES DE SEGURIDAD ADVERTENCIA Para reducir el riesgo de incendio, choque eléctrico, lesiones a personas o daños al utilizar el acondicionador de aire, siga precauciones básicas, incluyendo las siguientes: • L ea todas las instrucciones antes de usar este electrodoméstico. • C onecte a un contacto de pared de conexión a tierra de 3 terminales. • No quite el terminal de conexión a tierra. • No use un adaptador. • D esconecte el suministro de energía antes de limpiarlo..
USO DEL ACONDICIONADOR DE AIRE 4 Controles Las luces al lado de las teclas de toque en el panel de control del acondicionador de aire indicarán los ajustes seleccionados. Las funciones y el aspecto pueden variar. A Cool Fan Dry Low Med High Temp / Time B Controles G C F D C D A. P ANTALLA DEL PANEL DE CONTROL Muestra la temperatura fijada en grados Fahrenheit o grados centígrados, o las horas restantes de un tiempo diferido. La luz indicadora correspondiente se encenderá. B.
La pantalla siempre mostrará la temperatura del ambiente por omisión. Cuando el acondicionador de aire sea encendido, se iniciará de forma automática en las configuraciones de modo y ventilación que fueron usadas por última vez. Modo de Refrigeración Use el modo COOL (Refrigeración) para enfriar. Para configurar el modo COOL (Refrigeración): 1. P resione la tecla MODE (Modo) hasta que la luz indicadora de COOL (Refrigeración) esté encendida. 2.
USO DEL ACONDICIONADOR DE AIRE Controles Las luces al lado de las teclas de toque en el panel de control del acondicionador de aire indicarán los ajustes seleccionados. Las funciones y el aspecto pueden variar. WiFi Balanceo Velocidad Del Ventilador ℃ Enfriamiento A B C D E ℃ Ventilador C Deshumidificar Calor F CONTROL REMOTO 1. Inserte las dos baterías (incluidas). 2. Apunte el control remoto al receptor de señal en el panel de control para operar el aire acondicionado. A.
LIMPIEZA ADVERTENCIA Riesgo de descarga eléctrica. Desconecte la fuente de alimentación antes de limpiar. El incumplimiento de estas instrucciones puede provocar la muerte o una descarga eléctrica FILTROS DE AIRE Los filtros de aire deben limpiarse al menos una vez a la semana para garantizar que la unidad funcione con una eficiencia óptima. PRECAUCIÓN No opere el acondicionador de aire si los filtros de aire no están en su lugar. Para eliminar: 1. Desenchufe o desconecte el suministro de energía. 2.
CUIDADO Y LIMPIEZA Cuidado y Limpieza TANQUE DE AGUA INTERIOR El indicador de agua llena se ilumina cuando el tanque de agua interno está lleno de agua de condensación. Vaciar el depósito de agua interno: 1. Desconecte o desconecte la fuente de alimentación. eléctrica. 2. Coloque un recipiente hueco con una capacidad mínima de 1 cuarto (no incluido) debajo de la piscina de drenaje inferior en la parte posterior del acondicionador de aire (cerca de la parte inferior). 3.
¿Preguntas? Llame a GE Appliances al 800.GE.CARES (800.432.2737) o visite nuestro sitio web en: GEAppliances.com. En Canadá, llame al 1.800.561.3344 o visite nuestro Sitio Web en: www.GEAppliances.ca ANTES DE INICIAR Lea estas instrucciones completa y cuidadosamente. • IMPORTANTE — Guarde estas instrucciones para uso del inspector local. • IMPORTANTE — Observe todos los códigos y órdenes de ley. • Nota al instalador – Asegúrese de dejar estas instrucciones con el consumidor.
INSTRUCCIONES DE INSTALACIÓN Piezas Y Características PARTES INCLUIDAS (Apariencia puede variar) 1 2 6 9 7 11 8 10 12 13 3 14 1. Panel de Control 2. Celosías del Balanceo de Aire 3. Ventilación de aire a través de las paletas de balanceo 4. Ensamble de la manguera de salida 6. Control Remoto 7. Panel del Filtro 8. Gancho del Cable de Corriente (2) 9. Manija (2) 10. Ventilación de Aire - salida 11. Agujero de Desagüe Continuo 12. Rejilla de Entrada de Aire 13. Agujero de drenaje 14.
1. D ESEMBALE EL ACONDICIONADOR DE AIRE ADVERTENCIA Riesgo de Peso Excesivo Cuente con la ayuda de dos o más personas para trasladar e instalar el acondicionador de aire. Si esto no se cumple se podrán producir lesiones en la espalda u otras heridas. •R etire los materiales del embalaje. Conserve el cartón y el embalaje de gomaespuma para guardar el acondicionador de aire cuando no se encuentre en uso.
INSTRUCCIONES DE INSTALACIÓN Instrucciones de instalación 4. C onecte la Manguera de Salida al Panel de la Ventana Coloque el acondicionador de aire cerca de la ventana, asegurándose de contar por lo menos con 20” de espacio desde la pared hasta cualquier otra obstrucción. Extienda la manguera de modo que llegue hasta el Kit de Ventana. Inserte el Adaptador de la Manguera de Salida en la abertura del Kit de Ventana y deslice el mismo hasta la posición de bloqueo.
Problema Causas posibles Qué hacer La unidad no se pone en marcha ni funciona El cable de suministro de energía no está enchufado en un toma corriente. El cable de suministro de energía se ha disparado. Conecte el cable eléctrico a un toma corriente de 3 terminales con conexión a tierra. Presione y libere RESET (Restablecer) en el cable de suministro de energía. El botón Power (Encendido) no se ha presionado.
CONFIGURACIÓN WIFI Configuración WiFi (en algunos modelos) GE Appliances WiFi Connect (Conexión WiFi de GE Appliances) (Para clientes en Estados Unidos) GE Appliances U+ Connected Habilitado* Si su acondicionador de aire posee una etiqueta de Información del Electrodoméstico Conectado ubicada en la parte externa como se muestra a continuación, su acondicionador de aire cuenta con GE U+ Connect Habilitado.
Abroche su recibo aquí. Para acceder al servicio técnico de acuerdo con la garantía deberá contar con la prueba de la fecha original de compra. Por el Período de: Reemplazaremos: Un Año Desde la fecha de la compra original Reemplazo, reparación o reembolso del costo minorista original de cualquier producto que falle debido a un defecto en los materiales o la fabricación.
SOPORTE PARA EL CONSUMIDOR Soporte al Cliente GE Appliances Sitio Web ¿Desea realizar una consulta o necesita ayuda con su electrodoméstico? ¡Intente a través del Sitio Web de Electrodomésticos de GE Appliances las 24 horas del día, cualquier día del año! Usted también puede comprar más grandiosos productos de GE Appliances y sacar ventaja de todos nuestros servicios a través de Internet diseñados para su conveniencia. En EE.UU.: GEAppliances.