Built-In Gas Cooktops GEAppliances.com In Canada: www.GEAppliances.ca Printed in the United States Safety Instructions . . . . . . . . 2–6 Operating Instructions Control Lock . . . . . . . . . . . . . . . .7 Cookware . . . . . . . . . . . . . . . . . . 8 Dual Stack Burner . . . . . . . . . . .7 Flame Size . . . . . . . . . . . . . . . . . 8 Lighting a Burner . . . . . . . . . . . 7 PowerBoil™ Burner . . . . . . . . . . .7 Sealed Gas Burners . . . . . . . . . . .
WARNING: If the information in this manual is not followed exactly, a fire or explosion may result causing property damage, personal injury or death. Operating Instructions — Do not store or use gasoline or other flammable vapors and liquids in the vicinity of this or any other appliance. — WHAT TO DO IF YOU SMELL GAS ■ Do not try to light any appliance. ■ Do not touch any electrical switch; do not use any phone in your building.
WARNING! For your safety, the information in this manual must be followed to minimize the risk of fire or explosion, electric shock, or to prevent property damage, personal injury, or loss of life. Safety Instructions GEAppliances.
SAFETY PRECAUTIONS ■ Do not leave children alone or unattended where a cooktop is hot or in operation. They could be seriously burned. ■ Do not allow anyone to climb, stand or hang on the cooktop. Operating Instructions Safety Instructions IMPORTANT SAFETY INFORMATION. READ ALL INSTRUCTIONS BEFORE USING.
WARNING! SURFACE BURNERS ■ Always use the LITE position when igniting the top burners and make sure the burners have ignited. ■ Never leave the surface burners unattended at high flame settings. Boilovers cause smoking and greasy spillovers that may catch on fire. ■ When using glass cookware, make sure it is designed for cooktop cooking. ■ Always turn the surface burner controls off before removing cookware. ■ Carefully watch foods being fried at a high flame setting.
SURFACE BURNERS Adjust the top burner flame size so it does not extend beyond the edge of the cookware. Excessive flame is hazardous. ■ Clean the cooktop surface with caution. If a wet sponge or cloth is used to wipe spills on a hot surface, be careful to avoid steam burns. Some cleaners can produce noxious fumes if applied to a hot surface. NOTE: We recommend that you avoid wiping any surface areas until they have cooled. Sugar spills are the exception to this.
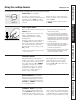
GEAppliances.com Throughout this manual, features and appearance may vary from your model. Control Lock (on some models) UNLOCK LOCK CONTROL LOCK To lock the cooktop and prevent unwanted use, turn the control lock knob counterclockwise to LOCK. An indicator light will glow to show that the cooktop is locked. When locked, the cooktop will sound if any control knob is set to any position other than OFF. To unlock, turn the control lock knob to UNLOCK.
Safety Instructions How to Select Flame Size For safe handling of cookware, never let the flames extend up the sides of the cookware. Watch the flame, not the knob, as you reduce heat. The flame size on a gas burner should match the cookware you are using. Any flame larger than the bottom of the cookware is wasted and only serves to heat the handle. Wok This Way Use a flat-bottomed wok. We recommend that you use a 14-inch or smaller flat-bottomed wok. They are available at your local retail store.
GEAppliances.com Be sure electrical power is off and all surfaces are cool before cleaning any part of the cooktop. How to Remove Protective Shipping Film and Packaging Tape To assure no damage is done to the finish of the product, the safest way to remove the adhesive left from packaging tape on new appliances is an application of a household liquid dishwashing detergent. Apply with a soft cloth and allow to soak. NOTE: The adhesive must be removed from all parts before using the cooktop.
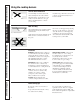
Burners and Cooktop Electrodes CAUTION: DO NOT OPERATE A BURNER WITHOUT ALL BURNER PARTS IN PLACE. NOTE: Before removing the burner caps and heads, remember their size and location. Replace them in the same location after cleaning. Remove the burner grates, burner caps and burner heads for easy cleaning. NOTES: ■ Do not attempt to remove the electrode from the cooktop or any screws from the burner head or burner base. ■ Do not use steel wool or scouring powders to clean the burners.
Burner Head and Cap Replacement Burner cap properly seated Replace the burner cap onto the burner head, making sure to place the correct burner cap on the correct burner head. The burner caps are not interchangeable. Also, make sure that the burner caps are properly seated on the burner heads. Operating Instructions Replace the burner head onto the burner base, making sure that the head is properly oriented over the burner base and the electrode.
Safety Instructions Operating Instructions Cleaning the glass cooktop surface. (on some models) Normal Daily Use Cleaning ONLY use CERAMA BRYTE® Ceramic Cooktop Cleaner on the glass cooktop. Other creams may not be as effective. To maintain and protect the surface of your glass cooktop, follow these steps: Clean your cooktop after each spill. Use CERAMA BRYTE® Ceramic Cooktop Cleaner.
Metal Marks and Scratches If pots with a thin overlay of aluminum or copper are allowed to boil dry, the overlay may leave black discoloration on the cooktop. This should be removed immediately before heating again or the discoloration may be permanent. WARNING: Carefully check the bottom of pans for roughness that would scratch the cooktop. Glass surface—potential for permanent damage.
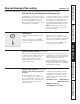
Safety Instructions Operating Instructions Troubleshooting Tips Save time and money! Review the charts on these pages first and you may not need to call for service. Problem Possible Causes What To Do Burners have yellow or yellow-tipped flames The combustion quality of burner flames needs to be determined visually. • Use the illustrations below to determine if your burner flames are normal. If burner flames look like A, call for service.
What To Do Cooktop makes sound when a control knob is turned on The cooktop is locked (on some models). • Turn the control lock knob to UNLOCK. Scratches on cooktop glass surface Cookware has been slid across the cooktop surface, leaving deposits. • See the Cleaning the glass cooktop surface section. Incorrect cleaning methods being used. • Scratches are not removable. Tiny scratches will become less visible in time as a result of cleaning.
Consumer Support Troubleshooting Tips Care and Cleaning Operating Instructions Safety Instructions Notes.
Please place in envelope and mail to: Veuillez mettre dans une enveloppe et envoyez à : OWNERSHIP REGISTRATION P.O.
Safety Instructions Notes.
Safety Instructions Operating Instructions Care and Cleaning All warranty service provided by our Factory Service Centers, or an authorized Customer Care® technician. To schedule service, visit us on-line at GEAppliances.com, or call 800.GE.CARES (800.432.2737). Please have serial number and model number available when calling for service. Staple your receipt here. Proof of the original purchase date is needed to obtain service under the warranty.
All warranty service provided by our Factory Service Centres or an authorized Customer Care® technician. To schedule service, visit us on-line at www.GEAppliances.ca or call 1.800.561.3344. Please have serial number and model number available when calling for service. Staple your receipt here. Proof of the original purchase date is needed to obtain service under the warranty.
Consumer Support. GE Appliances Website In the U.S.: GEAppliances.com Have a question or need assistance with your appliance? Try the GE Appliances Website 24 hours a day, any day of the year! For greater convenience and faster service, you can now download Owner’s Manuals, order parts or even schedule service on-line. In Canada: www.GEAppliances.ca Schedule Service In the U.S.: GEAppliances.com Expert GE repair service is only one step away from your door.
À Gaz Plaque de Cuisson www.electromenagersge.ca Imprimé aux États-Unis Instructions de sécurité . . . 2–6 Manuel du propriétaire Instructions de fonctionnement JGP328 JGP330 JGP628 JGP630 JGP933 JGP940 JGP945 JGP963 JGP970 JGP975 Brûleur PowerBoil™ . . . . . . . . . .7 Brûleur double raccordé . . . . . .7 Brûleurs au gaz scellés . . . . . . . .7 Casseroles . . . . . . . . . . . . . . . . . 8 Pour allumer un brûleur . . . . . 7 Taille de la flamme . . . . . . . . . . 8 Verrouillage des contrôles . .
AVERTISSEMENT : Si vous ne suivez pas exactement les informations communiquées dans ce manuel, un incendie ou une explosion peut se produire entraînant des dommages à votre propriété, des blessures corporelles ou même la mort. Instructions de fonctionnement — Ne pas entreposer ou utiliser de l’essence ou d’autres combustibles à proximité de cet appareil ou tout autre appareil. — QUE FAIRE SI VOUS SENTEZ L’ODEUR DE GAZ Entretien et nettoyage ■ Ne pas tenter d’allumer tout autre appareil.
AVERTISSEMENT! Pour votre sécurité, nous vous conseillons de suivre les informations contenues dans ce manuel afin de réduire les risques d’incendie ou d’explosion, les chocs électriques ou pour empêcher tout dommage à la propriété, les blessures corporelles ou la perte de vie.
PRÉCAUTIONS DE SÉCURITÉ ■ Ne pas laisser des enfants seuls ou sans surveillance lorsqu’une plaque de cuisson est chaude ou en cours d’utilisation. Ils pourraient être gravement brûlés. ■ Ne permettre à personne de grimper, de se tenir debout ou de se suspendre à la plaque de cuisson. Instructions de fonctionnement Instructions de sécurité INFORMATIONS IMPORTANTES SUR LA SÉCURITÉ. LIRE TOUTES LES INSTRUCTIONS AVANT UTILISATION.
AVERTISSEMENT! BRÛLEURS DE SURFACE Soutien au consommateur 5 En cas de panne rond placé sur le brûleur. Cet anneau se comporte comme accumulateur de chaleur qui peut endommager la grille du brûleur et la tête du brûleur. De plus, l’anneau peut empêcher le brûleur de fonctionner correctement et causer une concentration d’oxyde de carbone supérieure à celle tolérée par les normes actuelles et représenter un danger pour la santé. ■ Les aliments à frire doivent être aussi secs que possible.
BRÛLEURS DE SURFACE Régler la flamme du brûleur supérieur de façon à ce qu’elle ne dépasse pas les bords de la casserole. Une trop grande flamme peut présenter des dangers. ■ Nettoyez la plaque de cuisson soigneusement. Si vous utilisez une éponge ou un linge mouillé pour essuyer les débordements, prenez bien soin d’éviter les brûlures dues à la vapeur chaude. Certains produits nettoyants peuvent produire des vapeurs nocives quand on les utilise sur une surface chaude.
www.electromenagersge.ca Tout au long de ce manuel, les caractéristiques et l’apparence peuvent varier d’un modèle à l’autre. Verrouillage des contrôles (sur certains modèles) UNLOCK LOCK CONTROL LOCK Pour verrouiller la plaque de cuisson et prévenir une utilisation non voulue, tournez le bouton de verrouillage des contrôles dans le sens opposé à celui des aiguilles d’une montre en position LOCK (verrouillage). Un voyant lumineux s’allume pour indiquer le verrouillage de la plaque de cuisson.
Instructions de sécurité Comment choisir la taille de la flamme Afin de sécuriser l’utilisation des casseroles, ne jamais laisser la flamme dépasser les parois de celles-ci. Toute flamme qui dépasse le fond de la casserole est gâchée et ne fait que réchauffer la poignée. Lorsque vous réduisez la chaleur, surveillez la flamme et non le bouton de commande. La taille de la flamme d’un brûleur à gaz doit correspondre au type de casserole que vous utilisez.
www.electromenagersge.ca Assurez-vous que l’alimentation électrique est coupée et que toutes les surfaces sont froides avant de nettoyer une partie quelconque de la plaque. Comment retirer la pellicule protectrice d’expédition et le ruban d’emballage Pour s’assurer qu’aucun dommage ne soit causé à la finition du produit, le plus sûr moyen d’enlever l’adhésif provenant du ruban d’emballage resté sur les appareils neufs est d’appliquer du détergent liquide pour lavage de la vaisselle.
Brûleurs et électrodes de la plaque de cuisson ATTENTION : NE FAITES JAMAIS FONCTIONNER UN BRÛLEUR SANS TOUTES SES PIÈCES EN PLACE. Lavez les capuchons et les têtes de brûleur dans de l’eau savonneuse chaude et rincez-les à l’eau propre courante. Vous pouvez récurer avec un tampon à récurer en plastique pour enlever les particules de nourriture brûlées. Entretien et nettoyage En cas de panne NOTE : Avant d’enlever les capuchons et les têtes de brûleur, notez leur taille et leur emplacement.
Remplacement de la tête et du capuchon de brûleur Capuchon de brûleur bien installé Capuchon de brûleur mal installé JGP940 et JGP970 (tous les brûleurs) JGP328, JGP330, JGP628, JGP630, JGP933, JGP945, JGP963, JGP975 JGP933 et JGP963 (brûleur avant droit seulement) Remettez le capuchon de brûleur dans la tête de brûleur, en vous assurant de placer le bon capuchon sur la bonne tête de brûleur. Les capuchons de brûleur ne sont pas interchangeables.
Instructions de sécurité Instructions de fonctionnement Nettoyage normal quotidien Utilisez UNIQUEMENT la crème nettoyante CERAMA BRYTE® sur votre plaque de cuisson en vitrocéramique. Autres crèmes peuvent être moins efficaces. Pour entretenir et protéger votre plaque de cuisson en vitrocéramique, conformez-vous aux instructions suivantes : Nettoyez votre plaque de cuisson chaque fois qu’elle est sale. Utilisez la crème nettoyante CERAMA BRYTE® pour plaque de cuisson.
Traces de métal et rayures Si vous laissez des casseroles recouvertes d’une couche d’aluminium ou de cuivre chauffer à sec, leur métal peut laisser des traces noires sur la plaque de cuisson. Vous devez enlever ces traces immédiatement, avant de faire chauffer à nouveau la plaque de cuisson. Autrement, les traces risquent de devenir permanentes. AVERTISSEMENT : Vérifiez toujours le fond de vos casseroles pour vous assurer qu’elles n’aient pas d’aspérités qui risquent de rayer la plaque de cuisson.
Informations sur le dépannage Gagnez du temps et économiser de l’argent! Passez en revue les cartes de ces pages d’abord. Il est possible que vous n’ayez pas besoin de service. Problème Causes possibles Que faire La flamme ou l’extrémité de la flamme du brûleur est jaune La qualité de combustion de la flamme de brûleur doit être déterminée visuellement. • Utiliser l’illustration ci-dessous pour déterminer si la flamme de votre brûleur est normale.
Problème Causes possibles Que faire Le bruit tic-tic de l’allumeur à étincelles persiste après l’allumage du brûleur Le bouton de commande est encore sur la position LITE (allumage). • Tourner le bouton de la position LITE (allumage) pour le placer au réglage désiré. Les flammes du brûleur sont très grandes ou jaunes Mélange air/gaz incorrect. Instructions de fonctionnement • Eteindre le brûleur et le rallumer. Si le problème persiste, appelez pour le service.
Soutien au consommateur En cas de panne Entretien et nettoyage Instructions de fonctionnement Instructions de sécurité Notes.
Le service sous garantie est assuré par nos centres de service de l’usine ou par un technicien agréé Customer Care®. Pour obtenir le service, visitez notre site Web à electromenagersge.ca ou contactez 1.800.561.3344. Veuillez fournir le numéro de série et le numéro de modèle lorsque vous appelez pour obtenir le service. Agrafez le reçu d’achat ici. Pour obtenir le service sous garantie, vous devrez fournir la preuve de l’achat original.
Soutien au consommateur. Site Web appareils électroménagers GE www.electromenagersge.ca Vous avez une question ou vous avez besoin d’aide pour votre appareil électroménager? Contactez-nous par Internet au site www.electromenagersge.ca 24 heures par jour, tous les jours de l’année. Service de réparations 1.800.561.3344 Service de réparations GE est tout près de vous. Pour faire réparer votre électroménager GE, il suffit de nous téléphoner.