
Installation guide


Installation Instructions
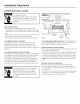
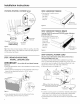
STEP 7 INSTALL 90 ° ELBOW
• Wrap 90° elbow with thread seal tape.
• Install a 90° elbow onto the water valve.
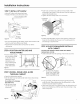
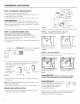
Front of Dishwasher
• Pushhose over the drain outlet on the back side of the
dishwasher. See Figure R Pushthe hose over the outlet and
against the shoulder stop.
• Tighten the hose clamp with a 1/4" nut driveE
Insulation
Blanket
900_
Elbow
Figure N
_ Water Valve
Bracket
e
Thread
SealTape
• Do not over tighten the 90° elbow, water valve bracket could
bend or water valve fitting could break.
• Position the end of the elbow to face the rear of the
dishwasher.
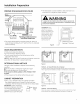
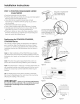
STEP 8 POSITION WATER LINE AND
HOUSE WIRING
• Position water supplg
line and house wiring
on the floor of the
opening to avoid
interference with
base of dishwasher
and components
under dishwasher.
Figure O
HOUSE
Water Wiring
Line
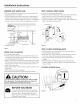
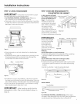
STEP 9 INSTALL DRAIN HOSE, GUIDE
THROUGH CABINET
• Stand the dishwasher upright.
• Getthe drain hose set aside earlier and remove hose clamp
attached to hose.
Becareful not to damage Drain
the drain hose.
• Slipthe hose clamp
over the pump end
of the hose.
Drain
Outlet
Figure Q
House
Wiring
Power Cord
(If Used)
• Position the dishwasher in front of the opening. Insert drain
hose into the cabinet side. If power cord is used, guide the
end through a separate hole.
STEP 10 SLIDE DISHWASHER PARTIALLY
INTO CABINET
DO NOT PUSHAGAINST FRONT PANELWITH KNEES.
DAMAGEWILL OCCUR.
• Slide dishwasher into the opening a few inches at a time.
Figure R
Do Not Push Against
Front Door Panel With
Knee. Damage to The
Door Panel Will Occur.
• As you proceed, pull the drain hose through the opening
under the sink. Stop pushing when the dishwasher is a few
inches forward of adjacent cabinets.
• Make sure drain hose is not kinked under the dishwasher and
there is no interference with the water line and wiring or an9
other component.
Figure P 7