
Manual


10 49-80819
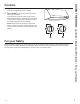
INSTALLATION PREPARATION
Installation Preparation
TOOLS AND MATERIALS
REQUIRED
(NOT SUPPLIED)
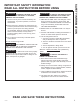
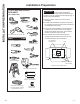
CAUTION
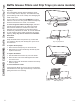
Lift the hood by grasping the
outside edges of the inlet opening of the hood. Do
not lift the hood by grasping the exhaust opening or
transition duct with damper!
Ŷ 2SHQWKHFDUWRQDQGUHPRYHWKHKRRGDQG
packaging.
Ŷ &RQILUPWKDWDOOKDUGZDUHDQGSDUWVDUHSUHVHQW
by reviewing the section named Parts Provided in
the Installation Instructions.
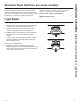
Ŷ /RRVHQWKHVFUHZVKROGLQJWKHZRRGVXSSRUWWR
the back of the hood. Remove wood support.
Keep wood support and screws. These will be
used to mount the hood to the wall.
Ŷ )XOO\LQVSHFWDQGFRQILUPWKDWDOOWDSHDQG
packing material has been removed from the
hood and transition duct with damper
Pliers
Wire Cutter/Stripper
Tin Snips
Spirit level
Duct tape
Safety glasses
Ladder
Saber saw or Key Hole Saw
Phillips and Flat blade
screwdrivers
1/4” pivoting hex socket
Hammer
Electric drill with 1/8” and 3/8” bits
Flashlight
UL Listed Wire nuts
Pencil and tape
measure
120V 60Hz. 15 or 20 Amp,
2-wire with ground. Properly
grounded branch circuit.
Strain relief for
junction cover.
10" round metal duct,
length to suit installation
Top view of open shipping carton
Do not lift from
transition duct Hood
Lift hood out of carton
from the sides
Carton