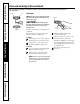
Vented Range Hoods www.GEAppliances.ca Safety Instructions . . . . . . . . . 2, 3 Operating Instructions Light Controls . . . . . . . . . . . . . . . .4 Vent Controls . . . . . . . . . . . . . . . .4 Owner’s Manual and Installation Instructions JV936 CV936 Care and Cleaning Grease Filters . . . . . . . . . . . . . . . .5 Hood Lights . . . . . . . . . . . . . . . . .6 Hood Surfaces . . . . . . . . . . . . . . . .5 Stainless Steel Surfaces . . . . . . . . .5 Installation Instructions . . .
SAFETY PRECAUTIONS WARNING – TO REDUCE THE RISK OF FIRE, WARNING – TO REDUCE THE RISK OF ELECTRIC SHOCK OR INJURY TO PERSONS, OBSERVE THE FOLLOWING: A. Use this unit only in the manner intended by the manufacturer. If you have questions, contact the manufacturer. B. Before servicing or cleaning unit, switch power off at service panel and lock the service disconnecting means to prevent power from being switched on accidentally.
SAFETY PRECAUTIONS WARNING – TO REDUCE THE RISK OF WARNING – TO REDUCE THE RISK OF FIRE, USE ONLY METAL DUCTWORK. ■ Do not attempt to repair or replace any part of your hood unless it is specifically recommended in this guide. All other servicing should be referred to a qualified technician. WARNING – TO REDUCE THE RISK OF FIRE, Care and Cleaning ELECTRIC SHOCK OR INJURY TO PERSONS, OBSERVE THE FOLLOWING: A.
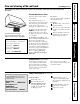
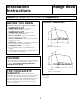
Throughout this manual, features and appearance may vary from your model. Operating Instructions Safety Instructions Using the hood controls. FAN Control LIGHT Control Turn the FAN speed control to LO, MED LO, MED HI or HI, as needed. Turn the LIGHT control to HI for bright light while cooking. Turn to NITE for use as a night light. Care and Cleaning Continuous use of the fan system while cooking helps keep the kitchen comfortable and less humid.
www.GEAppliances.ca Be sure electrical power is off and all surfaces are cool before cleaning or servicing any part of the vent hood. Reusable Metal Grease Filters The hood has 2 metal reusable grease filters. If it ever becomes necessary to replace the metal grease filters, they may be ordered from your GE supplier. Heavy-duty commercial filters may also be used in place of the filters. For 36” (91.4 cm) hoods, order Kit no. JXBF36SS. To order, call 1.800.661.
Be sure electrical power is off and all surfaces are cool before cleaning or servicing any part of the vent hood. Receptacle Socket Hood Lights NOTE: The glass cover should be removed only when cold. Wearing latex gloves may offer a better grip. Receptacle CAUTION: Before replacing your Operating Instructions Safety Instructions Care and cleaning of the vent hood. Bulb Glass cover light bulb, disconnect the electrical power to the hood at the main fuse or circuit breaker panel.
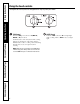
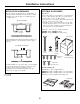
Installation Instructions Range Hood Questions? Call 1-800-561-3344 or Visit our Website at: www.GEAppliances.ca BEFORE YOU BEGIN PRODUCT DIMENSIONS Read these instructions completely and carefully. • 12" IMPORTANT – Save these instructions for local inspector’s use. • • • • • • • IMPORTANT – Observe all governing codes and ordinances. Note to Installer – Be sure to leave these instructions with the Consumer. Note to Consumer – Keep these instructions for future reference.
Installation Instructions INSTALLATION CLEARANCES OPTIONAL ACCESSORIES These vent hoods are designed to be installed onto a wall. They may be installed beneath a soffit or cabinet. • Install these hoods 24” Min. to 36” Max above the cooking surface. Duct Cover A Decorative duct cover is available to accommodate 8 to 10 ft. ceiling heights. The duct cover will expand from 12” Min. or 24” to 34” Max. height. • The duct cover conceals the ductwork running from the top of the hood to the ceiling.
Installation Instructions ADVANCE PLANNING DECORATIVE DUCT COVERS Ductwork Planning • This hood may be vented vertically through upper cabinets, soffit or ceiling. A duct transition piece is supplied for vertical exhaust. Use locally supplied elbows to vent horizontally through the rear wall. See page 13. • Determine the exact location of the vent hood. • Use the shortest and straightest duct route possible.
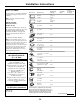
Installation Instructions DUCT FITTINGS Use this chart to compute maximum permissable lengths for duct runs to outdoors. Note: Do not exceed maximum permissable equivalent lengths! Maximum duct length: 100 foot for vent hoods. Flexible ducting: If flexible metal ducting is used, all the equivalent feet values in the table should be doubled. The flexible metal duct should be straight and smooth and extended as much as possible. Duct Piece Dimensions Equivalent Length* Round, straight 1 ft.
Installation Instructions TOOLS AND MATERIALS REQUIRED REMOVE THE PACKAGING (NOT SUPPLIED) • Remove parts package from the “V” shaped cardboard insert. Remove insert. Remove shipping pads. • Lift the hood out of the box. CAUTION: Lift hood by grasping the outside edges of the exhaust opening on the top. Do not lift hood by the exhaust opening divider – damage will occur.
Installation Instructions PARTS PROVIDED Locate the hardware accessory box packed with the hood and check contents. Screws, wall fasteners, washers Filter Support Duct Transition with Damper 2 Aluminum Grease Filters 2 Control Knobs DUCT COVER REQUIREMENTS Review the following examples to ensure a trouble free installation using the duct cover accessory. We recommend that the vent hood and decorative duct cover (if used) be on site before final framing and wall finishing.
Installation Instructions DETERMINE HOOD, DUCTWORK AND WIRING LOCATIONS • Measure desired distance from the bottom of the hood to the cooking surface, 24” min. to 36” max. Refer to the previous page if the accessory duct cover will be used. • Use a level to draw a horizontal line indicating the bottom of the hood. • Use a level to draw the cooktop centerline location. • Measure 15-3/8” up from the horizontal line for the bottom of the hood. Draw another horizontal line.
Installation Instructions 1 INSTALL HOOD SUPPORT 2 INSTALL TRANSITION • Locate at least 2 vertical studs at the wood mounting location by tapping drywall with a hammer or use a stud finder. • Center the supplied wood horizontal support, left to right and below the marked line. Top of Hood Duct Transition 7” Min. Opening for Ductwork • Place the transition piece over the hood exhaust. Secure transition to hood with 4 screws provided. • Use duct tape to seal the connection.
Installation Instructions 4 Alternate Mounting Method IMPORTANT: For additional support and to minimize vibration during operation, we strongly recommend that the hood also be secured to the back wall with wall fasteners. INSTALL HOOD TO SOFFIT OR BENEATH CABINETS 30” Models SKIP THIS STEP IF USING WALL MOUNTING METHOD 2-9/16" IMPORTANT: Framing must be capable of supporting 100 lbs (45.
Installation Instructions 6 CONNECT DUCTWORK 5 INSTALL CEILING BRACKET • Push duct over the end of the transition until it reaches the stop tabs. • Install ductwork, making connections in direction of airflow as illustrated. • Secure joints in ductwork with sheetmetal screws. • Wrap all duct joints with duct tape for an airtight seal. • Use duct tape to seal the flange connection. The ceiling bracket must be installed when the duct cover is used to span 24” or more height above the hood.
Installation Instructions 9 INSTALL DUCT COVERS 7 INSTALL MOTOR • Align and engage the slots in the blower assembly to the 3 hooks at the rear of the exhaust opening. • Rotate motor upwards until it aligns with the attachment screw location. • Secure the motor to attachment bracket at the front of the opening with washer and screw provided. To install the 12” duct cover alone: • Place the 12” section of the decorative duct cover on top of the hood.
Installation Instructions 11A INSTALL OPTIONAL COMMERCIAL 11 INSTALL FILTERS FILTERS • Remove protective film covering the filters. • Insert the filter into the “C” clips mounted to the top of the vertical front panel. • Tap the filter against one side to align with outside opening. • Pull the filter down into the lower slots at the bottom of the filter support. • Remove supplied filters (if installed).
Operating Instructions Care and Cleaning Troubleshooting Tips Consumer Support 19 Safety Instructions www.GEAppliances.ca Notes.
Safety Instructions Troubleshooting Tips Save time and money! Review the charts on the following pages first and you may not need to call for service. Problem Possible Causes What To Do Fan does not operate when the switch is on A fuse may be blown or a circuit breaker tripped. • Replace fuse or reset circuit breaker. The blower connector is loose or not plugged into its mating connector. •Disconnect power to the unit. Remove the filters and look up at the blower.
Please place in envelope and mail to: Veuillez mettre dans une enveloppe et envoyez à : OWNERSHIP REGISTRATION P.O.
Pour les consommateurs canadiens 22 CUT ALONG THIS LINE AND RETURN CARD – THANKS DÉCOUPEZ ICI ET ENVOYEZ LA FICHE – MERCI For Canadian Customers OWNERSHIP REGISTRATION CERTIFICATE – FICHE D’INSCRIPTION DU PROPRIÉTAIRE Please register your product to enable us to contact you in Veuillez enregistrer votre produit afin de nous permettre de the remote event a safety notice is issued for this product communiquer avec vous si jamais un avis de sécurité concernant and to allow for efficient communication under
All warranty service provided by our Factory Service Centers, or an authorized Customer Care® technician. To schedule service, on-line, 24 hours a day, visit us at www.GEAppliances.ca, or call 1.800.561.3344. Staple your receipt here. Proof of the original purchase date is needed to obtain service under the warranty. Mabe Will Replace: One Year From the date of the original purchase Any part of the range hood which fails due to a defect in materials or workmanship.
Consumer Support. GE Appliances Website GEAppliances.ca Have a question or need assistance with your appliance? Try the GE Appliances Website 24 hours a day, any day of the year! For greater convenience and faster service, you can now download Owner’s Manuals, order parts or even schedule service on-line. Schedule Service GEAppliances.ca Expert Mabe repair service is only one step away from your door.