ge.com Safety Instructions ............ 2-5 Operating Instructions Care and Cleaning .................... Controls ............................. Features ............................. Loading and Using the Drger .......... Installation Instructions Electrical Installation lj !3 8 6 7 8 U.S. Models: DSXH43 DPXH46 DH43 ..... 9-20 for Canada Models: Electric Drger ................... 16, Electrical Requirements .............. Exhausting the Drger ............. 12, Gas Connection for Gas Drger ..
IMPORTANTSAFETYINFORMATION. READALLINSTRUCTIONSBEFOREUSING. WARNING! For your safety, the information in this manual must be followed to minimize the risk of fire or explosion, electric shock, or to prevent property damage, personal injury, or death. • Do not store or use gasoline or other flammable vaporsand liquids in the vicinity of this or any otherappliance. • Installation and service must be performed by a qualified installer,service agency or the gas supplier.
PROPER INSTALLAtiON This dryer must be properly installed and located in accordance before it is used. [] Prol)erlx, ,gr(mnd drxer go_ erning codes and derails ill Inst:dlation to conform _ith ordinances. Instructions. with the Installation Instructions Exhaus_/Ducting: all Follo_ [] Install or store where it will not be exposed to temperatures belo_ freezing or exposed to the _eath er. dr) er MUSTbe [_ This exhausted to the outside. [_ l_.
iMPORTANT SAFETY iNFORMATiON. READALLiNSTRUCTIONS BEFORE USING. WARNING! YOUflLAUNOflYAflEA • Keep tile area underneath and around ",'our appliances fl'ee of coml_ustible materials, such as lint, paper, rags and chemicals. • Keep tile floor around your appliances dry to reduce tile possibili b' of slipping. • Close supervision used bv or near is necessary if this appliance children. Do not allow children to play on, or inside with or any other appliance.
WARNING! • Never attempt to operate this appliance if it is dmnaged, malflmcfioning, partially disassembled or has missing or broken parts, including a damaged cord or plug. • Tile interior of tile machine • You may wish to soften your la undered tiff)tics or reduce the static electricity in them by using a d_Te>applied riO)tic softener or an antistatic condifione_: _'\'e recommend you rise either a fabric softener in tile wash cycle, according to tile mantdacturer's instructions for those products, or tr
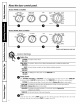
About the dryer controlpanel. Models DPXH46 and DCXH46 FABRIC CARE WRINKLE START CARE EASY _Vre_DEO C00LAm T_MBLE PERM PRESS K_rrs ._._. ;} 0n WRInKlE CARE CARE / DEIJCATES MOeE D_Y • COTTONS _D._, iliU_........... 0_, _!_i! _, :;; ; _ %i! _ssoeY !!i!!ili_ D_ _ i,_ssORv TIMED DRy 50 • DELICATES V Models DSXH43, DH43 and PSXH43 FABRIC PERM_ESS CARE CYCE SIGNAL START ,o_°7 TIMED _TS/DWC_ES i DRY oo ilii i.o., co_o,s O 0 Features and appearance may vary.
About your dryer features. Cycle Signal Option (on some models) CYCLE SIGNAL LOUD When before five tile signal is on it will sound just the end of the cycle to remind you to remove tile clothes. can be set at OFF(no SOtln(l), an}where in between. If the dried load calmot Tile signal LOUD Or CARE OFF ;i reI//isl(lel" t(5 reI//(sve If items are removed before the end of the cycle, turn the CYCLESELECTORknob to OFF. EXTENDED COOL DOWN setting.
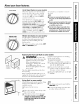
Loadingand using thedryer. Always follow the fabric manufacturer's care label when laundering. Sortingand LoadingHints _s a general rule, if clothes are soiled properly fi)r tlle washe_; they are sol_ed pr()perly tor tlle (hyel; Do not add fabn_softener sheea once the load has become warm Theymay causefabn_ softener stalbs Bounce_'Fabn_ConditionerDryerSheets have been approvedfor use ib aft GEDryerswhen usedib accordance with the manufacturer# /bstructions. Do not ove#oad.
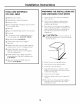
SpacemakerDryer Installation Instructions Models DCXH46 DSXH43 DPXH46 DH43 PSXH43 I In ff youhaveany Canada,carl 1.800.361.3400 questions,in the orvisitonr U.S.,call Wehsite 800. at:geappliances.ca GE.CARES(800.432.2737) orvisitonrWehsiteat: ge.com FOR YOUR SAFETY: BEFORE YOU BEGIN Read these instructions completely • IMPORTANT instIuctions fl)r local inspector's instIuctions - Obsei,e,ll with Be sure to - tile • Completion • Product covered these - Keep these instructions reference.
Installation Instructions PREPARING THE INSTALLATION SITE AND UNPACKING YOUR DRYER TOOLS AND MATERIALS YOU WILL NEED [] Phillips head screwdriver [] Ac!justable plie_5 (at!just leveling [] Caq_enter's legs) ]° Prepare tile area and exhaust of tile ne',_ (h3el= 2. Check to be sm'e that the existing external exhaust is clean and that it meets attached level [] Flat or straight fin" cord strain blade screwdriver relief) installation (may be needed 3° tile specifications.
Installation Read these instructions Instructions completely ELECTRICAL CONNECTION INFORMATION FOR ELECTRIC DRYERS A_ WARNING fire, electric • DO shock NOT THIS fire, CORD WITH must • DO with the NO. Electrical Electrical grounded mad ordinances, ANSI/NFPA CmmdJma NOT USE Code iIIjtu3: AN I_LTENSION PLUG WITH CORD THIS OR AN APPLIANCE, in accordmace or ha the absence NATIONAL 70 or ha Cmmda Part or personal This of local ELECTRICAL CSA dryer must with local C22.
Installation Instructions EXHAUST SYSTEM REQUIREMENTS _/kWARNING The dryer MUST NOT be exhausted into a chinmey, a wall, a ceiling, a commou duct with a kitchen exhaust or any concealed space of a building which can accumulate lint, resulting in a fire hazard. Use only 4" (10.
Installation EXHAUST DUCTING Instructions LENGTH EXHAUST Tim exhaust systeln should be inspected and cleaned a nfilfinmm of evei T year with noi_nal usage. Tile more tim (liTer is used, tile more often you should check tile exhaust system and vent hood fin" l)rol)er ol)elvltion. • DO NOT asselnble the duct work with tilstenei_ that extend into the duct. They will serve as collection fin" lint.
Installation LOCATION Do Not OF YOUR DRYER Install the h_stall the Allow the following clearances for ease of installation: Dryer: 1. Do not h_stall the &cyer in an area exposed water or outside weather c(mditions. 2. Do not Instructions dryer in an area in contact with curtains, drapes obstruct tile flow of combustion where to dripping Alcove, stack, undercounter or closet it will come FRONT SLOES REAR TOP 3" (7.6cm) 0 (0 cm) 3" (7.
Installation Instructions MOBILE HOME INSTALLATION ROUGH-IN 1, Dryer MUST be exhausted outside (outdoing, not beneath the mobile home) using metal ducting that will not support combustion. Metal ducting must be 4" (l 0.l 6 cm) in diamemr with no obstructions. Rigid metal duct is preferred. 267/8" _1 (68.3cm) counter 29/16" MUST confimn Construction to cmTent & Safety Standard (6.6cmT _'_ 1 fin" other Manufi_cmred (which _, 345/8" (87.9cm) 139/16" 4.
Installation ELECTRICAL INSTALLATION ELECTRIC DRYERS ik WARNING: Instructions FOR GROUNDING WARNING: mp,,,pe, .,..ecti,,.,,fthe Thef.ll,,wi.g eqtfipment-grounding conductor can result in a risk _ff electric shock. Check Mth a licensed electrician if you are in requirements for proper and sate electrical installation oI your d_Te_: [_filure to follow these instructions can create electrical shock and/or a fire hazard. doubt as to whether cord with this (h_'e_: Some is properly grounded.
Installation Instructions 3-WIRE SYSTEM FOR ELECTRIC DRYERS 4-WIRE SYSTEM FOR ELECTRIC DRYERS NOT for use in Canada. DO NOT use for Mobile Home Installations, NOT for use on new construction. Effective 1. ReInove the screws securing the temfinal block access cover and the strain relict mounting bracket located on the back of the (hwer upper corne_: In Cmmda Jaamaacy 1, 1996: requires that new 4-wire connection The National construction to an electric a 4-wire power supply cord 1. 2.
Installation GAS CONNECTION GAS DRYERS 1. I{emove tile shipping tile dryer: Conversion conve_ion without No. a 1/2" or approved 3/8" dryeI: NOT connect tile tile (hyer gas wflve. 14-A038) MUST cm) I.D. semi-rigid combustible materials, gasoline, and other flanmmble wq)ot_. _Mso see that nothing (such as boxes, clothing, etc.) ol>tructs tile flow of combustion and ventilation ai_: to An I,P 6. Rtm tile dryer through be installed (1.
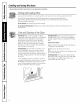
Stacking Instructions MOUNTING THE DRYER TO THE WASHER WARNING: • To reduce the risk of electric shock, disconnect this appliance ti'om the power supply befin'e attempting any user maintenance. Turning tile controls to tile OFF position does not disconnect this appliance ti'om tile power sui_ply. The numbers in the illustration correspond to steps. 1.
Stacking Instructions-Reversing Thenumbers in the illustration correspond to steps. 5. Using the blade end ofa putb' knite co',ered with masking tape, carefllll) remoxe .... the hole I_lugs, located in the 1)otmm of the (h-vet fl'ont panel. 8. Insert the 2 long screws provided in the kit through the holes in the dryer ti'ont panel and install into the fl'ont mounting brackets. 9. Install 10. Refer 6, Remoxe the 4 legs from the dr}er base. 7.
Before you call for service... Troubleshooting -tips Save time and money! Review the charts on the following pages first and you may not need to call for service. Dryer doesn't start Possible Causes What To Do Dryer is unplugged • Make sure the (hTer plug is pushed the outlet. Fuse is blown/dreuit tripped Thermal limiter breaker is the vent fi:q" any obstructions.
Before you call for service... Staticoccurs Possible Causes What To Do Overdrying • TI_' a fid_fic • A(!iust No fabric softener was used Synthetics, permmmnt blends can cause static Inconsistentdryingtimes Type press mad softeuei: controls sottelleY. • Tin' a fabric s(_tteuer. • Automatic of heat fin" less drying. • Tl-v a tidglJC drying ot heat used D'pes of fid_fics, exhaust ducts.
Notes.
GEDryer Warranty.(For customers in the United States) Aft warranty service provided by our Factory Service Centers, or an authorized Customer Care® technician. Toschedule service, Staple your receipt here. Proof of the original purchase date is needed to obtain service under the warranty. on-line, 24 hours a day, visit us at ge.com, or call 800.GE.CARES (800.432.2737).Please have serial number and model number available when calling for service.
GEDryer Warranty. (For c.stomers inCanada) All warranty service provided by our Factory Service Centers, or an authorized technician. For service, call 1.800.361.3400. Please have serial number and model number available when calling for service.
ConsumerSupport. f "l gEAppliancesWebsite an} of tile }ear'. For Havedo} a question or need order pat_s, catalogs, or and so much more... In i,,the_.8.: go.cam greater thster service now download assistanceconvenience with ?am" and appliance? %) tile you GE can Appliances "_\_bsite Ox_ner's 24 ham's Mmmals, a day, even schedule service on-line. You can also "_sk Ore" Team of Experts'"' }our questions, Canada: geappliances.ca. ScheduleService i,,the_.,.8.: 0e.