
Manual


Installation Instructions
TOOLS AND MATERIALS
YOU WILL NEED
[] Phillips head screwdriver
[] Ac!justable plie_5 (at!just leveling legs)
[] Caq_enter's level
[] Flat or straight blade screwdriver (may be needed
fin" cord strain relief)
[] Duct tape
[] Rigid or UI Aisted flexible metal 4" (10.2 cm) duct
[] Vent hood
[] 1/4" nut driver (renlove temfinal block access
cover and install cord) _:LECTRIC DRYER)
[] Pipe thread sealer (GAS DRYER)
[]/JIAisted strain _eliet (may be sui)plied
with cord)
[] UiAismd 30A, 240V, 3-wire, #10 AWG minimum
conductor power cord (/J.S. existing structure)
[]/JiAisted 30A, 240V, 4-wire, #10 A_.VG
minimmn conductor power cord is required
(U.S. new construction)
[] Flexible stainless steel or plastk_coated brass
commecting robe (if allowed by building code)
(GAS DRYER)
[] Open-end wrenches lot flexible robe and
connector (GAS DRYER)
PREPARING THE INSTALLATION SITE
AND UNPACKING YOUR DRYER
]°
2.
3°
Prepare tile area and exhaust fi)r installation
of tile ne',_ (h3el=
Check to be sm'e that the existing external
exhaust is clean and that it meets attached
installation specifications.
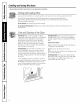
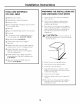
Place tile ffmr corner posts fl'om tile shipping
crouton on tile floox; parallel to each othe*; 2-3"
apa_nL ( arefldly lay tile dryer on its left side on
top of tile corner posts. Remo\v tile ioam
shipping pad.
CAUTION: T,,prevent damage, do
not use tile control panel as a metals to pick up
of I//O'_ e tile (lI'} el2
Foamshippingpad
4. Return tile dryer to all uptight position,
5. Mo\e tile dryer to tile desired location.
6. Connect tile extermd exhmlst.
7. A(!iust tile leveling legs to match tile washer
height, Tile &yer must be le\vl and rest firmly
on all fimr le\ eling legs.
8. Connect tile power suppl>
9. Check tile operation ot tile power supply and
venting.
10. Place tile Owner's Manual and tile Installation
Instructions ill a location where they will be
noticed by tile ownel:
10