
Installation Guide


6 31-3000212 Rev. 0
Installation Instructions
INSTALLING THE RISER ONTO A VENTED DRYER (cont.)
1
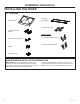
INSTALLING RISER BODY
• Do not remove dryer leveling legs. Ensure all 4
are screwed all the way into the dryer base.
• Align top of riser body with bottom of dryer and
ensure the riser hose is on the same side as the
back of the dryer.
• Attach metal brackets D & E with the 6 long
mounting screws.
Riser
Hose
Metal Brackets
D & E
2
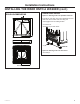
INSTALLING LEVELING LEG
BRACKETS
• Secure both leveling leg brackets to the bottom
of the riser with the 18 short mounting screws
(9 per leveling leg bracket). After attaching the
screws, fully screw in the 4 leveling legs. Do not
tighten the lock nuts at this time.
3
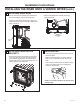
LEVELING UNIT
• Carefully upright the dryer and move it close to
its final location.
• Make sure that the dryer is level by placing a
level on top. Check side to side and front to
back.
• Use and open ended wrench to adjust the legs
in and out. Tighten the lock nut against the
bottom of the pedestal.
NOTE: To minimize vibration, the locking nuts
must be tight.