Installation Instructions 15" Built-In Compactors 6C61580 SS 6C61500 BB 6 061500 WW GCG1700I1" ZC6S150 SS ZCGP150I1" *For ZCGP150II and 6C61700 II, also refer to the instructions provided on the template packed with those models.
Safety information BEFORE YOU BEGIN WARNING! Do not allow items to fall Read these instructions completely and carefully. • IMPORTANT- Save these or collect behind the compactor. Failure to follow this instruction could result in a fire. instructions for local inspector's use. • IMPORTANT- Observe all governing codes and ordinances.
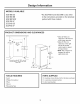
Design information MODELS AVAILABLE GCG1580SS GCG1500BB GCG1500WW GCG1700I1" ZCGS150SS ZCGP150I1" PRODUCT *For ZCGP150 II and GCG1700II, also refer to the instructions provided on the template packed with those models. DIMENSIONS AND CLEARANCES • Allow 23" (58.4 cm) clearance atthe front for 24" (61 cm) min a full drawer opening, • Allow 6"(15.2 cm) clearance on the right side to the nearest vertical wall or cabinet 15-1/8" (38.4cm) min 34" (86.4cm) to 35" !88.9 cm) 33-3/4" (85.8cm) min.
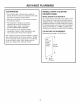
ADVANCE PLANNING CLEARANCES MODELS WiTH A CUSTOM DRAWER PANEL You should be able to fully open the compactor drawer. Six inches (15.2 cm)is required on the right side of the compactor for bag removal. Models ZCGP150 II and GCG1700 II The custom drawer panel and custom handle of your choice should be secured to the compactor before installation begins. A template with instructions and installation hardware is provided with those models. For planning purposes, you may order the template in advance.
Installation Preparation ELECTRICAL REQUIREMENTS GROUNDING WARNING! The improper connection of the equipment WARNING! grounding conductor can result in a risk of FOR PERSONAL SAFETY: Remove house fuse or open circuit breaker before beginning installation. Do not use an extension cord or adapter plug with this appliance. electric shock. Check with a qualified electrician or service representative if you are in doubtthatthe appliance is properly grounded.
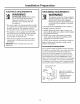
Installation Preparation UNPACKING THE COMPACTOR • Move the compactor close to the installation location. UNPACKING THE COMPACTOR (CONT.) • Use a section of the shipping carton to protectthe finished floor. • Open the compactor drawer and remove any shipping materials or other items shipped in the drawer. • Do not use the handle to lift the compactor. • Do not remove the compactor bag (if installed). • Remove all protective packaging materials such as tape or shipping pads.
Installation Preparation [_ LEVELING THE COMPACTOR • The top of the compactor should be at least 1/8" (3 ram) from the top of the cabinet opening. You can adjust the height of the compactor by turning the screws on the front leveling legs and rear wheels. I_ ADJUST THE RETAINING BRACKET Determine installation depth of the compactor beneath the countertop, Adjust the position of the retaining brackets so that the screws can meet the underside of the countertop.
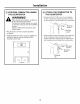
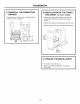
Installation I_ POSITION COMPACTOR THE COUNTERTOP UNDER I_ ATTACH THE COMPACTOR THE COUNTERTOP WARNING! TO • Use two #8-18 x 1/2" (45.7 cm x 1.3 cm) mounting screws to fasten the retaining brackets at the top of the compactor to the underside of the countertop. When moving the compactor, use gloves to protect and cushion your hands. To protect the finished flooring, use a dolly to move the compactor near the installation location. Failure to follow these instructions could result in injury.
Installation [_ REINSTALL THE COMPACTOR DRAWER _] INSTALLATION OF THE TRASH BAG CADDY (on some models) • Grasp the sides of the drawer. Carefully slide the drawer into the compactor. • Set the bag caddy into the drawer and hook the pre-punched holes in the caddy on the drawer buttons. • Setthe trash bag into the bag caddy and fold over. • Hook the holes in the bag over the drawer buttons. iiiii Trash Drawer buttons _9qFINALIZE THE INSTALLATION • Turn power on atthe source.
Notes 10
Notes 11
NOTE:While performing installations described in this book, safety glasses or goggles should be worn. NOTE: P]-odtlcr General specifi(ations GE Consumer & Industrial Appliances General Electric Company Louisville, KY40225 ge.com Electri(. ilnpvovelnent is a continuil_g Thel-etk_re, _11-(_ sul_je(r lnatevials, to (hmlge Lql(](_aVOl" _ll_pem-al_ce without at mid nori(e. Pub.No.