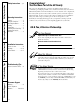
GEAppliances.com Trash compactors LOCK/OFF ON START I . Loren Gomeum dvcdf. L deces Ips Ipsum runstew Wadf . Loren . Loren Jasdpum Gomeum.Loren Ipsu Gomeum deces epes migjom Ipsum deces Wadf deces Ipsum runstewLoren Ipsum . Loren Loren Gomeu.H . Ipsum Jasdpum deces Gomeum psum deces epes migjom deces Gomeumdvcdf. Lorendeces G Ipsum oren Ipsum Go Gomeu.H Loren Ipsum runstew Wadf . Loren deces um decesGomeum. Jasdpum GomeumLoren IpsumGomeu. Wadf m deces Hepes migjom Ipsum deces deces runstewLoren Ipsum .
Troubleshooting Tips Installation Instructions Operating Instructions Safety Instructions Safety Instructions . . 3, 4 Welcome to the GE family. We’re proud of our quality products and we are committed to providing dependable service. You’ll see it in this easy-to-use Owner’s Manual and you’ll hear it in the friendly voices of our customer service department. Operating Instructions Features . . . . . . . . . . . . . . . . . .5 Using the Compactor . . . . . . . .6 Trash Bag Installation . . . . . . .
Safety Instructions IMPORTANT SAFETY INFORMATION. READ ALL INSTRUCTIONS BEFORE USING. WARNING! For your safety, the information in this manual must be followed to minimize the risk of fire, electric shock or personal injury. SAFETY PRECAUTIONS ■ Close supervision is necessary when any appliance is operated near children. Do not allow the compactor to be used as a toy, or to run unattended at any time. ■ Do not push trash into the drawer with hands or feet.
ELECTRICAL SAFETY When using electrical appliances, basic safety precautions should be followed, including the following: Operating Instructions To prevent hazard of electrical shock, this compactor must be properly installed and grounded in accordance with the Installation Instructions before it is used. Do not operate with a damaged cord set, plug, motor, or after damage in any manner. Have the appliance examined, repaired, or adjusted by an authorized service technician.
Safety Instructions About the trash compactor.
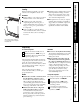
What It Does and How It Works Your compactor reduces household trash to as little as 1/4 of its original volume. It compacts most refuse, including paper, cans, bottles, jars, plastic containers, wrappings, sweepings and some food wastes. Drop trash into a disposable bag that lines the trash drawer and close the drawer. When you start the compactor, an electrically-operated ram moves down into the drawer, compacts trash, moves back up again—and the compactor shuts off automatically.
Lift the trash drawer handle or press the touch-toe bar and pull the drawer out. Remember: ■ Bottles and large cans compact best when laid flat near the center of the drawer. ■ Although it is not necessary to compact until the drawer is full or nearly full, we suggest that, for maximum compaction, you start the compactor each time a significant amount of trash is added.
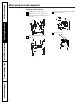
Removing a Full Trash Bag Pull the drawer completely open. Remove the top of the bag from the bag retainer buttons. Pull up all four bag cuffs. Operating Instructions Safety Instructions About using the trash compactor. Push the side-lock latch down and tilt the drawer side open. Lift the bag out. Consumer Support Troubleshooting Tips Installation Instructions Close the bag with the twist ties provided.
Safety Instructions Care and cleaning of the compactor. As is true of most appliances, proper care is needed to give you continued satisfaction. Before cleaning the compactor, turn the key-knob to the OFF position and remove. If you will be away for more than a couple of days, remove the compactor bag. Lock the compactor and remove the key-knob and store it in a safe place. The outside and inside of your compactor are finished with durable baked-on enamel.
Safety Instructions Installation Instructions. Before you start… Proper installation is your responsibility. Make sure you have everything necessary for correct installation. It is the personal responsibility and obligation of the customer to contact a qualified installer to assure that electrical installation meets national and all local codes and ordinances. WARNING Check the location where your compactor will be installed. The cabinet opening should be square.
Electrical ground is required on this compactor. DO NOT ground to a gas pipe. DO NOT change the power supply cord plug. If it does not fit the outlet, have a proper outlet installed by a qualified electrician. DO NOT use an extension cord with this compactor. Electrical Shock Hazard Check with a qualified electrician if you are not sure the compactor is properly grounded. Failure to follow these instructions could result in death or serious injury.
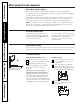
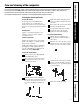
Starting to Install…with the compactor in the room where it will be installed. DO NOT grasp console to move compactor. Slide the compactor onto cardboard or hardboard before moving compactor across the floor to prevent damaging floor covering. Consumer Support 12 DO NOT allow the rear frame of the compactor to touch the floor covering when lifting or moving compactor. 1 2 Remove the compactor from the shipping carton. Remove all the protective packaging materials such as tape and shipping pads.
The rear wheels are preset for a cabinet opening height of 34-1/4″ (87 cm) (Position “A”). Position B: 34-1/4″ to 34-7/16″ (87 to 87.5 cm) Position C: 34-7/16″ to 34-5/8″ (87.5 to 88 cm) Tighten screw. Repeat for other rear wheel. Cabinet A C B Locating stud Wheel bracket assembly Self-tapping screw (pivot) 8 Determine if you want the compactor frame or drawer front flush with the cabinet front. Use pliers to lower leveling legs away from cabinet. Place level inside on the floor of the cabinet.
9 Move the compactor close to its final position. Plug the power supply cord into a properly grounded receptacle. Carefully lift the front slightly and roll compactor into the cabinet opening until the retaining brackets stop the unit. Using the two #8 -18 x 1/2″ screws, fasten the retaining brackets to the underside of the countertop with the mounting screws. If the brackets cannot be attached to the underside of countertop, attach mounting clips to brackets.
Safety Instructions Custom Panel Options Three options are available for customizing you compactor: • Color-matched trim kit with Handle (maximum thickness of 7/32″ at edges) • Trimless panel with Compactor Handle (1/2″ minimum to 5/8″ maximum thickness) • Trimless panel without Compactor Handle (1/2″ minimum, use cabinet custom handle or foot pedal) Installing a Custom Panel Operating Instructions To order a color-matched trim kit for the installation of a custom-made panel, contact your local authoriz
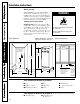
Safety Instructions Installation Instructions. Trimless Panel with Handle Dimensions for trimless panel with handle Use these dimension drawings to create a custom panel for use without a trim kit. The panel should be 1/2″ to 5/8″ (13 mm to 16 mm) thick. Operating Instructions NOTE: A thicker panel may need rounded front corners and cut-out for access to the handle. 23 13⁄16″ (60.5 cm) Installation: 1. Remove foot pedal, toe guard and decorative panel. 2.
Dimensions for trimless panel without handle Use these dimension drawings to create a custom panel for use without a trim kit. The panel should be 1/2″ (13 mm) thick. 15″ (38.1 cm) 1 2 3 Custom Panel 15″ x 1/2″ Quarter-round #8 x 1″ Wood Screws Toe Guard Washer Toe Guard Screw Installation Instructions 1 2 3 4 5 6 Operating Instructions 25″ (63.5 cm) Installation: 1. Remove foot pedal, toe guard, decorative panel and handle. 2.
Troubleshooting Tips Save time and money! Review the charts on the following pages first and you may not need to call for service. Problem Possible Causes What To Do Compactor won’t operate Compactor is unplugged •Make sure cord is plugged securely into a working outlet. Circuit breaker/fuse is tripped/blown •Check house circuit breakers /fuses. Replace fuses or reset breaker. Key-knob switch may not be in position •Make sure the switch is in the ON position.
Safety Instructions Trash Compactor Warranty. All warranty service provided by our Factory Service Centers, or an authorized Customer Care® technician. For service, call 800.GE.CARES (800.432.2737). For The Period Of: GE Will Replace: One Year From the date of the original purchase Any part of the compactor which fails due to a defect in materials or workmanship. During this full one-year warranty, GE will also provide, free of charge, all labor and in-home service to replace the defective part.
Consumer Support. GE Appliances Website GEAppliances.com Have a question or need assistance with your appliance? Try the GE Appliances Website 24 hours a day, any day of the year! For greater convenience and faster service, you can now download Owner’s Manuals, order parts, catalogs, or even schedule service on-line. You can also “Ask Our Team of Experts™” your questions, and so much more... Schedule Service GEAppliances.com Expert GE repair service is only one step away from your door.