
Quick Start Manual


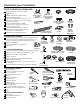

Dishwasher Installation
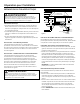
Figure CC
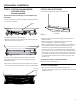
STEP 22: REPLACE TOEKICK
3ODFHWRHNLFNDJDLQVWWKHOHJVRIWKHGLVKZDVKHU
Attachment
Screws
Toekick
$OLJQWKHWRHNLFNZLWKWKHERWWRPHGJHDQGPDNHVXUHLWLV
DJDLQVWWKHÀRRU
,QVHUWDQGWLJKWHQWKHWRHNLFNDWWDFKPHQWVFUHZV7KH
WRHNLFNVKRXOGVWD\LQFRQWDFWZLWKWKHÀRRU
:KHQUHLQVWDOOLQJWKHWRHNLFNRQPRGHOVZLWKDVRXQGEDUULHU
ensure that the bottom edge of the rubberized flap is flush
with the floor. Any excess material should be tucked up
behind the outer door. Do not allow excess rubberized flap to
lay on the floor. If any excess is not tucked completely behind
the outer door, it will bunch up between the door and toe kick
and impede proper opening and closing of the door. This will
be noticeable because the door will not stay fully open and
will spring up.
Tip: Reduce sound from under the dishwasher.
Make sure toekick is against floor.
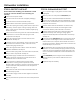
STEP 23: LITERATURE
%HVXUHWROHDYHFRPSOHWHOLWHUDWXUHSDFNDJHWKHVH
Installation Instructions and product samples and/or coupons
with the consumer.
13
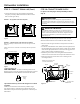
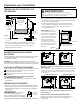
STEP 21: POSITION SOUND BARRIER
AND INSULATION
(on some models)
Skip this step if the sound barrier is not assembled to the
dishwasher.
/RFDWHWKHVRXQGLQVXODWLRQSDFNDJHLQVLGHWKHGLVKZDVKHU
/RFDWHWKHFRQWUROER[
3HHORȺWKHSDSHUIURPWKHLQVXODWLRQ
$SSO\WKHLQVXODWLRQWRWKHXQGHUVLGHRIWKHFRQWUROER[DQG
ÀXVKZLWKLWVIURQWIDFHDVVKRZQ
Insulation shown adhered to bottom edge of the control
box, flush with the front face, and correctly placed along
dishwasher bottom.
5HPRYHWKHPDVNLQJWDSHIURPWKHVRXQGEDUULHUDQGGRRU
front. Re-position the sound barrier over the sound insulation.
Control
Box
Sound
Barrier