
GDT225 GDT226 PDT145


7
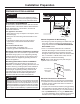
STEP 6
POSITION WATER LINE
AND HOUSE WIRING
• Position water supply line and house wiring on the
floor of the opening to avoid interference with base
of dishwasher and components under dishwasher.
Dishwasher Installation
Water
Line
House
Wiring
3"
3"
6"
6"
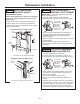
INSTALL 90° ELBOW
• Ensure rubber gasket is located between valve and
elbow.
• Thread 90° elbow onto the water valve.
• Do not overtighten elbow. Water valve bracket could
bend or water valve fitting could break.
• Position the end of the elbow to face the rear of the
dishwasher.
Gasket
90°
El
bo
w
Water
Valve
Screw the
90° elbow
onto the
water valve
until it is
secure and
points to the
rear of the
dishwasher
STEP 5
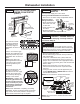
STEP 7
INSTALL DRAIN HOSE,
THROUGH CABINET
• Stand the dishwasher upright and position it in front
of cabinet opening. Insert drain hose into the hole in
cabinet side. If a power cord is used, guide the end
through a separate cabinet opening.
Tip: Prevent unnecessary service call charges for
fill, drain or noise concerns.
Position utility lines so they do not interfere with
anything under or behind the dishwasher.
CONNECT DRAIN LINE
The molded end of the drain hose will fit 5/8” through 1”
diameter inlet ports on the air gap, waste tee or disposer.
• Determine size of inlet port.
• Cut drain hose
connector on the
marked line, if
required, to fit the
inlet port.
• Use the drain hose
extension provided
and connect directly
to the drain loop
already attached to the unit. Secure the connection,
with hose clamp, to the provided user bag drain
hose.
• DRAIN CONNECTION HEIGHT IS NOT TO EXCEED
72” ABOVE BOTTOM OF DISHWASHER.
• TOTAL DRAIN HOSE LENGTH MUST NOT EXCEED
12 FEET FOR PROPER DRAIN OPERATION.
STEP 8
1"
3/4"
5/8"
Cutting Lines
IMPORTANT: Do NOT cut
corrugated portion of hose
Hose Clamp
Power Cord
(If Used)
Water
Line
House
Wiring
Drain
Hose
Insulation
Blanket
Maximum
Drain Hose
Length 12’