
Installation guide


Dishwasher Installation
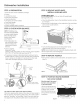
STEP 14: PUSH DISHWASHER INTO
FINAL POSITION
, Check the tub insulation blanket, if equipped, to be sure it is
smoothly wrapped around the tub. It should not be "bunched
up" and it must not interfere with the door springs. If the
insulation is "bunched up" or interfering with the springs,
straighten and recenter the blanket prior to sliding the
dishwasher into its final position.
. Slide the dishwasher into the final position by pushing on the
sides of the door panel. Do not use a knee or push on the
center of the panel. If you do, damage to the panel will likely
result.
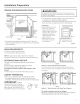
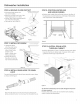
IM PORTANT - Beforeopening the dishwasher door,
be certainthe edges of the dishwasher door panelare behind
the face ofthe adjacentcabinetand not up againstthe cabinet
face.Referto FigureU. Ifthe dishwasher door isopened
when the edge of the door isagainstthe face of the cabinet,
dishwasher door damage and cabinetdamage willoccur.
, Open and close the dishwasher door to be sure it operates
smoothly, and does not rub on the adjacent cabinet.
Door
Fits and
Swings
Back
Behind
Cabinet
Frame
Alignment
Figure U
Incorrect Alignment Door Catches
will result in door damage on Cabinet Frame
Tip: Prevent unnecessary service charges for panel damage
or wash performance.
Check dishwasher alignment prior to opening dishwasher door
to prevent panel damage.
Hake sure utility lines are not trapped or crushed behind
dishwasher. Crushed lines will restrict water flow.
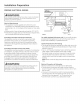
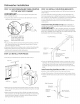
STEP 15: LEVEL DISHWASHER
IM PORTANT - Dishwashermust be levelforproper
dishrackoper(]tion,w(]shperform(]nce(]nddoor oper(]tion.
The dishw(]shermust be leveledlefttoright(]ndfrontto back.
Thisensuresthedishrackswillnotrollinorout on theirown,
circul(]tion w(]ter will flow to the pump inlet, and the door will close
without hitting the side of
the tub.
• Remove the lower dish rock ,,
(]ndplacea levelon the ,...................................................................
door (]ndlowerracktr(]ck
(isshown inFigureV.
• Ifyour model has 4 leveling
feet,adjustthe levelofthe Check
dishwasherby individually
turningthe4 legson the Front Check
bottom ofthedishwasher to Back Level
/ Side
as illustrated in Figure W. _C; _toSide
• If your model has rear
wheels, the height of the
\
wheels ore (]djusted from .....
the front of the dishw(]sher _' .......... J '_
.................................. /
(]long with the 2 front legs FigureV
on the bottom of the Adjust
dishw(]sher. Begin
the leveling process
with the front legs by
individually turning
the front 2 legs. By
(]djusting the front
legs first, (]ccess to
the re(jr leveling bolts
is m(]ximized easing
re(jr wheel
(]djustment.
When the
front legs
ore (]djusted
to (] height
resulting
in on
Figure W
(]ppropriate
gap to
the upper
cabinet, proceed to (]djust the re(jr leveling bolts (]nd wheels.
Individually turn the 2 bolts to (]djust the rear wheels. Slowly
rotate the 2 bolts counter clockwise to raise the dishwasher,
(]nd clockwise to lower it. Continue to (]djust the feet (]nd wheels
until the dishw(]sher is level (is illustr(]ted in Figure W.
• The dishw(]sher is properly leveled when the level indic(]tar is
centered left to right (]nd front to b(]ck. Also, the dishw(]sher door
should close without hitting the side of the tub.
• Repl(]ce the lower rock.
• Pull e(]ch rock out, (]bout h(]lfway. Check to be sure it does not
roll back or forw(]rd on the door. If the rock moves, (]djust
leveling legs.
Tip: Prevent unnecessary service charges. Verify dishwasher is
leveled.
Pull the dish rocks h(]lf w(]y out. They should st(]y put. Open (]nd
close the door. The door should fit in the tub opening without
hitting the side of the tub. If the rocks roll on their own, or the door
hits the side of tub, relevel the dishw(]she[
9