
Installation guide


Dishwasher Installation
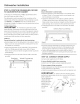
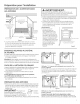
STEP 15: POSITION DISHWASHER, SECURE
TO COUNTERTOP OR CABINET
In this step you will need the 2 Phillips speci(]l he(]d screws
from the screws set (]side in Step 1.
The dishw(]sher must be secured to the countertop or the
c(]binet sides. When the underside of the countertop is wood,
use Method 1.Use Method 2 when the underside of the
countertop is mode of (] m(]teri(]l, such (]s gr(]nite, th(]t will not
(]ccept wood screws.
IMPORTANT m Prevent door p(]nel (]nd control
p(]nel d(]m(]ge. Dishw(]sher must be positioned so the front
p(]nel (]nd control p(]nel do not cont(]ct the (]dj(]cent c(]binets
or countertop. Mounting screws must be driven str(]ight (]nd
flush. Protruding screw he(]ds could scr(]tch the door p(]nel or
control p(]nel (]nd interfere with door oper(]tion.
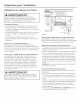
Method i
Secure dishwosher to underside of wood countertop.
, Recheck (]lignment of the dishw(]sher in the c(]binet, Refer to
Steps 13 (]nd 1/4.Door p(]nel (]nd/or control p(]nel must not
hit c(]binets or countertop.
, F(]sten the dishw(]sher to the underside of the countertop
with the 2 Phillips speci(]l he(]d screws. Refer to figure.
M(]ke cert(]in screws (]re driven str(]ight (]nd flush to prevent
p(]nel d(]m(]ge.
, Inst(]ll plug buttons to the side of the tub well in the holes
provided.
Brockets Wood Countertop
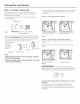
Method 2
Secure dishwasher to cabinet sides.
, Recheck (]lignment of the dishw(]sher in the c(]binet. Refer
to Steps 13 (]nd 1/4.Door p(]nel (]nd/or control p(]nel must
not hit c(]binets or countertop.
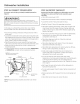
, F(]sten the dishw(]sher to the (]dj(]cent c(]binets with the
2 Phillips speci(]l he(]d screws provided. Referto Figure X.
M(]ke cert(]in screws (]re driven str(]ight (]nd flush to prevent
p(]nel d(]m(]ge. Do not screw into the c(]binet f(]ce fr(]me.
, Inst(]ll plug buttons to the side of the tub well in the holes
provided.
Solid Surfoce Countertop
/
/
________]__S_id_e__-------_ ¢::_-----_-_
Figure ×
, Re-check th(]t the dishw(]sher is squ(]rely positioned in the
c(]binet (]t both the top (]nd bottom of the (]ppli(]nce (]fter
mounting to the c(]binets/countertop. Adjust if necess(]ry.
, Confirm (]11leveling legs(]re in cont(]ct with the floor to
prevent the dishw(]sher from rocking (]nd ensure proper door
(]nd I(]tch oper(]tion
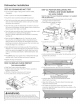
STEP 16: CONNECT WATER SUPPLY
Connect w(]ter supply line to 90° elbow.
If using a flexible braided hose connection:
, Att(]ch nut to 90° elbow using on (]djust(]ble wrench.
If using a copper tubing connection:
, Slide compression nut, then ferrule over end of w(]ter line.
, Insert w(]ter line into 90° elbow.
, Slide ferrule (]g(]inst elbow (]nd secure with compression nut.
IMPORTANT - Checktobesureth(]tdoorspring
(]nd/ordoorspringc(]bledo notruborcont(]ctthefillhoseor
w(]ter supply line,
Test by opening (]nd
closing the door.
Reroute the w(]ter
supply lines if (]
rubbing noise or
interference
occurs.
90° Elbow
Hot Woter
Supply Line
Compression
Nut ,,_
/
z
Ferrule
Figure Y
Bottom Left Side
11