
Installation guide


Dishwosher Instollotion
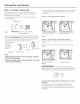
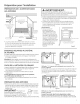
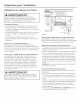
STEP 23: REPLACE TOEKICK
* Place toekick ogainst the pre-toekick (on some models) and
legs of the dishwasher.
Figure AH SCFeWS
* Align the toekick with the bottom edge and make sure it is
agoinst the floor.
* Insert and tighten the 2 toekick attachment screws. The
toekick should stay in cont(]ct with the floor.
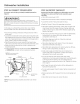
* When reinstalling the toe kick on models with (] sound barrier,
ensure that the bottom edge of the rubberized flap is flush
with the floor. Any excess material should be tucked up
behind the outer door. Do not allow excess rubberized flap to
lay on the floor. If any excess is not tucked completely behind
the outer door, it will bunch up between the door and toe kick
and impede proper opening and closing of the door. This will
be noticeable because the door will not stay fully open and
will spring up.
Tip: Reduce sound from under the dishwosher. Moke sure
toekick is ogoinst floor.
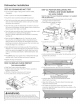
STEP 24: CHECK THE FOLLOWING
* Tub trim does not interfere with the door
* Dishwasher is square and level (It both the top and bottom of
the cabinet opening, with no twisting or distortion of the tub
ordoor
* All 4 legs of the dishwasher are firmly in cont(]ct with the floor
* Droin hose is not pinched between the dishwasher and
(]djocent cabinets or wolls
* Tub trim is fully seoted on the tub fl(]nge
STEP 25: LITERATURE
* Be sure to leave complete literature package, these
Installation Instructions and product samples and/or coupons
with the consumer.
15