
User Manual


49-6000226 Rev. 1 13
CARE AND CLEANING
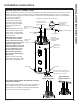
5. Replace Anode Rod (with same anode type that was
removed — sensing vs. standard), if more than 6” of
core wire is exposed. Contact Installer/Servicer for
correct replacement anode or GEA Customer Support
at GEAppliances.com/waterheater.
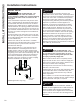
6. To Install anode rod:
a. Seal the threads with pipe joint compound or pipe
thread sealant tape.
b. Thread into the port and tighten with torque wrench
to 50 +/- 5 ft-lbs of torque.
7. Turn water supply on, open a tap to remove any
trapped air in water lines and inspect for leaks. Repair
any leaks, prior to proceeding.
8. Reconnect wire to anode fitting (for anode depleteion
sensing models) or replace anode cap (for standard
non-sensing anode)
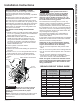
9. Reassemble front shroud, previously removed in step
2, if equipped.
10. Turn power On. If sensing anode was replaced with
a special alloy (non-sensing) anode rod, the anode
depletion sensing feature must be disabled and the
unattached wire end must be covered with electrical
tape. See page 12 for instructions on enabling or
disabling sensing anode.
11. Reset ANODE replacement indicator light (if
equipped) by pressing and holding ANODE button for
10 seconds to indicate that a new anode depletion
sensing anode rod is installed.
Anode Rod Maintenance and Service