
Manual


Installation Instructions
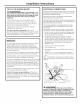
TO FILL THE WATER HEATER
A WARNING: RiskofUnitDamage- The
tank must be full of water before heater is turned on. The
water heater warranty does not cover damage or failure
resulting from operation with an empty or partially
empty tank.
Hake certain the drain valve is completely closed.
Open the shut-off valve in the cold water supply line.
Open each hot water faucet slowly to allow the air to
vent from the water heater and piping.
A steady flow of water from the hot water faucet(s)
indicates a full water heater.
Fll" fault code during installation: If the unit is
powered on without a full tank, the error code "Fll" will
show in the display. Turn off the power, fill the tank with
water (see above), then turn the power back on.
NOTICE:
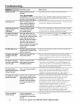
Do not mis-wire electrical connections. 240V AC or 208AC
must be applied across L1 and L2 wires as shown in
'Water heater junction box' illustration. Failure to do so
will VOID the warranty, and can result in 120V applied to
water heater, which may damage the compressor or other
electrical components.
If 4-conductor wire is supplied to the water heater, cap the
neutral, and connect the remaining wires as illustrated.
NOTEREGARDINGUTILITYPOWER-MANAGEMENTDEVICES
(Sometimes called Peak Load Reduction Switches):
Some power-management switching devices or even some
basic timer switches exist that REDUCEvoltage from 240V
to 120V during high-electricity-demand periods. These
devices must be removed from the circuit providing power
to the water heater because of the potential unit damage
noted above.
However, switching devices which cut power from 240V to
0V on a periodic basis are acceptable.
"bAd linE" fault code during installation: If "bAd linE" is
shown on the display, the unit is not receiving the correct
voltage as a result of incorrect wiring. To correct this fault,
turn the power off to the unit, correct the wiring issue, then
turn the power back on.
ELECTRICAL CONNECTIONS
A separate branch circuit with copper conductors, overcurrent
protectivedeviceand suitabledisconnecting meansmust be
provided by a qualifiedelectrician.
Allwiring must conform to local codesor latest edition of
NotionalElectricalCodeANSI/NFPA70.
Thewater heater iscompletely wiredto the junction box at the
top of the water heater.An openingfor 1/2"electricalfitting is
providedfor field wiring connections.
Thevoltage requirementsand wattage loadfor the water
heater are specifiedon the rating label onthe front of the
water heater.
The branch circuit wiring should include either:
1. Metallic conduit or metallic sheathed cable approved
for use as a grounding conductor and installed with
fittings approved for the purpose.
2. Nonmetallic sheathed cable, metallic conduit or
metallic sheathed cable not approved for use as a
ground conductor shall include a separate conductor
for grounding. It should be attached to the ground
terminals of the water heater and the electrical
distribution box.
To connect power to the water heater:
1. Turn the power off.
2. Remove the screw/screws holding the junction box
top cover.
3. Install L1to L1, L2 to L2 and ground to the green
ground wire connected to the bottom of the junction
box.
NOTE: Install electric connections according to local
codes or latest edition of National Electrical Code ANSI/
NFPA70.
Water heaterjunction box
HouseGround
A WARNING:Proper ground connection is
essential. The presence of water in the piping and water
heater does not provide sufficient conduction for a
ground. Nonmetallic piping, dielectric unions, flexible
connectors, etc., can cause the water heater to be
electrically isolated. Do not disconnect factory ground.
16