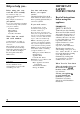
Built-in Oven Contents Aluminum Foil Appliance Registration Baking, Baking Guide Broiling, Broiling Guide 4,15 2 Roasting, Roasting Guide Safety Instructions 12-14 2-4 9,10,11 15,16 Self-Cleaning Instructions Shelves 18-20 8,21 Care and Cleaning Clock/Timer 17-21 7 Consumer Services Energy-Saving Tips 23 4 Features Light; Bulb Replacement Model and Serial Numbers Oven Control Probe Problem Solver ModelsJKP44GP JKP45WP GE Appliances Thermostat Adjustment 20 Back Cover Warmnty 5,6 17,22 2 6,7
Help us help you... Before using your oven, read this book carefully. It is intended to help you operate and maintain your new oven properly. Keep it handy for answers to your questions. If you don’t understand something or need more help, write (include your phone number): Consumer Affairs GE Appliances Appliance Park Louisville, KY 40225 Write down the model and serial numbers. You’ll find them on a label on the front of the oven behind the oven door.
Don’t attempt to repair or replace any part of your oven unless it is specifically recommended in this book. All other servicing should be referred to a qualified technician. ● Before performing any service, DISCONNECT THE OVEN POWER SUPPLY AT THE HOUSEHOLD DISTRIBUTION PANEL BY REMOVING THE FUSE OR SWITCHING OFF THE CIRCUIT BREAKER. ● Do not leave children alone— Children should not be left alone or unattended in an area where appliance is in use.
IMPORTANT SAFETY INSTRUCTIONS (continued) Self-Cleaning Oven ● Do not clean door gasket before reading special cleaning instructions in the Self-Clean section of this book. The door gasket is essential for a good seal. Care should be taken not to rub, damage or move the gasket. c Do not use oven cleaners. No commercial oven cleaner or oven liner protective coating of any kind should be used in or around any part of the oven. ● Clean only parts listed in this Use and Care Book.
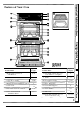
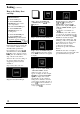
Features of Your Oven Ill I Ill Uuuu Uuuu llu Uunu u u Uu Uwuuuu u Duo 00 Uuuu u u Uo Uuuuuu o u Uu U(J e - Uouu u nun 00 Uuuu u Unu Unuouu u Uuu Un Ulluu JKP44GP JKP45WP u nun Ulluuuu n Doll no Explained on page Feature Index I Feature Index Explained on page 1 Removable Oven Doors with Window 17,21 8 Oven Light Switch (Lets you control interior oven lights.
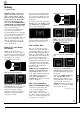
NOTE: Oven has controls for upper oven and lower oven. Be sure to set the correct control. Pads on the left side of panel are for the upper oven. Pads on the right side of panel are for the lower oven. The TIMER ON/OFF, COOK TIME, and STOP TIME pads can be used for either oven. 1. BAKE. Touch this pad to select bake function. Then tap or press INCREASE or DECREASE pad to display desired temperature. 2. CLEAIUOFF. Touch this pad to cancel all oven operations except clock and timer. 3. FUNCTION INDICATORS.
Oven Control, Clock and Timer Child Lockout Feature Your built-in oven has a provision for locking the control panel to prevent the oven from being turned on accidentally. To lock the control panel press & hold the INCREASE and DECREASE pad and the STOP TIME pad at the same time for 2 seconds. The word “OFF” will appear and then disappear in the display and the control panel will be locked. During lockout, the word “OFF” will appear momentarily each time a cooking function pad is touched.
Using Your Oven — INCREASE & DECREASE Pad Speed You can change the speed of these pads in 5 increments. While the oven is off and the time of day shows in the display, press & hold the INCREASE and DECREASE pads and the TIMER pad for 2 or 3 seconds. A number from 1 to 5 will replace “0:00” in the display. 1 is slowest and 5 is fastest. Use INCREASE or DECREASE pad to change, then press CLEAWOFF to return to time-of-day display. Before Using Your Oven 1. Look at the controls.
Baking See Baking Guide. NOTE: Oven has controls for upper oven and lower oven. Be sure to set the correct control. Pads on the left side of panel are for the upper oven. Pads on the right side of panel are for the lower oven. The TIMER ON/OFF, COOK TIME, and STOP TIME pads can be used for either oven. Your oven temperature is controlled very accurately using an oven control system.
Baking (continued) How to Set Delay Start and Stop Quick Reminder: 1. Touch BAKE pad. 2. Touch INCREASE/ DECREASE pad to select oven temperature. 3. Touch COOK TIME pad. 4. Touch INCREASE/ DECREASE pad to set cooking time. 5. Touch STOP TIME pad. 6. Touch INCREASE/ DECREASE pad until desired Stop Time appears in display. Delay Start and Stop is setting the oven control to turn the oven on and bake until specific time. For example: Let’s say it’s 2:00 and dinner time is shortly after 7:00.
Baking Guide 1. Aluminum pans conduct heat quickly. For most conventional baking, light, shiny finishes generally give best results because ~hey help ~revent overbrowning. For best results, we recommend dull bottom surfaces for cake pans and pie plates. 2. Dark or non-shiny finishes and glass cookware generally absorb preheating gives best appearance and crispness. Although preheating is not necessmy with meats, it is preferred for baked goods. 4.
Roasting NOTE: Oven has controls for upper oven and lower oven. Be sure to set the correct control. Pads on the left side of panel are for the upper oven. Pads on the right side of panel are for the lower oven. The TIMER ON/OFF, COOK TIME, and STOP TIME pads can be used for either oven. Roasting is cooking by dry heat. Tender meat or poultry can be roasted uncovered in your oven. Roasting temperatures, which should be low and steady, keep spattering to a minimum.
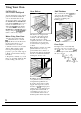
Roasting tith the Probe Correct Placement of the Temperature Probe Oven has a probe in the upper oven only. For many foods, especially roasts and poultry, internal food temperature is the best test for doneness. The temperature probe takes the guesswork out of roasting by cooking foods to the exact doneness you want. When the internal temperature of the food reaches the temperature you set, the oven automatically shuts off. PROBE I See Roasting Guide.
Roasting with the Probe How to Set the Oven When Using the Temperature Probe Oven has a probe in the upper oven only. Step 1: Insert probe into meat. (continued) ● mll ● B~: Step 3: Touch PROBE pad. Step 4: Press INCREASE or DECREASE pad to set probe temperature. Step 5: Touch BAKE pad. Step 6: Press INCREASE or DECREASE pad to set oven temperature. Step 7: When internal temperature of roast reaches number you have set, probe and oven turn off and oven signals. To stop signal, press timer CLEAR/OFF pad.
Broiling NOTE: Oven has controls for upper oven and lower oven. Be sure to set the correct control. Pads on the left side of panel are for the upper oven. Pads on the right side of panel are for the lower oven. The TIMER ON/OFF, COOK TIME, and STOP TIME pads can be used for either oven. Broiling is cooking food by intense radiant heat from the upper broil unit in the oven. You can broil in upper or lower oven. Most fish and tender cuts of meat can be broiled.
Broiling Guide . 1. Always use broiler pan and rack that comes with your oven. It is designed to minimize smoking and spattering by trapping juices in the shielded lower part of the pan. 2. Oven door should be open to the broil stop position for all foods. 3. For steaks and chops, slash fat evenly around outside edges of meat. To slash, cut crosswise through outer fat surface just to the edge of the meat. Use tongs to turn meat over to prevent piercing meat and losing juices. 4.
Care and Cleaning Proper care and cleaning are important so your oven will give you efficient and satisfactory service. Follow these directions carefully in caring for your oven to assure safe and proper maintenance. Oven Shelves Oven shelves may be cleaned with a mild abrasive cleanser following manufacturer’s directions. After cleaning, rinse the shelves with clean water and dry with a clean cloth. To remove heavy, burned-on soil, soapy metal pads may be used following manufacturer’s directions.
Operating the Self-Cleaning Oven — NOTE: Oven has controls for upper oven and lower oven. Be sure to set the correct control. Pads on the left side of panel are for the upper oven. Pads on the right side of panel are for the lower oven. The TIMER ON/OFF, COOK TIME, and STOP TIME pads can be used for either oven. Programmed Cleaning Time: 3 hours Prepare the Oven Before Setting the Controls Step 1: Remove the broiler pan, broiler rack, all cookware and any aluminum foil from the oven.
Operating the Self-Cleaning Oven To Stop a Clean. Cycle 1. Press the CLEAIUOFF pad. After Self-Cleaning Set the Oven for Cleaning If range is too hot and you start to set a clean cycle, the word “OFF” will appear in the display. Allow additional time for cooling before you try to set the cycle. NOTE: Only one oven at a time can be self-cleaned. “OFF” wiH appear in the display if you try to clean both ovens at the same time. 1. Close the oven door compl.etel.y. 2. Touch the CLEAN pad. 3.
@3rat@ the Self-C1eaning oven Questions and Answers Q. If my oven clock is not correct, can I still self-clean my oven? A. If the clock is not set to the correct time of day you will not be able to set a delay clean to end at a specific time. Q. Can I use commercial oven cleaners on any part of my self-cleaning oven? A. No cleaners or coatings should be used around any part of this oven.
Cleaning Guide NOTE: Let oven parts cool before touching or handling. PART MATERIALS TO USE Broiler Pan and Rack Soap and Water c Soap-Filled Scouring Pa{ ● Plastic Scouring Pad ● Dishwasher-Safe Drain fat and COOI pan and rack slightly. (Do not let soiled pan and rack stand in oven to cool.) Sprinkle on detergent. Fill the pan with warm water and spread a damp cloth or paper towel over the rack. Let pan and rack stand for a few minutes. Wash; scour if necessary. Rinse and dry.
-~— Questions? ~ Use This Problem Solver ~ ~ PROBLEM OVEN WILL NOT WORK OVEN LIGHT DOES NOT WORK OVEN DOES NOT COOK PROPERLY — POSSIBLE CAUSE AND REMEDY ● The circuit breaker in your house has been tripped, or a fuse has been blown. ● Oven controls not properly set. “ Light bulb is loose or defective. Tighten or replace. ● Control panel is broken. Call for service. ● Aluminum foil being used improperly in oven. s Oven vent blocked, ● Oven shelf not level. ● Incorrect cookware being used.
Wdll Be There With the purchase of your new GE appliance, receive the assurance that if you ever need information or assistance from GE, we’ll be there. All you have to do is call–toll-free! GEAnswer Center In-Home Repair Service Service Contracts 8WGE4ARES (800432-2737) You can have the secure feeling that GE Consumer Service will still be there after your warranty expires. Purchase a C~E contract. while your warranty is still in effect and yoLI’11 receive a substantial discount.
YOUR GE ELECTRIC OVEN WARRANTY .— Save proof of original purchase date such as your sales slip or cancelled check to establish warranty period. WHAT IS COVERED FULL ONE-YEAR WARRANTY For one year from date of original purchase, we will provide, free of charge, parts and service labor in your home to repair or replace any part d the oven that fails because of a manufacturing defect.