Owner’s Manual Triton XL™ Dishwashers www.GEAppliances.com EDW4000 Series GHDA960 Series GHDA980 Series GSD6100 Series GSD6200 Series GSD6300 Series GSD6500 Series GSD6600 Series GSD6700 Series GSD6800 Series GSD6900 Series SSD4900 Series Safety Instructions . . . . . . . 2, 3 Consumer Support Operating Instructions Consumer Support . . .Back Cover Product Registration . . . . .13, 14 Warranty . . . . . . . . . . . . . . . . . 15 Care and Cleaning . . . . . . . . . 10 Control Panel and Settings . .
Safety Instructions IMPORTANT SAFETY INFORMATION. READ ALL INSTRUCTIONS BEFORE USING. WARNING! For your safety, the information in this manual must be followed to minimize the risk of fire or explosion, electric shock, or to prevent property damage, personal injury, or death. WATER HEATER SAFETY Under certain conditions hydrogen gas may be produced in a water heater that has not been used for two weeks or more. HYDROGEN GAS IS EXPLOSIVE.
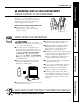
www.GEAppliances.com Safety Instructions WARNING! RISK OF CHILD ENTRAPMENT PROPER DISPOSAL OF THE DISHWASHER Junked or abandoned dishwashers are dangerous…even if they will sit for “just a few days.” If you are getting rid of your old dishwasher, please follow the instructions below to help prevent accidents. Before You Throw Away Your Old Dishwasher: Operating Instructions ■ Take off the door of the washing compartment or remove the door latch keeper (as shown).
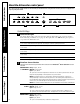
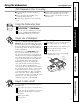
Safety Instructions About the dishwasher control panel. You can locate your model number on the tub wall just inside the door. Throughout this manual, features and appearance may vary from your model. 1 5 4 2 3 Operating Instructions Control Settings 1 Status Indicator Lights The Status display tells you what’s happening while the dishwasher is in operation and may flash, indicating a malfunction (see page 6). The lights will come ON indicating the sequence of operation the dishwasher is in.
www.GEAppliances.com Safety Instructions SPEED CYCLE Heavy 9.3 gal., 36 min. or Medium 7.2 gal., 36 min. SPEED WASH Light 5.7 gal., 33 min. (on some models) This cycle is for everyday dishes and glassware. CHINA CRYSTAL Heavy 10.0 gal., 49 min. (on some models) Medium 7.2 gal., 36 min. Light 7.2 gal., 36 min. This cycle is for lightly soiled china and crystal. RINSE ONLY Heavy 2.9 gal., 7 min. Light 1.4 gal., 3 min. For rinsing partial loads that will be washed later. Do not use detergent with this cycle.
Operating Instructions Safety Instructions About the dishwasher control panel. 4 Start 5 Clean Close the dishwasher door and select the cycle and desired enhancements. Touch the START/RESET pad to begin the cycle. Water fill begins, and approximately 60 seconds later the wash action begins. NOTE: The dishwasher remembers your last cycle so you don’t have to reprogram each time. When the dishwasher door is fully closed, the control panel lights will display the last settings you selected.
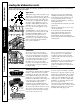
Using the dishwasher. www.GEAppliances.com Safety Instructions Dish Preparation Prior to Loading ■ No pre-rinsing of normal food soil is required. ■ Scrape off hard soils, including bones, toothpicks, skins and seeds. ■ Remove large quantities of any remaining food. ■ Remove leafy vegetables, meat trimmings, and excessive amounts of grease or oil. ■ Remove acidic food soils that can discolor stainless steel.
Safety Instructions Loading the dishwasher racks. For best dishwashing results, follow these loading guidelines. Features and appearance of racks and silverware baskets may vary from your model. Upper Rack Although the upper rack is for glasses, cups and saucers, pots and pans can be placed in this rack for effective cleaning. Cups and glasses fit best along the sides. This is also a secure place for dishwasher-safe plastics.
Loading place settings… www.GEAppliances.com Safety Instructions Follow these guidelines for loading 10 place settings. Features and appearance of racks and silverware baskets may vary from your model. Operating Instructions Upper Rack—10 place settings Lower Rack—10 place settings Follow these guidelines for loading 12 place settings. Features and appearance of racks and silverware baskets may vary from your model.
Safety Instructions Caring for the dishwasher. To clean the control panel, use a lightly dampened cloth, then dry thoroughly. To clean the exterior, use a good appliance polish wax. Never use sharp objects, scouring pads or harsh cleaners on any part of the dishwasher. Protect Against Freezing If your dishwasher is left in an unheated place during the winter, ask a service technician to: off electrical power to the 1 Cut dishwasher.
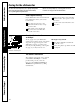
Before you call for service… www.GEAppliances.com Problem Possible Causes What To Do Control panel lights go off when you’re setting controls Time too long between touching of selected pads • Each pad must be touched within 30 seconds of the others. To relight, touch any pad again, or unlock and relatch door. Noise Some of the sounds you’ll hear are normal • Detergent cup opening.
Safety Instructions Before you call for service… Problem Possible Causes What To Do Spots and filming on glasses and flatware Extremely hard water Low inlet water temperature Overloading the dishwasher Improper loading Old or damp powder detergent Rinse agent dispenser empty Too little detergent • Use Jet-Dry ® and Cascade Rinse Aid® rinse agents to remove spots and prevent new film buildup.
GE Service Protection Plus™ GE, a name recognized worldwide for quality and dependability, offers you Service Protection Plus ™—comprehensive protection on all your appliances— No Matter What Brand! Benefits Include: • Backed by GE • All brands covered • Unlimited service calls • All parts and labor costs included • No out-of-pocket expenses • No hidden deductibles • One 800 number to call We’ll Cover Any Appliance. Anywhere. Anytime.
Consumer Product Ownership Registration Dear Customer: Thank you for purchasing our product and thank you for placing your confidence in us. We are proud to have you as a customer! Follow these three steps to protect your new appliance investment: 1 2 3 Complete and mail your Consumer Product Ownership Registration today. Have the peace of mind of knowing we can contact you in the unlikely event of a safety modification. Read your Owner’s Manual carefully.
GE Dishwasher Warranty. Staple your receipt here. Proof of the original purchase date is needed to obtain service under the warranty. One Year From the date of the original purchase Any part of the dishwasher which fails due to a defect in materials or workmanship. During this full one-year warranty, GE will also provide, free of charge, all labor and in-home service to replace the defective part.
Consumer Support. GE Appliances Website www.GEAppliances.com Have a question or need assistance with your appliance? Try the GE Appliances Website 24 hours a day, any day of the year! For greater convenience and faster service, you can now download Owner’s Manuals, order parts, catalogs, or even schedule service on-line. You can also “Ask Our Team of Experts™” your questions, and so much more... Schedule Service www.GEAppliances.com Expert GE repair service is only one step away from your door.
GE Appliances GSD6200G – GE Triton XL™ Built-In Dishwasher Built-In Dishwasher Dimensions (in inches) Wood Insert Cut-Out Dimensions (flat door models only) Installation Information (in inches) See Detail E for 3/4" Panel 25-1/4 24 Countertop This wall area must be free of pipes or wires 90° 24" MIN.
GE Appliances GSD6200G – GE Triton XL™ Built-In Dishwasher Features and Benefits Extras CLEAN SANITIZED Sensor ExtraClean RINSE ONLY Specification Revised 6/02 CHINA CRYSTAL Selections AL NORM H WAS POTS & PANS ANTI BACTERIA START RESET 8 2 4 DELAY HOURS EXTRA HOT WASH HEATED DRY CONTROLS DRY TO LOCK HEATED PRESS FOR 3 SECONDS XL Triton • ENERGY STAR® Qualified • Full-Length Flat Door • Tall-Over-Tall™ Towerless Rack Design: Tiered Upper Rack w/PVC Tines and Two Utility Shelves, Lower Rack
Installation Instructions Built-In Dishwasher If you have questions, call 800-GECARES or visit our website at: www.GEAppliances.com BEFORE YOU BEGIN • Read these instructions completely and carefully. • IMPORTANT – Observe all governing codes and ordinances. • Note to Installer – Be sure to leave these instructions for the consumer’s and local inspector’s use. • Note to Consumer – Keep these instructions with your Owner’s Manual for future reference.
Installation Preparation Trim Pieces PARTS SUPPLIED: ¨ Two #8 Phillips flat head wood screws, 5/8" long to secure dishwasher to underside of countertop or to side of cabinetry. (Taped to top or side of dishwasher.
Installation Preparation PREPARE DISHWASHER ENCLOSURE • The dishwasher must be installed so that drain hose is no more than 10 feet in length for proper drainage. • The dishwasher must be fully enclosed on the top, sides and back, and must not support any part of the enclosure. This Wall Area must be Free of Pipes or wires 34-1/2"±1/4" Underside of Countertop to Floor 5" 4" 5" 24" Min. Plumbing and Electric Service Must Enter Inside This Area 6" Figure A Floor MUST be Even With Room Floor.
Installation Preparation PREPARE ELECTRICAL WIRING FOR PERSONAL SAFETY: Remove house fuse or open circuit breaker before beginning installation. Do not use an extension cord or adapter plug with this appliance. Alternate Receptacle Location 18" 18" Electrical Requirements • This appliance must be supplied with 120V, 60 Hz., and connected to an individual properly grounded branch circuit, protected by a 15 or 20 ampere circuit breaker or time delay fuse.
Installation Instructions STEP 1 CHECK DOOR BALANCE PREPARE HOT WATER LINE • The line may enter from either side, rear or floor within the shaded area shown in Figure F. • The line may pass through the same hole as the electrical cable and drain hose. Or, cut an additional 1-1/2" dia. hole to accommodate the water line. If power cord with plug is used, water line must not pass through power cord hole. 4" 1-1/2" Dia.
Installation Instructions STEP 3 REMOVE TOEKICK STEP 5 INSTALL 90° ELBOW • Remove the two toekick screws. • Wrap 90° elbow with thread seal tape. • Install a 90° elbow onto the water valve. To ek ick Front of Dishwasher Remove 2 Toekick Screws Water Valve Bracket Figure I 90° Elbow Fill Hose STEP 4 INSTALL POWER CORD Skip this step if dishwasher will be direct wired or has a factory installed power cord.
Installation Instructions STEP 9 INSTALL TRIM PIECES STEP 7 INSERT DRAIN HOSE THROUGH CABINET Skip this step if trim is not supplied with the dishwasher. • Locate trim strips inside dishwasher. • Press trim onto the tub flange on each side. Start with the top edge, pressing on as you move towards the bottom. • Press the two top trim pieces on each side of the latch. • Open and close the door to check that trim does not bind and does not interfere with door latch.
Installation Instructions STEP 11 LEVEL DISHWASHER • Level the dishwasher by adjusting the four leveling legs individually. • If adjustment to the right rear leveling leg is required, loosen junction box bracket screw (through the access hole) and rotate bracket clockwise. IMPORTANT – Dishwasher must be level for proper dish rack operation and wash performance. • Place level on door and rack track inside the tub as shown to check that the dishwasher is Check level.
Installation Instructions Compression Nut STEP 13 CONNECT WATER SUPPLY Ferrule Connect water supply line to 90° elbow. • Slide compression nut, then ferrule over end of water line. • Insert water line into 90° elbow. • Slide ferrule against elbow and secure with compression nut. Hot Water 90° Elbow Supply Line IMPORTANT: Check to be sure that door spring does not rub or contact the fill hose or water supply line. Test by opening and closing the door. Re-route the lines if necessary.
Installation Instructions STEP 16 PRE-TEST CHECK LIST STEP 15 CONNECT POWER SUPPLY Review this list after installing your dishwasher to avoid charges for a service call that is not covered by your warranty. Skip this step if equipped with power cord Verify that power is turned off at the source. ¨ Check to be sure power is OFF. (If a power cord with plug is used, proceed to Step 16.) • Remove junction box cover. • Secure house wiring to the back of the junction box with a strain relief.
Installation Instructions STEP 17 DISHWASHER WET TEST STEP 18 REPLACE TOEKICK ¨ Turn on power supply (or plug power cord into outlet, if equipped). • Place toekick against the legs of the dishwasher. ¨ Latch door. ¨ Push “Normal Wash” button. ¨ Push start/reset pad once. ¨ Check to be sure that water enters the dishwasher. If water does not enter the dishwasher, check to be sure that water and power is turned on. ¨ Check for leaks under the dishwasher.
Pub. No. 31-30530 Dwg. No. 206C1559P070 SPECIFICATIONS SUBJECT TO CHANGE WITHOUT NOTICE (N.D.