
- General Electric Dishwasher User Manual


Installation Preparation
2
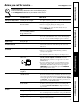
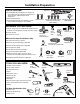
PARTS SUPPLIED:
¨ Two #8 Phillips flat head wood screws, 5/8" long to
secure dishwasher to underside of countertop or to
side of cabinetry. (Taped to top or side of
dishwasher.)
¨ Side and top trim pieces
¨ 2 Side mounting brackets with 4 mounting screws
(for non-wood countertops) on some models
MATERIALS YOU WILL NEED :
¨ Ferrule, compression nut and 90° Elbow (3/8"NPT external
thread on one end, opposite end sized to fit water supply)
¨ Thread seal tape
¨ UL Listed wire nuts (3)
Materials For New Installations Only:
¨ Air gap for drain hose, if required
¨ Waste tee for house plumbing, if applicable
¨ Electrical cable or power cord, if applicable
¨ Screw type hose clamps
¨ Strain relief for electrical connection.
¨ Hand shut-off valve (recommended)
¨ Water line 3/8" min. copper or 1/2" min. plastic
(plastic must be tested for temperature and pressure)
¨ Coupler for extending drain line, if applicable
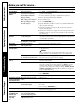
TOOLS YOU WILL NEED:
¨ Phillips head screwdriver
¨ 5/16" and 1/4" nutdriver
¨ 6" Adjustable wrench
¨ Level
¨ Carpenters square
¨ Measuring tape
¨ Safety glasses
¨ Flashlight
¨ Bucket to catch water when flushing the line
¨ 15/16" socket (optional for skid removal)
¨ Gloves
For New Installations Only:
¨ Tubing cutter
¨ Drill and appropriate bits
¨ Hole saw set
90° Elbow,
Ferrule and
Compression Nut
Wire Nuts (3)
Waste Tee
Electrical Cable
(or Power Cord, if applicable)
Hot Water line
Screw Type
Hose Clamps
Coupler
Hand
Shut-Off
Valve
Thread
Seal Tape
Trim Pieces
2 Wood Screws
4, #8 Pan head Phillips Screws
3/8" long for side mounting
(some models)
Air Gap
Hole Saw Set
Measuring Tape
Tubing Cutter
Drill and Bits
Phillips
Head
Screwdriver
15/16" Socket
1/4"
and 5/16"
Nutdriver
Safety Glasses
6" Adjustable
Wrench
Bucket
Flashlight
Gloves
Carpenters
Square
Strain Relief
Side Mounting Brackets
(some models)
Level