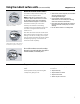
Ranges Electric Coil & Radiant GEAppliances.com Safety Information . . . . . . . . . . . 2-5 Operating Instructions Adjust the Oven Thermostat . . . . . . . . . . . . . . . . . . . . . . . . .20 Clock and Timer. . . . . . . . . . . . . . . . .14, 15 Oven . . . . . . . . . . . . . . . . . . . . . . . . . . . .11–13 Oven Controls . . . . . . . . . . . . . . . . . . . . 9, 10 Sabbath Feature . . . . . . . . . . . . . . . .18, 19 Selecting Types of Cookware . . . . . . . .8 Self-Cleaning . . . . . . . . . .
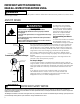
IMPORTANT SAFETY INFORMATION. READ ALL INSTRUCTIONS BEFORE USING. WARNING Read all safety instructions before using the product. Failure to follow these instructions may result in fire, electric shock, serious injury or death. ANTI-TIP DEVICE WARNING Rear Wall To reduce the risk of tipping the range, the range must be Tip-Over Hazard secured by a properly installed anti-tip bracket. See installation A child or adult can tip the range and be killed.
GEAppliances.com WARNING GENERAL SAFETY INSTRUCTIONS Use this appliance for its intended purpose as described in this Owner’s Manual. Never use your appliance for warming or heating the room. Be sure your appliance is properly installed and grounded by a qualified installer in accordance with the provided installation instructions. Do not touch the surface units, the heating elements or the interior surface of the oven. These surfaces may be hot enough to burn even though they are dark in color.
IMPORTANT SAFETY INFORMATION. READ ALL INSTRUCTIONS BEFORE USING. WARNING COOKTOP SAFETY INSTRUCTIONS Never leave the surface units unattended at medium or high heat settings. Boilovers cause smoking and greasy spillovers that may catch on fire. Never leave oil unattended while frying. If allowed to heat beyond its smoking point, oil may ignite, resulting in fire that may spread to surrounding cabinets. Use a deep fat thermometer whenever possible to monitor oil temperature.
GEAppliances.com WARNING OVEN SAFETY INSTRUCTIONS Stand away from the range when opening the oven door. Hot air or steam which escapes can cause burns to hands, face and/or eyes. Keep the oven vent unobstructed. Keep the oven free from grease buildup. Grease in the oven may ignite. Place oven racks in desired location while oven is cool. If rack must be moved while oven is hot, do not let pot holder contact hot heating element in oven.
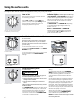
Using the surface units. Throughout this manual, features and appearance may vary from your model. How to Set Indicator Lights (on radiant glass models only) Push the knob in and turn in either direction to the setting you want. A HOT SURFACE or HOT COOKTOP (depending on model) indicator light will glow when any radiant element is hot and will remain on (even after the unit is turned off) until the surface is cooled to approximately 150°F.
Using the radiant surface units. (on some models) GEAppliances.com About the radiant surface units… SURFACE COOKING The radiant cooktop features heating units beneath a smooth glass surface. NOTE: A slight odor is normal when a new cooktop is used for the first time. It is caused by the heating of new parts and insulating materials and will disappear in a short time. Never cook directly on the glass. Always use cookware.
Selecting types of cookware. The following information will help you choose cookware which will give good performance on glass cooktops. Stainless Steel: Glass-ceramic: recommended usable, but not recommended Poor performance. May scratch the surface. Aluminum: Check pans for flat bottoms by using a straight edge. heavy weight recommended Good conductivity. Aluminum residues sometimes appear as scratches on the cooktop, but can be removed if cleaned immediately.
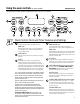
Using the oven controls. (on some models) GEAppliances.com Throughout this manual, features and appearance may vary from your model. or or Oven Control, Clock and Timer Features and Settings BAKE/TEMP RECALL Pad Touch this pad to select the bake function. BAKE Light Flashes while in edit mode³you can change the oven temperature at this point. Glows when the oven is in bake mode. START/ON Pad Must be touched to start any cooking or cleaning function.
Using the oven controls. (on some models) Oven Control, Clock and Timer Features and Settings AUTOMATIC OVEN Light (on some models) CLEAR/OFF Pad This lights anytime the oven has been programmed using the COOKING TIME OR START TIME functions. BROIL HI/LO Pad OVEN LIGHT ON/OFF or Pad Touch this pad to turn the oven light on or off. – Pad Short taps to this pad will decrease the time or temperature by small amounts. Touch and hold the pad to decrease the time or temperature by larger amounts.
Using the oven. GEAppliances.com Clock and Kitchen Timer (on some models) KITCHEN TIMER ON/OFF Pad Touch this pad to select the timer feature. CLOCK Pad Touch this pad before setting the clock. Display Shows the time of day and the time set for the timer, cook time or start time. SET +/- Pads Appearance may vary. These pads allow you to set the clock and timer. OVEN OFF Oven Temperature Knob (on some models) TEMP 0 20 AN CLE 300 3 50 250 Turn this knob to the setting you want.
Using the oven. Type of Margarine Will Affect Baking Performance! Most recipes for baking have been developed using high fat products such as butter or margarine (80% fat). If you decrease the fat, the recipe may not give the same results as with a higher fat product. Recipe failure can result if cakes, pies, pastries, cookies or candies are made with low fat spreads. The lower the fat content of a spread product, the more noticeable these differences become.
GEAppliances.com Broiling Guide The size, weight, thickness, starting temperature and your preference of doneness will affect broiling times. This guide is based on meats at refrigerator temperature. † The U.S. Department of Agriculture says “Rare beef is popular, but you should know that cooking it to only 140°F. means some food poisoning organisms may survive.” (Source: Safe Food Book. Your Kitchen Guide. USDA Rev. June 1985.
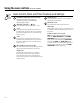
Using the clock and timer. (on some models) Not all features are on all models. To Set the Clock The clock must be set to the correct time of day for the automatic oven timing functions to work properly. The time of day cannot be changed during a timed baking or self-cleaning cycle. Touch the CLOCK pad twice. Touch the + or – pads. Make sure the clock is set to the correct time of day. Touch the START/ON pad until the time of day shows in the display. This enters the time and starts the clock.
Using the clock and timer. (on some models) GEAppliances.com Not all features are on all models. To Reset the Timer If the display is still showing the time remaining, you may change it by touching the KITCHEN TIMER ON/OFF or TIMER ON/OFF pad, then touch the + or – pads until the time you want appears in the display.
Using the timed baking and roasting features. (on some models) Do not lock the oven door with the latch during timed cooking. The latch is used for self-cleaning only. NOTE: Foods that spoil easily³such as milk, eggs, fish, stuffings, poultry and pork³should not be allowed to sit for more than 1 hour before or after cooking. Room temperature promotes the growth of harmful bacteria. Be sure that the oven light is off because heat from the bulb will speed harmful bacteria growth.
Special features of your oven control. GEAppliances.com Your new touch pad control has additional features that you may choose to use. The following are the features and how you may activate them. The special feature modes can only be activated while the display is showing the time of day. They remain in the control’s memory until the steps are repeated. When the display shows your choice, touch the START/ON pad. The special features will remain in memory after a power failure.
Using the Sabbath Feature. (on some models) (Designed for use on the Jewish Sabbath and Holidays) The Sabbath feature can be used for baking/roasting only. It cannot be used for broiling, self-cleaning or Delay Start cooking. NOTE: The oven light comes on automatically (on some models) when the door is opened and goes off when the door is closed. The bulb may be removed. See the Oven Light Replacement section. On models with a light switch on the control panel, the oven light may be turned on and left on.
Using the Sabbath Feature. (on some models) (Designed for use on the Jewish Sabbath and Holidays) GEAppliances.com How to Exit the Sabbath Feature Touch the CLEAR/OFF pad. If the oven is cooking, wait for a random delay period of approximately 30 seconds to 1 minute, until only is in the display. Touch and hold both the BAKE and BROIL HI/LO pads, at the same time, until the display shows SF. Tap the CLOCK pad until ON or OFF appears in the display.
$GMXVW WKH RYHQ WKHUPRVWDW³(DV\ WR GR \RXUVHOI You may find that your new oven cooks differently than the one it replaced. Use your new oven for a few weeks to become more familiar with it. If you still think your new oven is too hot or too cold, you can adjust the thermostat yourself. Do not use thermometers, such as those found in grocery stores, to check the temperature setting of your oven. These thermometers may vary 20–40°F.
Using the warming drawer. (on some models) Warming Drawer LO Control Knob (on models equipped with a knob) Push and turn the control knob to any desired setting. OFF HI MED GEAppliances.com NOTE: The warming drawer should not be used during a self-clean cycle. LO . . . . . . . . . . . . . . . . . . . . . . . . . . . . . . . . . Pies MED . . . . . . . . . . . . . . . . . . . . . . . . Casseroles HI . . . . . . . . . . . . . . . . . . . . . . . . . . . . . . . .
Using the warming drawer. (on some models) Temperature Selection Chart To keep several different foods hot, set the control to the food needing the highest setting. Place the items needing the highest setting on the bottom of the drawer and items needing less heat on the rack. The temperature, type and amount of food, Food Type Control Setting and the time held will affect the quality of the Bacon HI food.
Using the self-cleaning oven. (on some models) GEAppliances.com Never force the latch handle. Forcing the handle will damage the door lock mechanism. The oven door must be closed and all controls set correctly for the cycle to work properly. CAUTION: Never place cooking utensils, baking stones, foil, or any other items on the oven floor. Even items rated for high temperature may permanently adhere to the oven bottom or cause heat damage to the oven, flooring, or items in storage drawers.
Using the self-cleaning oven. (on some models) The oven door must be closed and all controls set correctly for the cycle to work properly. How to Delay the Start of Cleaning You can set the oven control to delay-start the oven, clean for a specific length of time and then turn off automatically. Make sure the clock shows the correct time of day. Follow the directions in the Before a Clean Cycle section. Latch the door. NOTE: Never force the latch.
GEAppliances.com Be sure electrical power is off and all surfaces are cool before cleaning any part of the range. WARNING Tip-Over Hazard A child or adult can tip the range and be killed. Verify the anti-tip bracket has been properly installed and engaged. Ensure the anti-tip bracket is re-engaged when the range is moved. Do not operate the range without the anti-tip bracket in place and engaged. Failure to follow these instructions can result in death or serious burns to children or adults.
Care and cleaning of the range. Oven Heating Elements Do not clean the bake element or the broil element. Any soil will burn off when the elements are heated. To clean the oven floor, gently lift the bake element. Clean with warm soapy water. On some models, the bake element is not exposed and is under the oven floor. If spillovers, residue or ash accumulate on the oven floor, wipe up before self-cleaning. Oven Racks Clean the oven racks with an abrasive cleanser or scouring pad.
GEAppliances.com Control Panel and Knobs Pull the knob straight off the stem. It’s a good idea to wipe the control panel after each use of the oven. Use a damp cloth to clean or rinse. For cleaning, use mild soap and water or a 50/50 solution of vinegar and water. For rinsing, use clean water. Polish dry with a soft cloth. Do not use abrasive cleansers, strong liquid cleaners, plastic scouring pads or oven cleaners on the control panel³they will damage the finish.
Care and cleaning of the range. Painted Surfaces (on some models) Painted surfaces include the sides of the range and the sides of the door trim. To clean the painted surfaces, use a hot, damp cloth with a mild detergent suitable for these surfaces. Use a clean, hot, damp cloth to remove soap. Dry with a dry, clean cloth. Do not use steel-wood pads, commercial oven cleaners, cleaning powders or other abrasive cleaners. They will damage the surface.
Cleaning the glass cooktop. (on some models) GEAppliances.com Normal Daily Use Cleaning Clean your cooktop after each spill. Use CERAMA BRYTE® Ceramic Cooktop Cleaner. ONLY use CERAMA BRYTE® Ceramic Cooktop Cleaner on the glass cooktop. Other creams may not be as effective. Shake the cleaning cream well. Apply a few drops of CERAMA BRYTE® Ceramic Cooktop Cleaner directly to the cooktop.
Cleaning the glass cooktop. (on some models) Metal Marks and Scratches Be careful not to slide pots and pans across your cooktop. It will leave metal markings on the cooktop surface. These marks are removable using the CERAMA BRYTE® Ceramic Cooktop Cleaner with the CERAMA BRYTE® Cleaning Pad for Ceramic Cooktops. If pots with a thin overlay of aluminum or copper are allowed to boil dry, the overlay may leave black discoloration on the cooktop.
Before you call for service… GEAppliances.com Troubleshooting Tips Save time and money! Review the charts on the following pages first and you may not need to call for service. Problem Possible Causes What To Do Surface units will not maintain a rolling boil or cooking is not fast enough Improper cookware being used. Use pans which are flat and match the diameter of the surface unit selected. Surface units do not work properly A fuse in your home may be blown or the circuit breaker tripped.
Before you call for service… Troubleshooting Tips Problem Possible Causes What To Do Light bulb is loose or defective. Tighten or replace the bulb. 2YHQ³$OO 0RGHOV Oven light does not work Switch operating light is broken. Call for service. Oven will not work Food does not bake or roast properly Food does not broil properly Plug on range is not completely inserted in the electrical outlet. Make sure electrical plug is plugged into a live, properly grounded outlet.
GEAppliances.com Problem Possible Causes What To Do Excessive condensation in the warming drawer Liquid in warming drawer. Remove liquid. Uncovered foods. Cover food with lid or aluminum foil. Temperature setting too high. Reduce temperature setting. Food dries out in the warming drawer Moisture escaping. Cover food with lid or aluminum foil. Oven temperature too hot or too cold Oven thermostat needs adjustment. See the Adjust the oven thermostat–Easy to do yourself! section.
Before you call for service… Troubleshooting Tips Problem Possible Causes What To Do “Burning” or “oily” odor emitting from the oven vent This is normal in a new oven and will disappear in time. To speed the process, set a self-clean cycle for a minimum of 3 hours. See the Using the self-cleaning oven section. Strong odor An odor from the insulation around the inside of the oven is normal for the first few times the oven is used. This is temporary.
Accessories. GEAppliances.com Looking For Something More? (Not all accessories are available for all models.) You can find these accessories and many more at GEAppliances.com (U.S.) or www.GEAppliances.ca (Canada), or call 800.626.2002 (U.S.) or 800.661.1616 (Canada) (during normal business hours). Have your model number ready.
Notes.
Notes. GEAppliances.
Notes.
Electric Range Warranty. All warranty service provided by our Factory Service Centers or an authorized Customer Care® technician. To schedule service, visit us on-line at GEAppliances.com, or call 800.GE.CARES (800.432.2737). Please have serial number and model number available when calling for service. Staple your receipt here. Proof of the original purchase date is needed to obtain service under the warranty.
Consumer Support. GE Appliances Website GEAppliances.com Have a question or need assistance with your appliance? Try the GE Appliances Website any day of the year! For greater convenience and faster service, you can now download Owner’s Manuals, order parts or even schedule service on-line. Schedule Service GEAppliances.com Expert GE repair service is only one step away from your door. Get on-line and schedule your service at your convenience any day of the year! Or call 800.GE.CARES (800.432.
Bobinas electricas y radiantes. Cocinas GEAppliances.com Instrucciones de Seguridad. . . . . . . . . . . . 2-5 Instrucciones de Operación Ajuste del termostato del horno . . . . . . . . . . . . . . . 21 Reloj y temporizador . . . . . . . . . . . . . . . . . . . . . . . . . . . 15 Horno . . . . . . . . . . . . . . . . . . . . . . . . . . . . . . . . . . . . . . .12-14 Controles de horno . . . . . . . . . . . . . . . . . . . . . . . . .10, 11 Función Sabbath . . . . . . . . . . . . . . . . . . . . . . . .
INFORMACIÓN IMPORTANTE DE SEGURIDAD. LEA TODAS LAS INSTRUCCIONES ANTES DE SU USO. ADVERTENCIA Lea todas las instrucciones de seguridad antes de utilizar este producto. No seguir estas instrucciones puede generar un incendio, una descarga eléctrica, lesiones corporales o la muerte. DISPOSITIVO ANTI-VOLCADURAS Para reducir el riesgo de volcar la cocina, ésta debe sujetarse mediante un soporte antiRiesgo de Volcaduras volcaduras con una adecuada Un niño o adulto pueden volcar la cocina y morir. instalación.
GEAppliances.com ADVERTENCIA INSTRUCCIONES GENERALES DE SEGURIDAD Use este aparato sólo con el objetivo para el que fue creado, como se describe en este Manual del Propietario. Asegúrese de que un técnico calificado realice una correcta instalación y puesta a tierra del artefacto de acuerdo con las instrucciones de instalación provistas. No intente reparar o cambiar ninguna pieza de su cocina a menos que esté específicamente recomendado en este manual.
INFORMACIÓN IMPORTANTE DE SEGURIDAD. LEA TODAS LAS INSTRUCCIONES ANTES DE SU USO. ADVERTENCIA INSTRUCCIONES DE SEGURIDAD DE LA ESTUFA Nunca deje las unidades de superficie sin atención en configuraciones de calor media o alta. Los alimentos que hierven y se derraman pueden provocar humo y derrames grasosos que pueden prenderse fuego. Nunca deje aceite sin atención mientras fríe.
GEAppliances.com ADVERTENCIA INSTRUCCIONES DE SEGURIDAD DEL HORNO Manténgase alejado de la cocina cuando abra la puerta del horno. El aire y el vapor calientes que salen de la cocina pueden provocar quemaduras en manos, rostro y/o ojos. Mantenga sin obstrucciones la ventilación del horno. Mantenga el horno libre de acumulaciones de grasa. La grasa dentro del horno puede prenderse fuego. Siempre coloque las bandejas del horno en la posición deseada mientras el horno esté frío.
Uso de unidades de la superficie. Es posible que las funciones y apariencias varíen con relación a su modelo a lo largo del manual. Cómo Configurar Presione la perilla hacia adentro y gire en cualquiera de las direcciones hasta la configuración que desee. Tanto en OFF (Apagado) como en HI (Alto), el control se ajusta en la posición. Es posible que escuche leves sonidos de ajuste durante la cocción, indicando que el control está manteniendo su configuración deseada.
GEAppliances.com Es posible que las funciones y apariencias varíen con relación a su modelo a lo largo del manual. Warming Zone Uso del Área para Calentar ADVERTENCIA RIESGO DE ENVENENAMIENTO CON COMIDA: Se pueden desarrollar bacterias cuando la comida esté a una temperatura inferior a los 140º. ■ Siempre comience con comida caliente.No use configuraciones en WARM (Caliente) para calendar comida fría. ■ No use la configuración WARM (Calentar) durante más de 2 horas.
Utilizando las unidades de superficie radiante. About the radiant surface units... La estufa radiante cuenta con unidades calentadoras debajo de una superficie lisa de vidrio. Nunca cocine directamente sobre el vidrio. Siempre utilice recipientes de cocción. Siempre coloque el recipiente en el centro de la unidad de superficie sobre la que está cocinando. NOTA: Un ligero olor es normal cuando una estufa nueva se utiliza por primera vez.
Cómo seleccionar tipos de utensilios para modelos de estufa de vidrio radiante. GEAppliances.com La siguiente información lo ayudará a elegir los recipientes de cocción que brindan un buen desempeño en estufas de vidrio. Ver el folleto sobre recipientes para usar con estufas de inducción. Acero inoxidable: Recomendado Aluminio: Verifique que los recipientes tengan bases planas utilizando una regla. Se recomienda de capa gruesa Buena conductividad.
Uso de los controles del horno. (en algunos modelos) (Es posible que las funciones y apariencias varíen con relación a su modelo a lo largo del manual.) or or Caracteristicas y ajustes del control de horno, reloj y temporizador Telca BAKE/TEMP RECALL Touch this pad to select the bake function. Tecla luz de horno BAKE light Flashes while in edit mode³you can change the oven temperature at this point. Glows when the oven is in bake mode.
Caracteristicas y ajustes del control de horno, reloj y temporizador Tecla START TIME ON /OFF (en algunos modelos) Use along with the COOKING TIME ON/OFF or SELF CLEAN pads to set the oven to start and stop automatically at a time you set. Luz Start Time Parpadeara mientras este en la funcion de edicion³usten puede cambiar el tiempo de inicio en este punto. Enciende cuando la funcion ha sido activada.
Cómo usar el horno. Clock and Kitchen Timer (on some models) KITCHEN TIMER ON/OFF Pad Touch this pad to select the timer feature. CLOCK Pad Touch this pad before setting the clock. Display Shows the time of day and the time set for the timer, cook time or start time. SET +/- Pads Appearance may vary. These pads allow you to set the clock and timer. OVEN OFF Oven Temperature Knob (on some models) TEMP 0 20 AN CLE 300 3 50 250 Turn this knob to the setting you want.
GEAppliances.com ¡El tipo de margarina utilizado modifica el horneado! La mayoría de las recetas de horneado incluyen productos de alto contenido graso tales como la manteca o la margarina (80% de grasa). Si se reduce el contenido de grasa, el resultado final puede ser diferente al esperado. Si se utilizan productos de bajo contenido graso en tortas, pasteles, masas, galletas o dulces, la receta puede fracasar. A menor contenido graso, mayores diferencias en el resultado final.
Cómo usar el horno. El tamaño, peso, grosor, temperatura inicial y el punto de cocción preferido afectarán los tiempos de asado. Esta guía está basada en carnes a temperatura de refrigerador. † El Ministerio de Agricultura de los EE.UU. afirma: “la carne de res jugosa es popular, pero debe saberse que al cocinarla a sólo 140°F (60°C) algunos organismos que provocan intoxicación alimentaria pueden sobrevivir”. (Fuente: Safe Food Book. Your Kitchen Guide. USDA Rev. Junio 1985.
Uso del reloj y del temporizador. (en algunos modelos) GEAppliances.com Para Configurar el Reloj El reloj se deberá configurar en la hora correcta del día para que las funciones automáticas del temporizador del horno funcionen de forma adecuada. La hora del día no se puede cambiar durante una cocción demorada o durante el ciclo de auto limpieza. Presione la tecla Clock (Reloj) dos veces. Para modelos sin la tecla Clock (Reloj): Mantenga presionadas las teclas + y – por 3 segundos.
Uso del reloj y del temporizador. (en algunos modelos) No todas las funciones corresponden a todos los modelos Para Reiniciar el Temporizador Si la pantalla aún muestra el tiempo restante, la puede cambiar presionando la tecla Kitchen Timer On/ Off (Encendido/Apagado del Temporizador de Cocina), y luego presionando las teclas numéricas hasta que el tiempo que desea aparezca en la pantalla.
Cómo utilizar las características de horneado y rostizado con temporizador. (en algunos modelos) GEAppliances.com No bloquee la puerta del horno con el cerrojo durante la cocción por tiempo. el cerrojo solo es usado en el ciclo de autolimpieza. NOTA: Los alimentos que se echan a perder con facilidad³como leche, huevos, pescado, rellenos, carne de ave y cerdo³no deben dejarse reposar por más de 1 hora antes y después de la cocción. La temperatura ambiente promueve el crecimiento de bacterias dañinas.
Características especiales de los controles del horno. Los nuevos controles con botones de toque cuentan con características adicionales. Las siguientes son las características y la manera en que usted puede activarlas. Los modos de características especiales sólo pueden activarse mientras la pantalla muestra la hora. Se conservan en la memoria de los controles hasta que se repitan los pasos. When the display shows your choice, touch the START/ON pad.
Cómo usar la función Sabbath. (en algunos modelos) (Diseñada para utilizarse durante el Sabbath u otras Fiestas Judías) GEAppliances.com La función Sabbath solamente puede utilizarse para hornear/rostizar. No es posible utilizarla para asado, auto-limpieza o cocción con inicio retardado. NOTA: La luz interior del horno se enciende automáticamente (en algunos modelos) cuando se abre la puerta y se apaga cuando se la cierra. Puede quitarse la bombilla de luz. Ver la sección de Reemplazo de bombilla de luz.
Cómo usar la función Sabbath. (en algunos modelos) (Diseñada para utilizarse durante el Sabbath u otras Fiestas Judías) Cómo desactivar la función Sabbath Presione el botón CLEAR/OFF (borrar/ apagado). Si el horno está cocinando, espere un período aleatorio de aproximadamente 30 segundos a 1 minuto, hasta que sólo aparezca en la pantalla. Presione y sostenga los botones BAKE (hornear) y BROIL HI/LO (asar alto/bajo) al mismo tiempo hasta que en la pantalla pueda verse SF.
Ajuste los termostatos--¡Fácil de realizar! GEAppliances.com Es posible que su nuevo horno cocine de manera diferente a la que usted se encuentra acostumbrado. Utilícelo durante algunas semanas para familiarizarse con sus funciones. Si luego de este período considera que la temperatura del horno es demasiado baja o demasiado alta, usted puede regular el termostato. No utilice termómetros, como los que se venden en las tiendas, para verificar la configuración de temperatura del horno.
Cómo usar el cajón calentador. (en algunos modelos) Warming Drawer Presione y gire la perilla del control a la posición deseada OFF LO Perilla de control (en modelos equipados con una perilla) HI MED NOTA: El cajon calentador no debe de estar en uso durante el ciclo de auto-limpieza. LO . . . . . . . . . . . . . . . . . . . . . . . . . . . . . Pasteles MED . . . . . . . . . . . . . . . . . . . . . . . . . . Cazuelas HI . . . . . . . . . . . . . . . . . . . . . . . . . . . . . . .
GEAppliances.com Tabla de selección de temperatura Para mantener calientes diferentes tipos de alimentos, establezca el control con la configuración más elevada. Coloque los articulos que necesiten mas calor en el piso del cajon y los articulos que necesiten menos calor en la parrilla. La temperatura, tipo, cantidad de alimentos y el tiempo en que se mantengan dentro del horno afectan la calidad de los alimentos.
Uso del horno con auto limpieza (en algunos modelos) Nunca fuerce la palanca del cerrojo. Forzar la palanca del cerrojo dañara el mecanismo del cerrojo. La puerta del horno debe estar cerrada y todos los controles programados correctamente para que el ciclo de auto-limpieza trabaje correctamente. PRECAUCIÓN: Nunca coloque utensilios de cocina, piedras de horneado, papel aluminio u otros artículos en el piso del horno.
GEAppliances.com Las puertas del horno debe estar cerradas y todos los controles deben estar correctamente configurados para que el ciclo funcione en forma adecuada. Cómo configurar un inicio retardado de limpieza Usted puede programar el control del horno para retrasar el inicio del horno, limpiar por un periodo específico de tiempo y detenerlo automáticamente. Asegúrese de que el reloj muestre la hora correcta. Siga las instrucciones mostradas en la sección de “Antes del ciclo de autolimpieza”.
Uso de la Limpieza al Vapor. (en algunos modelos) Asegurese que su aparato este desconectado y que todos los controles estén apagados y que todas las superficies se enfrién antes de limpiar cualquier parte de la cocina. ADVERTENCIA Riesgo de Volcaduras Un niño o adulto pueden volcar la cocina y morir. Verifique que el soporte anti-volcaduras se haya instalado y ajustado correctamente. Asegurese de que el soporte anti volcaduras sea reinstalado cuando se mueva la cocina.
Cuidado y limpieza de la cocina. GEAppliances.com Oven Heating Elements Do not clean the bake element or the broil element. Any soil will burn off when the elements are heated. To clean the oven floor, gently lift the bake element. Clean with warm soapy water. On some models, the bake element is not exposed and is under the oven floor. If spillovers, residue or ash accumulate on the oven floor, wipe up before self-cleaning.
Cuidado y limpieza de la cocina. Panel de Control y Perillas Empuje la perilla directamente hacia afuera del vástago. Una buena idea es limpiar el panel de control luego de cada uso del horno. Use una tela húmeda para limpiar o enjuagar. Para limpiar, use jabón suave y agua o una solución que sea mitad de vinagre y mitad de agua. Para enjuagar, use agua limpia. Pula en seco con una tela suave.
GEAppliances.com Superficies pintadas (en algunos modelos) Las superficies pintadas incluyen los lados de la cocina y la puerta, la parte superior del panel de control y el frente del cajón. Límpielas con jabón y agua o con una solución de agua y vinagre. No utilice limpiadores de horno comerciales, polvos limpiadores, esponjillas de acero o abrasivos potentes sobre cualquier superficie pintada.
Cómo limpiar la estufa de vidrio. (en algunos modelos) Limpieza normal de uso diario SÓLO utilice el limpiador de estufas cerámicas CERAMA BRYTE® en la estufa de vidrio. Otras cremas pueden no ser tan efectivas. Para mantener y proteger la superficie de su estufa de vidrio, siga estos pasos: Limpie la estufa después de cada derrame. Utilice el limpiador de estufas cerámicas CERAMA BRYTE®. Antes de usar la estufa por primera vez, límpiela con el limpiador de estufas cerámicas CERAMA BRYTE®.
GEAppliances.com Marcas de metal y rayones Tenga cuidado de no deslizar ollas y sartenes a través de su estufa. Dejará marcas de metal sobre la superficie de la estufa. Estas marcas pueden quitarse utilizando limpiador de estufas cerámicas CERAMA BRYTE® con el paño de limpieza CERAMA BRYTE® para estufas cerámicas. Si se permite que ollas con una capa fina de aluminio o cobre hiervan en seco, la capa puede dejar una decoloración negra en la estufa.
Antes de llamar al servicio técnico… Consejos para identificación y solución de problemas ¡Ahorre tiempo y dinero! Lea las tablas de las siguientes páginas y quizás no necesite llamar al servicio técnico. Problema Causas posibles Qué hacer Las unidades de superficie no mantienen un hervor constante o la cocción es lenta Se están utilizando recipientes de cocción inadecuados. Use recipientes de base plana y que se ajusten al diámetro de la unidad de superficie elegida.
GEAppliances.com Problema Causas posibles Qué hacer Horno- Todos los modelos La luz del horno no funciona El horno no funciona Los alimentos no se hornean o rostizan correctamente La bombilla de luz está floja o presenta defectos Ajuste o cambie la bombilla. La luz de funcionamiento del interruptor esta rota Llame al servicio técnico El enchufe de la cocina no está introducido del todo en el tomacorriente. El fusible puede haberse quemado o el interruptor de circuitos puede haber saltado.
Antes de llamar al servicio técnico… Consejos para identificación y solución de problemas Problema Causas posibles Qué hacer Condensación excesiva en el cajon calentador Liquido en el cajon calentador. Remueva líquidos. Alimentos descubiertos. Cubra los alimentos con una tapa o con papel aluminio. Temperatura ajustada demasiado alto. Reduzca la temperatura programada. Se seca la comida en el cajón calentador. Perdida de humedad. Cubra los alimentos con una tapa o con papel aluminio.
Accesorios. GEAppliances.com ¿Desea algo más? (No todos los accesorios se encuentran disponibles para todos los modelos) Usted puede encontrar estos accesorios y muchos más en GEAppliances.com, o llame al 800.626.2002 (en horario de trabajo normal). Tenga listo el número de modelo.
Notas.
GEAppliances.
Notas.
Garantía de cocina eléctrica de GE. Todos los servicios técnicos de garantía son otorgados por nuestros Centros de Servicio de Fábrica, o un técnico autorizado por Customer Care®. Para programar el servicio técnico, visítenos on-line en GEAppliances.com, o llame al 800.GE.CARES (800.432.2737). Tenga el número de serie y de modelo a mano cuando llame para solicitar un servicio técnico. Por el período de: GEAppliances.com Abroche su recibo aquí.
Apoyo al cliente. Página Web de GE Appliances GEAppliances.com ¿Tiene alguna pregunta sobre su electrodoméstico? ¡Pruebe la página Web de GE Appliances, 24 horas al día, cualquier día del año! Para mayor conveniencia y servicio más rápido, ya puede descargar los Manuales de los Propietarios, pedir piezas o incluso hacer una cita en línea para que vengan a realizar una reparación. Solicite una reparación GEAppliances.com El servicio de expertos GE está a tan sólo un paso de su puerta.