WASHERS SAFETY INFORMATION . . . . . . . . . .3 USING THE WASHER Getting Started . . . . . . . . . . . . . . . . . . . . . . 5 Loading . . . . . . . . . . . . . . . . . . . . . . . . . . . . . 11 CARE AND CLEANING . . . . . . . . . . . .12 INSTALLATION INSTRUCTIONS . . . . . . . . . . . . . . . . . . . . 14 OWNER’S MANUAL & INSTALLATION INSTRUCTIONS GFW148 ENGLISH/FRANÇAIS/ ESPAÑOL TROUBLESHOOTING TIPS. . . . . . 19 CONSUMER SUPPORT Warranty . . . . . . . . . . . . . . . . . . . . . . . . . . .
THANK YOU FOR MAKING GE APPLIANCES A PART OF YOUR HOME. Whether you grew up with GE Appliances, or this is your first, we’re happy to have you in the family. We take pride in the craftsmanship, innovation and design that goes into every GE Appliances product, and we think you will too. Among other things, registration of your appliance ensures that we can deliver important product information and warranty details when you need them. Register your GE appliance now online.
READ ALL INSTRUCTIONS BEFORE USING THE APPLIANCE WARNING To reduce the risk of death, fire, explosion, electric shock, or injury to persons when using your appliance, follow basic precautions, including the following: Ŷ Read all instructions before using the appliance. Ŷ DO NOT wash or dry articles that have been previously cleaned in, washed in, soaked in or spotted with gasoline, dry-cleaning solvents, or other flammable or explosive substances, as they give off vapors that could ignite or explode.
SAFETY INFORMATION IMPORTANT SAFETY INFORMATION READ ALL INSTRUCTIONS BEFORE USING THE APPLIANCE PROPER INSTALLATION This washer must be properly installed and located in accordance with the Installation Instructions before it is used. Ŷ Ensure that the hot water hose is connected to the “H” valve and the cold water hose is connected to the “C” valve.
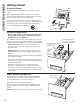
To reduce the risk of fire, electric shock, or injury to persons, read the IMPORTANT SAFETY WARNING INFORMATION before operating this appliance. Throughout this manual, features and appearance may vary from your model. Step 1 Step 2 Step 4 Step 3 Start Power Pause • Press the Start/Pause button. Liquid Only MAX MAX • Add fabric softener to the fabric softener dispenser; see page 10. • Loosely add items. Overloading may negatively impact wash performance.
USING THE WASHER Getting started B Wash Cycles The wash cycles are optimized for specific types of wash loads. The chart below will help you match the wash setting with the loads. The Gentle Wash™ lifters lightly tumble the clothes into the water and detergent solution to clean the load. Items to Wash Cycle Soil Level Wash Temp Spin Selection Options Available Cycle Details Cycle for normal, regular, or typical use for washing up to a full load of normally soiled cotton clothing. Normal Ex.
B Wash Cycles - Continued Items to Wash Cycle Soil Level Small loads of lightly soiled items that are needed in a hurry. Quick Wash Ex. Heavy Heavy Normal Light Ex. Light Cycle for washing a full load of normally soiled cotton clothing in cold water.
USING THE WASHER Getting started D Temp Temp Adjust to select the proper water temperature for the wash cycle. The rinse water is always cold to help reduce energy usage and reduce setting of stains and wrinkles. Follow the fabric manufacturer’s care label when selecting the wash temperature. To change the wash temperature, press the Temp button until you have reached the desired setting. You can choose between Cold, Cool, Warm, Hot or Extra Hot.
I Delay Wash Delay Wash Use to delay the start of your washer. 1. Choose your wash cycle and any options. 2. Press Delay Wash button. You can change the delay time in 1-hour increments (up to 24 hours) each time you press the Delay Wash button. Stop pressing the button when your desired time is displayed. 3. Press the Start/Pause button to start the countdown. The countdown time will be shown in the Est Time Remaining (Estimated Time Remaining) display.
USING THE WASHER Getting started Dispenser Drawer Slowly open the dispenser drawer by pulling it out until it stops. After adding laundry products, slowly close the dispenser drawer. Closing the drawer too quickly could result in early dispensing of the fabric softener or detergent. You may see water in the fabric softener compartment at the end of the cycle. This is a result of the flushing/siphoning action and is part of the normal operation of the washer. Use only HE High-Efficiency detergent.
Always follow fabric manufacturer’s care label when laundering. Sorting Wash Loads Sort by color (whites, lights, colors), soil level, fabric type (sturdy cottons, easy care, delicates) and whether the fabric produces lint (terry cloth, chenille) or collects lint (velveteen, corduroy). Wash lint producers such as cotton towels and socks separate from lint collectors including synthetic garments and dress pants. WARNING - Fire Hazard DO NOT wash fabrics soiled with flammable liquids or cleaning solvents.
CARE AND CLEANING Care and cleaning Water Supply Hoses Hoses connecting washer to faucet should be replaced every 5 years. Exterior Immediately wipe off any spills. Wipe with damp cloth. Wipe or dust spills or washing compounds with a damp cloth. Washer control panel and finishes may be damaged by some laundry pretreatment and stain remover products. Apply these products away from the washer. The fabric may then be washed and dried normally.
CARE AND CLEANING Care and cleaning Dispenser Drawer Area Detergent and fabric softener may build up in the dispenser drawer. Residue should be removed once or twice a month. • Remove the drawer by first pulling it out until it stops. Then reach back into the rear center of the drawer cavity and press down firmly on the lock tab, pulling out the drawer. • Remove all cups and inserts from the dispenser drawer.
Installation Instructions Washer If you have any questions, call GE Appliances at 800.GE.CARES (800.432.2737) or visit our Website at: GEAppliances.com In Canada, call 800.561.3344 or visit www.GEAppliances.ca BEFORE YOU BEGIN Read these instructions completely and carefully. • IMPORTANT – Save these instructions for local inspector’s use. • • • • • • • IMPORTANT – Observe all governing codes and ordinances. Note to Installer – Be sure to leave these instructions with the Consumer.
Installation Instructions CONNECTION DIMENSIONS ROUGH-IN DIMENSIONS BACK 21-3/4” (55.25 cm) FRONT 4-3/4” (12 cm) 23-7/16” (59.5 cm) 2-1/16” (5.24 cm) 31-1/32” (78.82 cm) *33-1/4” (84.5 cm) 29-3/4” (75.57 cm) SIDE 25-5/8” (65 cm) *33-1/4” (84.5 cm) *NOTE: Washer leveling legs retracted = 33-1/4” (84.5 cm) Washer leveling legs extended = 33-3/4” (85.5 cm) Stacked = 66-1/2” (169.
Installation Instructions UNPACKING THE WASHER Recycle or destroy the carton and WARNING plastic bags after the washer is unpacked. Make materials inaccessible to children. Children might use them for play. Cartons covered with rugs, bedspreads or plastic sheets can become airtight chambers causing suffocation. UNPACKING THE WASHER (cont.) 7. Insert shipping bolt hole covers into shipping bolt holes. 1. Cut and remove all packaging straps. 2.
Installation Instructions ELECTRICAL REQUIREMENTS WARNING - Electrical Shock Hazard Plug into a grounded 3-prong outlet. DO NOT remove ground prong. DO NOT use an adapter. DO NOT use an extension cord. Failure to follow these instructions can result in death, fire or electrical shock. CIRCUIT – Individual, properly polarized and grounded 15 or 20 amp circuit breaker or time-delay fuse. POWER SUPPLY – 2 wire plus ground, 120 Volt, single phase, 60 Hz, alternating current.
Installation Instructions INSTALLING THE WASHER INSTALLING THE WASHER (cont.) 1. Run some water from the hot and cold faucets to flush the water lines and remove particles that might clog the water valve screens. 7. Attach U-shaped hose guide to the end of the drain hose. Place the hose in a laundry tub or standpipe. 2. Remove the inlet hoses from the plastic bag. Remove black rubber washers from bag and insert into hose fitting before connecting to unit. 3.
Problem Not draining Not spinning Not tumbling Possible Cause Load is out of balance Redistribute clothes and run Rinse+Spin. Increase load size if washing small load containing heavy and light items. Pump filter may be clogged See the Care and Cleaning section on how to clean the Pump Filter. Drain hose is kinked or improperly connected Straighten drain hose and make sure washer is not sitting on it. Household drain may be clogged Check household plumbing. You may need to call a plumber.
TROUBLESHOOTING TIPS Troubleshooting Tips... Before you call for service Problem Incomplete cycle or timer not advancing Loud or unusual noise; vibration or shaking Possible Cause Automatic load redistribution Timer stops at 1 minute; machine has redistributed the load once or twice. This is normal operation. Do nothing; the machine will finish the wash cycle. Pump filter may be clogged See the Care and Cleaning section on how to clean the Pump Filter.
Problem Water does not enter washer or enters slowly Possible Cause What To Do Automatic self system checks After Start is pressed, the washer does several system checks. Water will flow several seconds after Start is pressed. Water valve screens are stopped up Turn off the water source and remove the water connection hoses from the upper back of the washer. Use a brush or toothpick to clean the screens in the machine. Reconnect the hoses and turn the water back on.
TROUBLESHOOTING TIPS Troubleshooting Tips... Before you call for service Problem Colored spots Possible Cause What To Do Incorrect use of fabric softener Check fabric softener package for instructions and follow directions for using dispenser. Dye transfer Sort whites or lightly colored items from dark colors. Promptly remove wash load from washer. Water temperature is incorrect Water supply is improperly connected Make sure hoses are connected to correct faucets.
GEAppliances.com All warranty service is provided by our Factory Service Centers, or an authorized Customer Care® technician. To schedule service online, visit us at www.geappliances.com/service_and_support/, or call GE Appliances at 800.GE.CARES (800.432.2737). Please have your serial number and your model number available when calling for service. Servicing your appliance may require the use of the onboard data port for diagnostics.
CONSUMER SUPPORT Consumer Support GE Appliances Website Have a question or need assistance with your appliance? Try the GE Appliances Website 24 hours a day, any day of the year! You can also shop for more great GE Appliances products and take advantage of all our on-line support services designed for your convenience. In the US: GEAppliances.
LAVEUSES CONSIGNES DE SÉCURITÉ . . . . . .3 UTILISATION DE LA LAVEUSE Comment démarrer . . . . . . . . . . . . . . . . . . . 5 Chargement . . . . . . . . . . . . . . . . . . . . . . . . . 11 ENTRETIEN ET NETTOYAGE . . . . . . . . . . . . . . . . . . . . . . . .12 INSTALLATION D’INSTALLATION. . . . . . . . . . . . . . . . . . GUIDE DE L’UTILISATEUR ET INSTRUCTION D’INSTALLATION GFW148 14 CONSEILS DE DÉPANNAGE . . . . . . . . . . . . . . . . . . . . . 19 SOUTIEN AU CONSOMMATEUR Garantie (Canada) . . .
NOUS VOUS REMERCIONS D’ACCUEILLIR GE APPLIANCES CHEZ VOUS Que vous ayez grandi avec GE Appliances ou qu’il s’agisse de votre première acquisition, nous sommes heureux de vous accueillir dans notre famille. Nous sommes fiers du savoir-faire, de l’innovation et de l’esthétique qui composent chaque appareil GE Appliances, et nous pensons que vous le serez aussi.
LIRE TOUTES LES CONSIGNES AVANT D’UTILISER L’APPAREIL AVERTISSEMENT Pour réduire les risques de décès, d'incendie, d'explosion, de choc électrique ou de blessures lorsque vous utilisez votre appareil, suivez les mesures de sécurité de base, notamment : Ŷ Lisez toutes les instructions avant d'utiliser l'appareil.
CONSIGNES DE SÉCURITÉ CONSIGNES DE SÉCURITÉ IMPORTANTES LIRE TOUTES LES CONSIGNES AVANT D’UTILISER L’APPAREIL INSTALLATION APPROPRIÉE Cette laveuse doit être installée conformément aux instructions d’installation avant d’être utilisée. Ŷ Assurez-vous que le boyau d’eau chaude est raccordé au robinet « H » et que le boyau d’eau froide est raccordé au robinet « C ».
Pour réduire le risque d’incendie, de choc électrique ou de blessure, lisez les AVERTISSEMENT CONSIGNES DE SÉCURITÉ IMPORTANTES avant de faire fonctionner cet appareil. Les caractéristiques et l'apparence de la cuisinière montrée dans ce manuel peuvent varier selon le modèle. Étape 1 Étape 2 Étape 3 Étape 4 Start Power Pause Liquid Only MAX • Si vous avez choisi un cycle de lavage, appuyez sur le bouton Start/ Pause (Départ/ Pause).
UTILISATION DE LA LAVEUSE Comment démarrer B Cycles de lavage Les cycles sont optimisés pour des catégories particulières de charges de lavage. Le tableau ci-dessous vous aidera à trouver un réglage de lavage qui correspond à votre charge de lavage. Les pales élévatrices Gentle Wash™ font délicatement culbuter les vêtements dans la solution d’eau et de détergent pour les laver. Temp. Lavage Sélection essorage Extrêm. sale Très sale Normal Légèrement Extrêm.
B Cycles de lavage - Suite Articles à laver Cycle Degré saleté Temp. Lavage Sélection essorage Chaude Tiède Frais Froide Max Rapide Modéré Lent Pas d’essorage Prewash (Prélavage) Extra Rinse (Rinçage supplémentaire) Delay Wash (Lavage en différé) My Cycle (Favori) Pour laver les brassées légèrement sales le plus rapidement possible. La durée du cycle est d’environ 33 minutes, selon les options choisies.
UTILISATION DE LA LAVEUSE Comment démarrer D Temp Temp (Température) Ajustez pour choisir la bonne température de l’eau pour le cycle de lavage. L’eau de prélavage et de rinçage est toujours froide pour réduire l’utilisation d’énergie et diminuer la fixation des taches et les froissements. Suivez l’étiquette du fabricant pour choisir la température de lavage. Pour changer la température de lavage, appuyez sur le bouton Temp (température de lavage) jusqu’au réglage désiré.
I Delay Wash Delay Wash (Lavage en différé) Pour différer le démarrage de votre laveuse. 1. Choisissez votre cycle de lavage et toute option. 2. Appuyez sur le bouton Delay Wash (Lavage en différé). Vous pouvez changer la durée du délai par incréments de 1 heure (jusqu’à 24 heures) à chaque pression du bouton Delay Wash (Lavage en différé). Relâchez le bouton lorsque le durée voulue est affichée. 3. Appuyez sur le bouton Start/Pause (Départ/Pause) pour lancer le décompte.
UTILISATION DE LA LAVEUSE Comment démarrer Tiroir distributeur Ouvrez lentement le tiroir distributeur en le tirant jusqu’à son arrêt final. Après avoir ajouté vos produits de lavage, fermez lentement le tiroir distributeur. Si vous fermez le tiroir trop vite, vous risquez de distribuer l’adoucissant ou le détergent trop tôt. Vous pouvez voir de l’eau dans le compartiment d’adoucissant à la fin du cycle.
Respectez toujours l’étiquette d’entretien du fabricant lors de la lessive. Tri du linge Triez le linge par couleur (blancs, clairs, couleurs), degré de saleté, type de tissu (coton robuste, tissu à entretien facile, tissu délicat) et en fonction de la charpie qu’il produit (tissu éponge, tissu chenille) ou qu’il ramasse (velvétine, velours côtelé).
ENTRETIEN ET NETTOYAGE Entretien et nettoyage Flexibles d’alimentation d’eau Les Flexibles d’alimentation d’eau connectant la laveuse au robinet devraient être remplacer tous les cinq ans. Extérieur Essuyez immédiatement tout débordement. Essuyez avec un linge humide. Essuyez ou époussetez les renversements ou les produits de lavage avec un linge humide. Le panneau de commande et le fini de la laveuse peuvent être endommagés par certains détachants et produits de prétraitement.
ENTRETIEN ET NETTOYAGE Entretien et nettoyage Emplacement du tiroir distributeur Le détergent et l’adoucisseur peuvent s’amasser dans le tiroir distributeur. Il faut enlever ces résidus une ou deux fois par mois. • Enlevez le tiroir en le tirant d’abord jusqu’à ce qu’il s’arrête. Puis atteignez le centre arrière de la cavité du tiroir et appuyez fermement sur la patte de verrouillage, en tirant le tiroir. • Retirez toutes les tasses et les insertions du tiroir distributeur.
Instructions d’installation Laveuse Des questions? Appelez le 800.561.3344 ou Visitez notre site Web à l’adresse : www.electromenagersge.ca AVANT DE COMMENCER Lisez ces instructions entièrement et soigneusement. • • • • • • • Niveau Clé (fournie) IMPORTANT – Conservez ces instructions pour l’inspecteur local. • OUTILS NÉCESSAIRES POUR INSTALLER LA LAVEUSE Pince multiprise à crémaillère IMPORTANT – Observez tous les codes et les ordonnances en vigueur.
Instructions d’installation DIMENSIONS DE CONNEXION ARRIÈRE 55,25 cm (21-3/4 po) DIMENSIONS APPROXIMATIVES AVANT 12 cm (4-3/4 po) 59,5 cm (23-7/16 po) 5,24 cm (2-1/16 po) 78.82 cm (31 1/32 po) *84,5 cm (33-1/4 po) 75.
Instructions d’installation DÉBALLAGE DE VOTRE LAVEUSE Recyclez ou détruisez AVERTISSEMENT le carton et les sacs en matière plastique après avoir déballé votre laveuse. Mettez ces matériaux hors de la portée des enfants. Les enfants peuvent être tentés de les utiliser pour jouer. Les cartons recouverts de tapis, de couve-lit, ou de drap en matière plastique peuvent devenir des chambres hermétiquement closes risquant d’étouffer des enfants. DÉBALLAGE DE VOTRE LAVEUSE (suite) 7.
Instructions d’installation EXIGENCES ÉLECTRIQUES AVERTISSEMENT - Risque d’électrocution Brancher à une prise de courant à 3 broches mise à la terre. NE PAS retirer la broche de contact de mise à la terre. N’UTILISEZ pas de rallonge électrique. N’UTILISEZ pas d’adaptateur de prise. Le non-respect de ces instructions pourrait entraîner un décès, un incendie ou un choc électrique. CIRCUIT - Individuel, correctement polarisé et mis à la terre, disjoncteur ou fusible temporisé de 15 ou 20 ampères.
Instructions d’installation INSTALLATION DE LA LAVEUSE INSTALLATION DE LA LAVEUSE (suite) 1. Faites couler un peu d’eau des robinets chaud et froid pour purger les tuyaux d’eau et enlever les particules qui peuvent boucher les tamis de robinet d’eau. 7. Attachez le guide de tuyau en U à l’extrémité du tuyau de vidange. Placez le tuyau dans une cuve à lessive ou un tuyau vertical. 2. Enlevez les tuyaux d’entrée d’eau du sac en matière plastique.
Problème Pas de vidange Pas d’essorage Pas de culbutage Fuite d’eau Causes possibles La charge est déséquilibrée Correctifs Redistribuez les vêtements et faites un Rinse+Spin (Rinçage + Essorage). Augmentez la taille de la charge si vous lavez une petite charge contenant des articles légers et lourds. Le filtre de la pompe à eau est peut-être bouché Reportez-vous Entretien et nettoyage pour le nettoyage du Filtre de la pompe.
CONSEILS DE DÉPANNAGE Conseils de Dépannage...Avant d’appeler un réparateur Problème Cycle incomplet ou minuterie arrêtée Secousses, vibrations ou bruits forts ou inhabituels Pas de puissance/ la laveuse ne fonctionne pas ou semble hors tension Causes possibles Correctifs Redistribution automatique de la charge La minuterie s’arrête après une minute. La laveuse répartit la charge à une ou deux reprises. C’est un fonctionnement normal. Ne faites rien, la machine terminera le cycle de lavage.
Problème Causes possibles Correctifs La porte se débloque ou la machine ne fonctionne pas lorsque vous appuyez sur Start C’est normal. Les laveuses à chargement frontal démarrent différemment de celles à chargement par le haut, et il faut plusieurs secondes pour vérifier le système. La porte se verrouille et se déverrouille Fonctionnement incorrect Ouvrez et fermez simplement la porte fermement, puis appuyez sur Start (Marche).
CONSEILS DE DÉPANNAGE Conseils de Dépannage...Avant d’appeler un réparateur Problème Taches colorées Causes possibles Correctifs Utilisation incorrecte d’assouplisseur Inspectez le sachet d’assouplisseur de tissu pour des instructions et suivez les directives d’utilisation du distributeur. Transfert de colorant Séparez le blanc et les couleurs claires des couleurs foncées.
www.electromenagersge.ca Toutes les réparations sous garantie seront effectuées par nos centres de réparation ou nos réparateurs autorisés. Appelez le 1.800.561.3344. Veuillez fournir le numéro de série et le numéro de modèle lorsque vous appelez pour obtenir le service. Pour le diagnostic, la réparation de votre appareil peut nécessiter l’utilisation du port de données embarqué. Celui-ci permet au technicien de réparation GE Appliances de diagnostiquer rapidement des problèmes avec votre appareil.
SOUTIEN AU CONSOMMATEUR Soutien au consommateur Site Web de GE Appliances Vous avez une question ou vous avez besoin d’aide pour votre appareil électroménager? Visitez le site Web de GE Appliances 24 heures par jour, tous les jours de l’année! Vous pouvez aussi y trouver d’autres formidables produits GE Appliances et tirer avantage de tous nos services d’assistance en ligne. Aux États-Unis : GEAppliances.com Au Canada : GEAppliances.
LAVADORAS INFORMACIÓN DE SEGURIDAD . . . . . . . . . . . . . . . . . . . . . 3 USAR LA LAVADORA Puesta en Marcha . . . . . . . . . . . . . . . . . . . . . .5 Carga . . . . . . . . . . . . . . . . . . . . . . . . . . . . . . . 11 MANUAL DEL PROPIETARIO E INSTALACIÓN GFW148 CUIDADO Y LIMPIEZA . . . . . . . . . . . . .12 INSTRUCCIONES DE INSTALACIÓN . . . . . . . . . . . . . . . . . . . . . 14 CONSEJOS PARA LA SOLUCIÓN DE PROBLEMAS . . . . . . . . . . . . . . . . . . 19 ATENCIÓN AL CLIENTE Garantía (EE.
GRACIAS POR HACER QUE GE APPLIANCES SEA PARTE DE SU HOGAR. Ya sea que haya crecido usando GE Appliances, o que ésta es su primera vez, nos complace tenerlo en la familia. Sentimos orgullo por el nivel de arte, innovación y diseño de cada uno de los electrodomésticos de GE Appliances, y creemos que usted también. Entre otras cosas, el registro de su electrodoméstico asegura que podamos entregarle información importante del producto y detalles de la garantía cuando los necesite.
LEA TODAS LAS INSTRUCCIONES ANTES DE USAR Para reducir el riesgo de muerte, incendio, explosión, descargas eléctricas o lesiones sobre ADVERTENCIA las personas al usar su electrodoméstico, siga las precauciones básicas, incluyendo lo siguiente Ŷ Lea todas las instrucciones antes de usar este electrodoméstico.
INFORMACIÓN DE SEGURIDAD INFORMACIÓN IMPORTANTE DE SEGURIDAD LEA TODAS LAS INSTRUCCIONES ANTES DE USAR INSTALACIÓN CORRECTA La lavadora se debe instalar y colocar correctamente de acuerdo con las instrucciones de instalación, antes de utilizarla. Ŷ Asegúrese de que la manguera de agua caliente esté conectada a la válvula “H” y que la manguera de agua fría esté conectada a la válvula “C”.
Para reducir el riesgo de incendios, descargas eléctricas o heridas, lea las INFORMACIÓN ADVERTENCIA IMPORTANTE DE SEGURIDAD antes de utilizar este electrodoméstico. Es posible que las funciones y apariencias varíen con relación a su modelo a lo largo del manual. Paso 1 Paso 2 Paso 3 Paso 4 Start Power Pause • Si seleccionó un ciclo de lavado, presione el botón Start/ Pause (iniciar/ pausa).
USAR LA LAVADORA Puesta en Marcha B Ciclos de lavado Los ciclos de lavado se han optimizado para tipos específicos de cargas de lavado. La siguiente tabla le ayudará a combinar el tipo de lavado con las cargas. Los elevadores Gentle Wash™ hacen girar la ropa suavemente en la solución de agua y detergente para limpiar la carga. Prendas a Lavar Ciclo Ciclo para el uso normal, regular o típica para el lavado hasta una carga completa de ropa de algodón de suciedad normal. Normal Blanca y ropa de cama.
B Ciclos de lavado - Continuado Prendas a Lavar Ciclo Para pequeñas cantidades de prendas con poca suciedad que se necesitan de forma rápida. Quick Wash (Lavado Rápido) Ciclo de lavado para una carga completa de ropa de algodón normalmente sucia en agua fría.
USAR LA LAVADORA Puesta en Marcha D Temp Temp (Temperatura) Ajuste este control para seleccionar la temperatura del agua adecuada para el ciclo de lavado. El agua de prelavado y enjuagado está siempre fría para poder reducir el consumo de energía y las manchas y arrugas. Siga las indicaciones de la etiqueta de cuidado del fabricante del tejido al seleccionar la temperatura de lavado. Para cambiar la temperatura de lavado, pulse el botón Temp (Temperatura) hasta obtener el valor deseado.
I Delay Wash Delay Wash (Retrasar Lavar) Utilícelo para retardar el inicio de su lavadora. 1. Elija su ciclo de lavado y cualquier otra opción. 2. Presione el botón Delay Wash (Retrasar Lavar). Usted puede cambiar el tiempo de retardo en unidades de 1 hora (hasta 24 horas) cada vez que presiona el botón Delay Wash (Retrasar Lavar). Deje de presionar el botón cuando vea el tiempo deseado. 3. Presione el botón de Start/Pause (Inicio/Pausa) para iniciar la cuenta regresiva.
USAR LA LAVADORA Puesta en Marcha Depósito de detergente Abra lentamente el depósito de detergente tirando de él hasta que se detenga. Tras añadir los productos de lavado, ciérrelo despacio. Si cierra el depósito demasiado rápido, puede provocar que el suavizante o el detergente se administren antes de tiempo. Es posible que observe agua en lo compartimento de suavizante al final del ciclo. Este es el resultado de la acción de trasvase y forma parte del funcionamiento normal de la lavadora.
Siempre siga las instrucciones del fabricante de la ropa cuando lave. Separación de cargas Separe por color (blancos, claros, colores), nivel de suciedad, tipo de tela (algodones rústicos, limpieza fácil, delicados) y si la tela produce pelusa (tela de toalla, felpilla) o junta pelusa (terciopelo, pana). Lave los productores de pelusas tales como toallas de algodón y medias aparte de los recolectores de pelusas, incluyendo prendas sintéticas y pantalones de vestir.
CUIDADO Y LIMPIEZA Cuidado y limpieza Mangueras de suministro de aguas Las mangueras que conectan la lavadora al grifo deben cambiarse cada 5 años. Exterior Limpie inmediatamente cualquier vertido. Limpie con un paño húmedo. Limpie los derrames o compuestos de limpieza con un paño húmedo. El panel de control y los acabados de la lavadora pueden resultar dañados por productos utilizados como tratamiento previo al lavado y removedores de manchas. Aplique estos productos lejos de la lavadora.
CUIDADO Y LIMPIEZA Cuidado y limpieza Zona del depósito de detergente El detergente y el suavizante pueden acumularse en el depósito de detergente. Los residuos deben eliminarse una o dos veces al mes. • Saque el depósito tirando de él hasta que se detenga. Luego acerque la mano a la parte central trasera de la cavidad del cajón y presione firmemente sobre la lengüeta de bloqueo, quitando el cajón. • Quite todos los recipientes y accesorios del cajón dosificador.
Instrucciones de instalación Lavadora Si tiene alguna pregunta, llame GE Appliances a 800.GE.CARES (800.432.2737) o visite nuestro sitio Web en: GEAppliances.com ANTES DE COMENZAR Lea detenidamente todas las instrucciones. • IMPORTANTE – Guarde estas HERRAMIENTAS NECESARIAS PARA LA INSTALACIÓN DE LA LAVADORA Nivel Llave (provista) instrucciones para uso del inspector local.
Instrucciones de instalación DIMENSIONES DE CONEXIÓN DIMENSIONES APROXIMADAS PARTE POSTERIOR 21-3/4” (55,25 cm) PARTE DELANTERA 4-3/4” (12 cm) ´ FP ´ (5,24 cm) 31 1/32” (78,82 cm) *33-1/4” (84,5 cm) ´ (75,57 cm) COSTADO 25-5/8” FP *33-1/4” (84,5 cm) *NOTA: Patas niveladoras de la lavadora retraídas = 33-1/4” (84,5 cm) Patas niveladoras de la lavadora desplegadas = 333/4” (85,5 cm) $SLODGD ´ FP 49-90570-1 15
Instrucciones de instalación DESEMBALAJE DE LA LAVADORA Recicle o deseche la caja ADVERTENCIA de cartón y las bolsas de plástico una vez que haya desembalado la lavadora. Mantenga estos materiales fuera del alcance de los niños, pues éstos podrían utilizarlos para jugar. Las cajas de cartón cubiertas con mantas, colchas o láminas de plástico pueden convertirse en cámaras de aire herméticas y producir asfixia. DESEMBALAJE DE LA LAVADORA (cont.) 7.
Instrucciones de instalación REQUISITOS ELÉCTRICOS ADVERTENCIA - Riesgo de Descarga Eléctrica Enchufe a un tomacorriente de 3 clavijas con conexión a tierra. NO retire la terminal de tierra. NO UTILICE un cable de extensión. NO UTILICE un enchufe adaptador con este artefacto. Si no se siguen estas instrucciones, se podrá producir la muerte, incendio o descargas eléctricas. CIRCUITO – individual, correctamente polarizado y FRQHFWDGR D XQ GLV\XQWRU GH R DPSHUHV R D XQ fusible con retardo.
Instrucciones de instalación INSTALACIÓN DE LA LAVADORA INSTALACIÓN DE LA LAVADORA (cont.) 1. Deje correr un poco de agua de los grifos de agua caliente y fría para purgar las tuberías de agua y eliminar las partículas que puedan obstruir los filtros de la válvula de agua. 2. Saque las tuberías de entrada de la bolsa de plástico. Quite las arandelas negras de goma de la bolsa y colóquelas dentro del accesorio de la manguera antes de conectar la unidad. 3.
Problema No hay drenaje No hay rotación No hay giro Causas posibles La carga está desequilibrada Solución Redistribuya las prendas y accione el Rinse+Spin (Enjuague+Centrifugado). Aumente el tamaño de la carga si lava una carga pequeña que contiene elementos pesados y livianos. El filtro de la bomba podría estar obstruido Ver la Cuidado y limpieza sobre cómo limpiar el Filtro de la bomba.
ANTES DE SOLICITAR EL SERVICIO TÉCNICO Consejos para la solución de problemas Problema Ciclo incompleto o el emporizador no avanza Solución Redistribución de carga automática El temporizador se detiene a 1 minuto, la máquina ha distribuido la carga una or dos veces. Esto es una operación normal. No haga nada; la máquina finalizará el ciclo de lavado. El filtro de la bomba podría estar obstruido Ver la Cuidado y limpieza sobre cómo limpiar el Filtro de la bomba.
Problema Causas posibles Solución La puerta no se destraba o presiona Start (inicio) y la máquina no funciona Esto es normal Las lavadoras con tapa frontal comienzan su funcionamiento de manera diferente que las lavadoras con carga superior, y toma varios segundos realizar un control del sistema. La puerta se bloqueará y desbloqueará. Funcionamiento incorrecto Simplemente abra y cierre la puerta firmemente y luego presione Start (Iniciar).
ANTES DE SOLICITAR EL SERVICIO TÉCNICO 22 Consejos para la solución de problemas Problema Manchas de color Causas posibles Solución Uso incorrecto del suavizante de telas Consulte el paquete del suavizante de telas sobre las instrucciones y siga las indicaciones de uso del depósito. Dye transfer Separe los blancos o los colores claros de los colores oscuros. Quite rápidamente la carga de la lavadora.
GEAppliances.com Por el Período de: Se sustituirá: Un Año Desde la fecha de compra original Cualquier pieza de la lavadora que falle debido a un defecto de los materiales o la mano de obra. Durante esta garantía limitada de un año, también ofrecemos, en forma gratuita, toda la mano de obra y los costos de servicio para reemplazar la pieza defectuosa. Qué No Cubrirá GE Appliances: Ŷ Viajes del personal de servicio a su casa para Ŷ Ŷ Ŷ Ŷ enseñarle cómo usar su producto.
SOPORTE PARA EL CONSUMIDOR Soporte para el Consumidor Sitio Web de GE Appliances ¿Desea realizar una consulta o necesita ayuda con su electrodoméstico? ¡Intente a través del Sitio Web de GE Appliances las 24 horas del día, cualquier día del año! Usted también puede comprar más electrodomésticos maravillosos de GE Appliances y aprovechar todos nuestros servicios de soporte a través de Internet, diseñados para su conveniencia. En EE.UU.: GEAppliances.