Washers GEAppliances.com Safety Instructions ............................. 2, 3 Operating Instructions Control Panels ..................................................... 4 Control Settings ..............................................5, 6 Features .............................................................6–9 Loading and Using the Washer........... 9, 10 Cleaning the Washer ............................. 11–13 Installation Instructions ...........
WARNING! For your safety, the information in this manual must be followed to minimize the risk of fire or explosion, electric shock, or to prevent property damage, personal injury or loss of life. The instructions in this manual and all other literature included with this washer are not meant to cover every possible condition and situation that may occur. Good, safe practices and caution MUST be applied when installing, operating and maintaining any appliance.
WHEN USING THE WASHER Never reach into washer while it is moving. Wait until the machine has completely stopped before opening the door. as wax, oil, paint, gasoline, degreasers, drycleaning solvents, kerosene, etc.) which may ignite or explode. Do not add these substances to the wash water. Do not use or place these substances around your washer or dryer during operation. if it is damaged, malfunctioning, partially disassembled, or has missing or broken parts, including a damaged cord or plug.
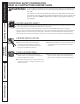
Find the illustration that closely matches your model and see the cycle descriptions starting on page 6 for details. 14 13 1 Operating Instructions Safety Instructions About the washer control panel.
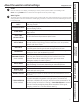
1 GEAppliances.com Power Press to “wake up” the display. If the display is active, press to put the washer into standby mode. NOTE: Pressing POWER does not disconnect the appliance from the power supply. 2 Wash Cycles The wash cycles are optimized for specific types of wash loads. The chart below will help you match the wash setting with the loads. The GentleClean™ lifters lightly tumble the clothes into the water and detergent solution to clean the load.
3 Soil Level Changing the SOIL LEVEL increases or decreases the wash time to remove different amounts of soil. To change the SOIL LEVEL, press the SOIL LEVEL button until you have reached the desired setting. You can choose between Extra Light, Light, Normal or Heavy soil. Speed 4 Spin Changing the SPIN SPEED changes the final spin speed of the cycles. Always follow the fabric manufacturer’s care label when changing the SPIN SPEED.
NOTE: Features may not be available on all washer models. 9 10 Extra Rinse Use an extra rinse when additional rinsing is desired to remove excess dirt and detergent from soiled loads. Delay Start You can delay the start of a wash cycle for 10–18 hours, depending on the model. Press the DELAY START button to choose the number of hours you want to delay the start of the cycle, then press the START button. The machine will count down and start automatically at the correct time.
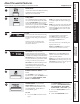
The Dispenser Drawer Slowly open the dispenser drawer by pulling it out until it stops. After adding laundry products, slowly close the dispenser drawer. Closing the drawer too quickly could result in early dispensing of the bleach, fabric softener or detergent. Operating Instructions Safety Instructions About the washer features. Use only HE High-Efficiency detergent. The Prewash Compartment Only use the Prewash Compartment if you are selecting the Prewash cycle for heavily soiled clothes.
The Fabric Softener Compartment Dilute with water to the maximum fill line. If desired, pour the recommended amount of liquid fabric softener into the compartment labeled “FABRIC SOFTENER.” Use only liquid fabric softener in the dispenser. Do not exceed the maximum fill line. Overfilling can cause early dispensing of the fabric softener, which could stain clothes. NOTE: Do not pour fabric softener directly on the wash load. Operating Instructions Loading and using the washer.
Loading the Washer Wash drum may be fully loaded with loosely added To add items after washer has started, press items. Do not wash fabrics containing flammable START/PAUSE and wait until the door is unlatched. materials (waxes, cleaning fluids, etc.). The washer may take up to 30 seconds to unlock the door after pressing START/PAUSE depending on the machine conditions. Do not try to force open the door when it is locked. After the door unlocks, open gently.
GEAppliances.com Care and Cleaning Exterior: Immediately wipe off any spills. Wipe with damp cloth. Do not hit surface with sharp objects. Long Vacations: Be sure the water supply is shut off at the faucets. Drain all water from the hoses if the weather will be below freezing. Cleaning the Interior of the Washer To clean the interior of the washer, select the BasketClean feature on the control panel. The cycle will use more water, in addition to bleach, to refresh your washer.
Cleaning the Pump Filter Due to the nature of the front-load washer, it is sometimes possible for small articles to pass to the pump. The washer has a filter to capture lost items so they are not dumped to the drain. To retrieve lost items, clean out the pump filter. 1. Using a small flathead screwdriver, open the access door. 2. Place a shallow pan or dish under the pump access door and towels on the floor in front of the washer to protect the floor.
Dispenser Drawer Area: Detergent and fabric softener may build up in the dispenser drawer. Residue should be removed once or twice a month. Remove the drawer by first pulling it out until it stops. Then reach back into the left rear corner of the drawer cavity and press down firmly on the lock tab, pulling out the drawer. Safety Instructions GEAppliances.
Installation Instructions Washer If you have any questions, call 800.GE.CARES (800.432.2737) or visit our Website at: GEAppliances.com. In Canada, visit www.geappliances or call 1.800.561.3344. TOOLS REQUIRED FOR WASHER INSTALLATION BEFORE YOU BEGIN Read these instructions completely and carefully.
Installation Instructions LOCATION OF YOUR WASHER ROUGH-IN DIMENSIONS Do Not Install the Washer: 1. In an area exposed to dripping water or outside weather conditions. The ambient temperature should never be below 60°F (15.6°C) for proper washer operation. FRONT 27” (68.58 cm) 2. In an area where it will come in contact with curtains or drapes. 39.8” (101.1 cm) 3. On carpet. The floor MUST be a hard surface with a maximum slope of 1/2 per foot (1.27 cm per 30 cm).
Installation Instructions UNPACKING THE WASHER ELECTRICAL REQUIREMENTS WARNING: Recycle or destroy the carton Read these instructions completely and carefully. and plastic bags after the washer is unpacked. Make materials inaccessible to children. Children might use them for play. Cartons covered with rugs, bedspreads or plastic sheets can become airtight chambers causing suffocation.
Installation Instructions WATER SUPPLY REQUIREMENTS INSTALLING THE WASHER Hot and cold water faucets MUST be installed within 42 inches (107 cm) of your washer’s water inlet. The faucets MUST be 3/4 (1.9 cm) garden hose-type so inlet hoses can be connected. Water pressure MUST be between 10 and 120 pounds per square inch. Your water department can advise you of your water pressure.
Installation Instructions INSTALLING THE WASHER (cont.) 8. Plug the power cord into a grounded outlet. 6. With the washer in its final position, place a level on top of the washer (if the washer is installed under a counter, the washer should not be able to rock). Adjust the front leveling legs up or down to ensure the washer is resting solid. Turn the lock nuts on each leg up towards the base of the washer and snug with a wrench.
Installation Instructions ADAPTIVE VIBRATION CONTROL 3. Rotate the cycle knob and select PE1 or PE2 for pedestal. Press the START button to make the selection PE1 is YES and PE2 is NO. Your GE washer is equipped with Adaptiive Vibration Control Technology. Using information about the floor, this system can reduce vibration and improve spin performance in some installations by adapting the spin cycle.
Safety Instructions Troubleshooting Tips Save time and money! Review the charts on the following pages first and you may not need to call for service. Problem Not draining Not spinning Not agitating Leaking water Consumer Support Troubleshooting Tips Installation Instructions Operating Instructions Before you call for service… Clothes too wet 20 Possible Cause What To Do Load is out of balance • Redistribute clothes and run drain & spin or rinse & spin.
Problem Incomplete cycle or timer not advancing Possible Cause GEAppliances.com What To Do Drain hose is kinked or improperly connected • Straighten drain hose and make sure washer is not sitting on it. Household drain may be clogged • Check household plumbing. You may need to call a plumber. Drain hose siphoning; drain hose pushed too far down the drain • Ensure there is an air gap between hose and drain. Cabinet moving • Washer is designed to move 1/4” to reduce forces transmitted to the floor.
Safety Instructions Operating Instructions Installation Instructions Troubleshooting Tips Consumer Support Before you call for service… Problem Water does not enter washer or enters slowly Possible Cause What To Do Automatic self system checks • After START is pressed, the washer does several system checks. Water will flow 60 seconds after START is pressed. Water supply is turned off • Turn on both hot and cold faucets fully.
Problem Detergent leak What To Do Incorrect placement of detergent insert • Make sure detergent insert is properly located and fully seated. Never put detergent above max line. This is normal • It is normal operation to see detergent leak on door gasket about 20 seconds after filling the dispenser. Dispenser clogged • Monthly clean the dispenser drawer to remove buildup of chemicals. Softener or bleach is filled above the max line • Make sure to have the correct amount of softener or bleach.
Safety Instructions Operating Instructions Installation Instructions Troubleshooting Tips Consumer Support GE Washer Warranty. All warranty service provided by our Factory Service Centers, or an authorized Customer CareÆ technician. To schedule service, visit us on-line at GEAppliances.com, or call 800.GE.CARES (800.432.2737). Please have serial number and model number available when calling for service. Staple your receipt here.
All warranty service provided by our Factory Service Centres or an authorized technician. For service, call 1.800.561.3344. Please have serial number and model number available when calling for service. Staple your receipt here. Proof of the original purchase date is needed to obtain service under the warranty. For The Period Of: We Will Replace: Any part of the washer which fails due to a defect in materials or workmanship.
Consumer Support. GE Appliances Website In the U.S.: GEAppliances.com Have a question or need assistance with your appliance? Try the GE Appliances Website 24 hours a day, any day of the year! For greater convenience and faster service, you can now download Owner’s Manuals, order parts or even schedule service on-line. In Canada: www.GEAppliances.ca Schedule Service In the U.S.: GEAppliances.com Expert GE repair service is only one step away from your door.