
Installation Guide


26 49-60769
Accessory Installation Instructions
ACCESSORY INSTALLATION INSTRUCTIONS
Troubleshooting Tips... Before you call for service
Savetimeandmoney!Reviewthechartsonthefollowingpagesfirstandyoumaynotneedtocallforservice.If
needed, service can be scheduled by visiting us online GEAppliances.com or calling 800.GECARES 800.432.2737.
InCanadavisitGEAppliances.caorcall800.561.3344.
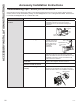
Problem Possible Causes What to Do
Automatic icemaker does
not work
Freezer compartment too warm. After installing the kit, allow the refrigerator to
completely cool down for 24 hours. Once the
compartment is cool, the icemaker will begin ice
production.
Icemaker is not turned on. Move the icemaker power switch to the ON position.
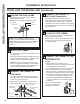
Icemaker is not plugged in correctly. Check that the
icemaker cord plug is
fully inserted into the
socket. See "Plug in
the icemaker" in the
Installation
Instructions.
Water line kinked. Check that the plastic
water line running from the valve to the water tube
inlet is not kinked. See "Connect the water line" in the
InstallationInstructions.Akinkinthewaterlinewill
restrict flow to the water line.
Water supply turned off or not
connected.
After installing the kit, make sure the house water
supply to the refrigerator has been turned on.
Piled up cubes in the storage bin
cause the icemaker to shut off.
Level cubes by hand.
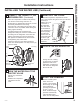
Water valve is not plugged in
correctly.
Check that the valve wire adapter is completely
plugged onto the terminals on the water valve. See
"Attachthewatervalve"intheInstallationInstructions.
Feeler
Arm
Power
Switch
Icemaker
Clip Restraints onto
Locking Tabs
Locking
Tabs
Hook
Adapter
Valve Terminals